MQTT: Part 2 – Protocol
Follow articleHow do you feel about this article? Help us to provide better content for you.
Thank you! Your feedback has been received.
There was a problem submitting your feedback, please try again later.
What do you think of this article?
In the previous post, we covered setting up a ROCK 5B Linux development host with VSCode for Python and the Arduino CLI before running a couple of tests.
This time we will dive into the MQTT protocol and look at some of its key features for use in IIoT networks. We will use the development host to examine the MQTT functionality with some working examples using the Mosquitto public test server.
Each of the tests we perform are shown with screen capture on the ROCK 5B (249-3159) so you can see it in action.
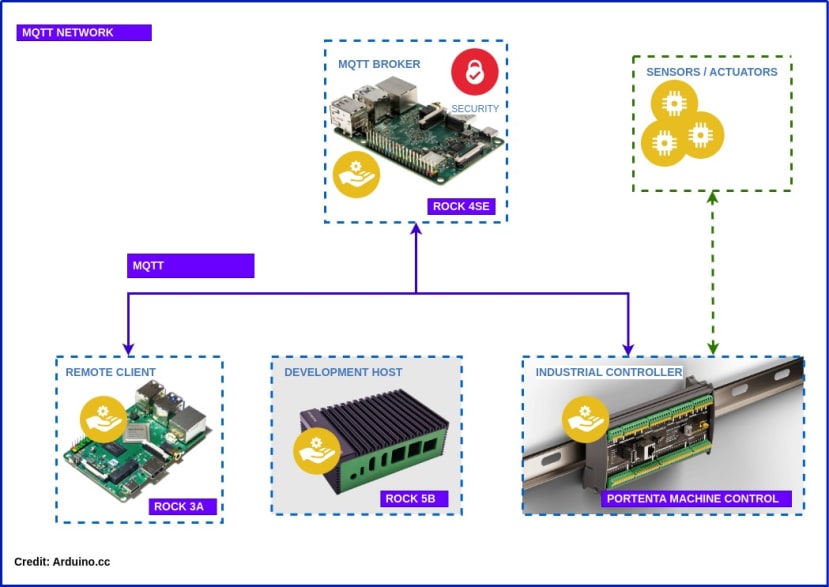
By the end of the series, you should have a working IIoT network that looks something like this for use in Industrial Control, Building HVAC, Smart Agriculture or even controlling your own micro-brewery!
Parts List
ROCK 5B (249-3159)
USB-C Power supply (243-6356)
USB-C Power Cable
32GB eMMC Module (256-5009)
MQTT
MQTT is an open standard messaging protocol for the Internet of Things, designed as an extremely lightweight messaging transport that is ideal for connecting remote devices. Low code footprint and minimal network bandwidth implementations exist in most programming languages and it is used across a wide variety of industries including automotive, manufacturing, transportation, telecommunications, smart home and consumer products.
MQTT allows for messaging between device to broker and broker to device making it easy to broadcast messages to groups of things using a publish and subscribe idiom that can scale to connect with millions of IoT devices.
Many IoT devices connect over unreliable networks so MQTT supports persistent sessions and Quality of Service to reduce these issues and makes it easy to encrypt messages using TLS and to authenticate clients using modern authentication protocols.
MQTT first appeared in 1999 and the latest version of the standard, MQTT 5.0 is an OASIS standard managed by the OASIS MQTT Technical Committee. It is still quite a short and readable specification:
https://docs.oasis-open.org/mqtt/mqtt/v5.0/mqtt-v5.0.html
There’s a large choice of Open-Source and commercial MQTT brokers, Cloud services, clients and tools available depending on your needs.
Mosquitto
Mosquitto is an open-source message broker from the Eclipse project that implements the MQTT protocol. It can run on devices with limited resources like SBC’s and the server and support tools are in the Debian repo.
For the exercises in this post, we just need to Install the Mosquitto clients onto the ROCK-5B dev host:
$ sudo apt update
$ sudo apt install mosquitto-clients
Now we have all the tools we need for testing MQTT brokers using the CLI clients.
Mosquitto Test Broker
You don’t need your own broker for MQTT testing as Mosquitto.org hosts a well-documented public broker which is very useful for validating software or if you are having problems with your own broker: https://test.mosquitto.org/
It is public so don’t publish any sensitive messages and respect its terms of use.
The broker host is test.mosquitto.org and it listens on a number of ports supporting both anonymous and TLS connections. The default is anonymous, un-encrypted communication on port 1883, which is what we generally use for testing purposes so you don’t even need to specify this.
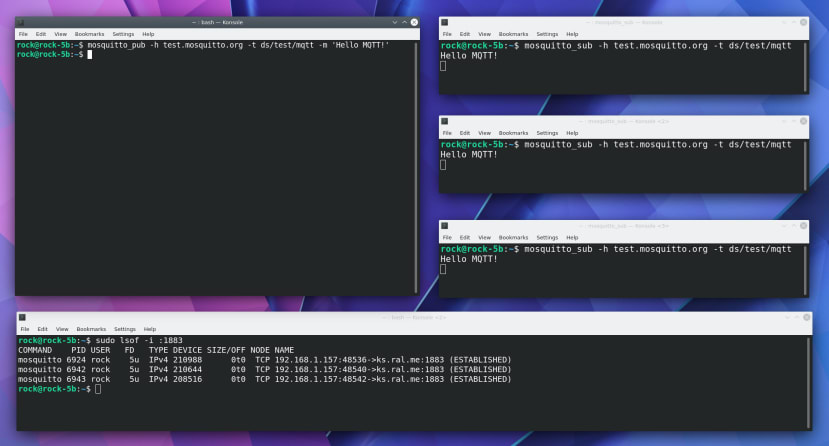
Let's subscribe to our own testing topic using the Mosquitto subscription client so you can see it in action:
Open a terminal (Konsole) and start a client:
$ mosquitto_sub -h test.mosquitto.org -t ds/test/mqttWhen the client runs it registers with the host test.mosquitto.org on default port 1883 for messages that match the topic ds/test/mqtt then it goes into a continuous loop listening for incoming messages. Because our client is now registered with the broker on that topic, if any messages matching that topic arrive at the broker it will broadcast to the subscribers.
In this way, a sensor can publish its readings to many subscribers without having any direct relationship to them. All the subscribers need to know is which host / port to connect to and what topic or topics to use.
Now open another couple of instances of Konsole using the same command. There are now 3 clients listening for messages on the same topic ds/test/mqtt
You can see the clients listening on port 1883 using the list of files command:
$ sudo lsof -i :1883Finally, open another terminal and publish to the same topic on the test server:
$ mosquitto_pub -h test.mosquitto.org -t ds/test/mqtt -m 'Hello MQTT!'Within a few milliseconds, you should see the text Hello MQTT! appear in the subscriber windows illustrating how multiple clients can subscribe to a single publisher. It’s possible to have 1000’s of distributed clients all listening to the same topic in a one to many relationship.
QoS
MQTT is designed to deal with unreliable networks and one of the ways it does this is with Quality of Service (QoS) levels.
There are 3 levels of QoS, the higher the level the more reliable, but the higher the latency and bandwidth requirements.
- 0: The broker will deliver the message once, with no confirmation.
- 1: The broker will deliver the message at least once, with confirmation required.
- 2: The broker will deliver the message exactly once by using a four-step handshake.
If a sensor is sampling periodically then you can minimise bandwidth by using QoS 0. It doesn’t matter if a single message gets lost. You can just pick up the next published reading. But if you have an actuator, you may need to use QoS 2 so you can guarantee it will receive every command only once. You can also raise the alarm if a message doesn’t get acknowledged due to a fault.
The default QoS level is 0 for maximum throughput.
We can see QoS in action by setting up a subscriber client with the clean session flag disabled. This will cause any messages published to the broker above QoS 0 to be retained for that client, even if it is disconnected at the time the message was received by the broker. When the client reconnects again it will receive any retained messages.
Using our 3 client sessions as before, stop one of them with CTRL + C then restart it like this:
$ mosquitto_sub -h test.mosquitto.org -t ds/test/mqtt -i client01 -c -q 1This adds some extra parameters, -i is the client ID which is required when -c which is the disable clean session flag is used. You also need to specify a QoS level with the -q flag.
Now publish a few test messages with QoS 2 to see them coming through in all the clients:
$ mosquitto_pub -h test.mosquitto.org -t ds/test/mqtt -m 'message1' -q 2
$ mosquitto_pub -h test.mosquitto.org -t ds/test/mqtt -m 'message2' -q 2
Now disconnect client01 and publish some more messages. These should appear in the connected clients but not in the client01 terminal as it’s not connected:
$ mosquitto_pub -h test.mosquitto.org -t ds/test/mqtt -m 'message3' -q 2
$ mosquitto_pub -h test.mosquitto.org -t ds/test/mqtt -m 'message4' -q 2
Now connect client01 again and it should receive the previously retained messages immediately:
$ mosquitto_sub -h test.mosquitto.org -t ds/test/mqtt -i client01 -c -q 1It’s possible to make MQTT super-reliable but there is obviously an overhead for this in terms of the number of handshakes that need to take place. It can also add significantly to the cost of using cloud services so only use these settings where necessary.
Topic VS Payload
We have used the term topic a few times so let's understand more about it and look at the pro’s and con’s of using it versus encoding information in the payload.
Topics are designed to add structure to messages and for filtering. They are hierarchical and similar to file paths in filesystems. A topic consists of one or more levels separated by a forward slash and they are case-sensitive - for example:
building01/room1/machine99 - to identify a specific machine on a factory floor.
discs/e414426a-7036-40ca-ac26-589f07303666/status - monitoring disc status info
France/Auvergne-Rhone-Alpes/Ain/parcel123456789/co-ords - parcel tracking
There is no ideal topic as the parcel tracking example could be like this:
parcels/parcel123456789 - with the location information encoded as a json string into the message like this:
{”country”:”france”,”region”:”auvergne-rhone-alpes”,”department”:”ain”,”lat”:461220N,”lon”:051344E}or as csv like this:
“FR,ARA,AIN,461220N,051344E”“FR,ARA,AIN,461220N,051344E”
The more compact the data the more encoding / decoding work needs to be done by the clients but the smaller the data that is transmitted. This can be crucial when very large volumes of messages are involved so it needs careful consideration and depends on the processing power of your clients and how you pay for data if you use hosted services.
There are some golden rules:
- Don’t start the topic with the forward slash
- Use only ascii characters and don’t include spaces in topics
- Keep the topic as short and as specific as possible
- Be careful not to expose sensitive data in the topic path
Last Will and Testament
The final thing I want to cover is Last Will and Testament (LWT) which sounds a bit ominous because it's used to help when bad things happen. It can help to warn of issues where clients are disconnecting unexpectedly for example, due to unstable network connections, erroneous client software or any other reason that causes connections to drop without exchanging a disconnect message.
When a client connects, it can specify several Will based parameters that causes the broker to automatically publish a message if the client disconnects unexpectedly, based on the keepalive time.
Both the broker and client can set a keepalive time, the client set time always wins. Clients that have not communicated within this time period must send a keepalive ping to the broker otherwise it will automatically disconnect them. If there is no activity within the keepalive time plus one half of the time, the broker will disconnect the client and publish the LWT message. That way clients can monitor the Will topic and be informed if this happens.
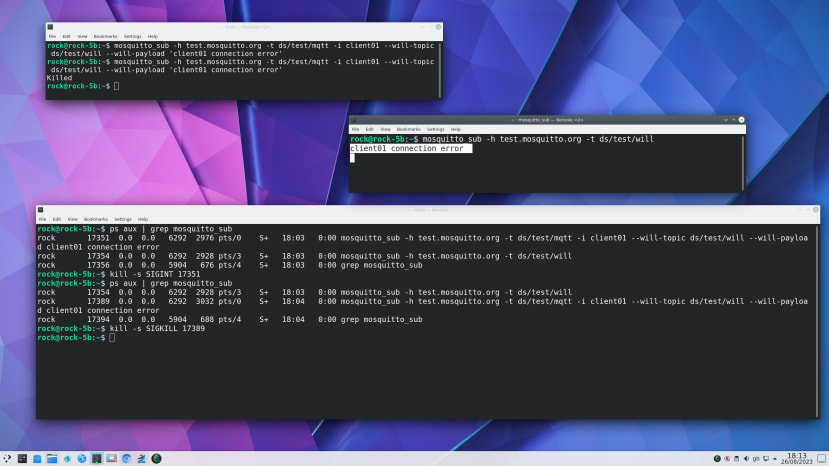
To illustrate, start a terminal and create a client with the following LWT parameters:
$ mosquitto_sub -h test.mosquitto.org -t ds/test/mqtt -i client01 --will-topic ds/test/will --will-payload 'client01 connection error'This registers the client with a LWT Topic of ds/test/will and a LWT Payload of client01 connection error and it will use the keepalive parameter set by the broker, which is quite short in this case.
In another terminal start another client and subscribe to the LWT topic:
$ mosquitto_sub -h test.mosquitto.org -t ds/test/willFinally, in a third terminal list the mosquitto client processes running on the system:
$ ps aux | grep mosquitto_subUsing the PID for the client with the LWT, send it the SIGINT signal - this is the same as CTRL + C and will stop the client, but before it finishes it will send a disconnect signal to the broker. In this case, there is no LWT message published because SIGINT allows a process to close normally.
$ kill -s SIGINT 17110Now restart the client with the LWT again:
$ mosquitto_sub -h test.mosquitto.org -t ds/test/mqtt -i client01 --will-topic ds/test/will --will-payload 'client01 connection error'This time use the SIGKILL signal - this will kill the client process immediately, without it having a chance to send the disconnect signal and the LWT message will be received in the other client.
$ kill -s SIGKILL 17389
Summary
In this article, we took a look at the important aspects and features of the MQTT protocol and used the ROCK 5B development host to test out the functionality of the public Mosquitto broker using the Mosquitto CLI clients.
In the next post, we will build our own networked MQTT broker using Mosquitto on a ROCK SBC so we have ultimate control over our network messaging.
References
MQTT: The Standard for IoT Messaging: https://mqtt.org/
Mosquitto: https://www.mosquitto.org/


Comments