MQTT: Part 3 – Broker
Follow article
 Dave from DesignSpark
How do you feel about this article? Help us to provide better content for you.
Dave from DesignSpark
Thank you! Your feedback has been received.
Dave from DesignSpark
There was a problem submitting your feedback, please try again later.
Dave from DesignSpark
What do you think of this article?
The previous post took a first look at the MQTT protocol by publishing and subscribing to messages sent using the public Mosquitto broker.
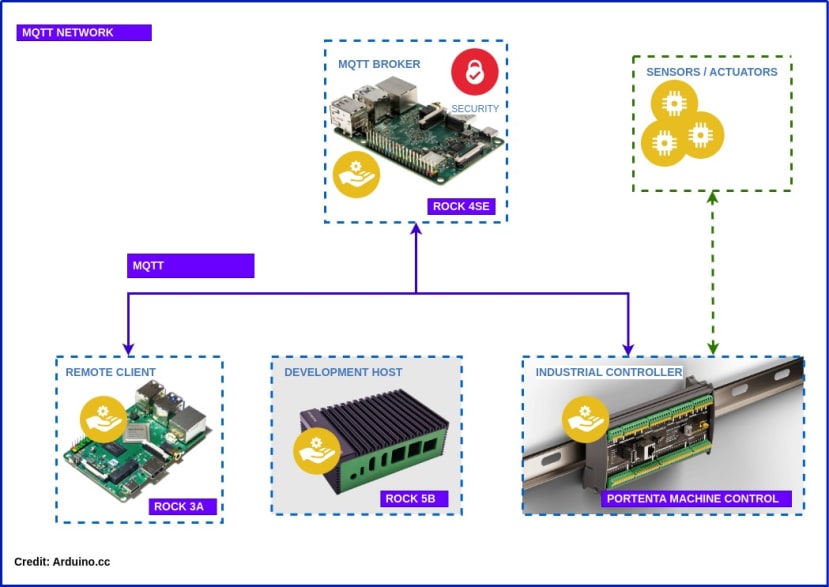
This article shows how to install and configure a private Mosquitto MQTT broker on the local network to take control of network messaging using a ROCK 4SE SBC (220-9536) .
As a bonus, it covers securing SSH access to the ROCK and controlling the GPIO with Libgpiod which is the authoritative method supported by the Linux kernel in userspace.
By the end of the series, you should have a working IIoT network that looks something like this for use in Industrial Control, Building HVAC, Smart Agriculture or even controlling your own micro-brewery!
Parts List
ROCK 4SE (220-9536)
USB-C Power supply (243-6356)
USB-C Power Cable
32GB eMMC Module (256-5009)
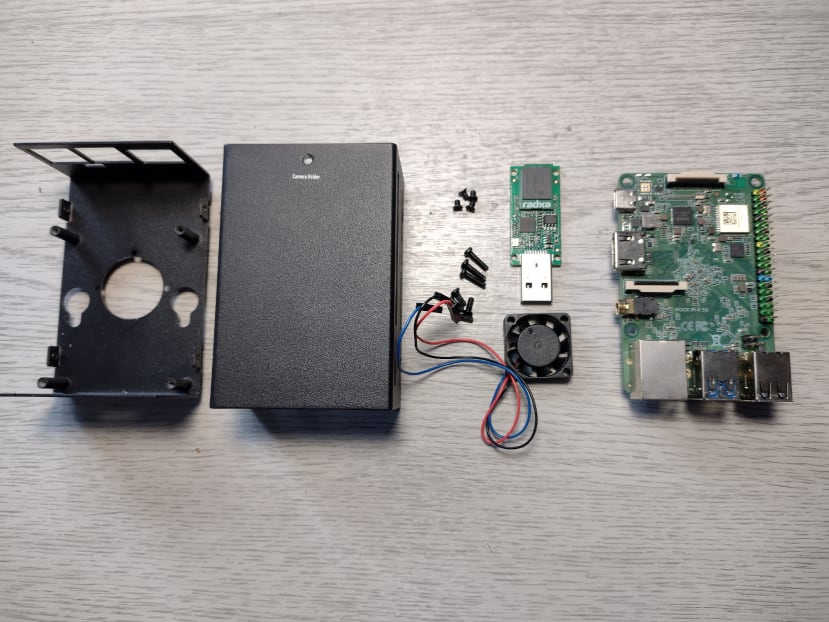
Metal case (241-4260)
Hardware
To host our MQTT broker I have chosen the ROCK 4SE. It comes with a high-performance Rockchip RK3399 Arm® 6-core processor with dual Cortex-A72® cores, and four Cortex-A53 cores plus 4GB of RAM. The board has an eMMC memory socket for modules which we will use for the operating system and true Gigabit Ethernet networking. It can run a variety of 64-bit Linux OS’s to suit different applications including Debian Bullseye.
OKdo sells a strong metallic case with heatsinks and active fan cooling which is ideal for our industrial application.
Download OS
The ROCK 4SE can support various Linux flavours. I’ve chosen the Debian Bullseye CLI image for this project as it will be a headless server and at the moment Radxa are focusing on support for Debian. You could also try out the Ubuntu server image but your mileage may vary.
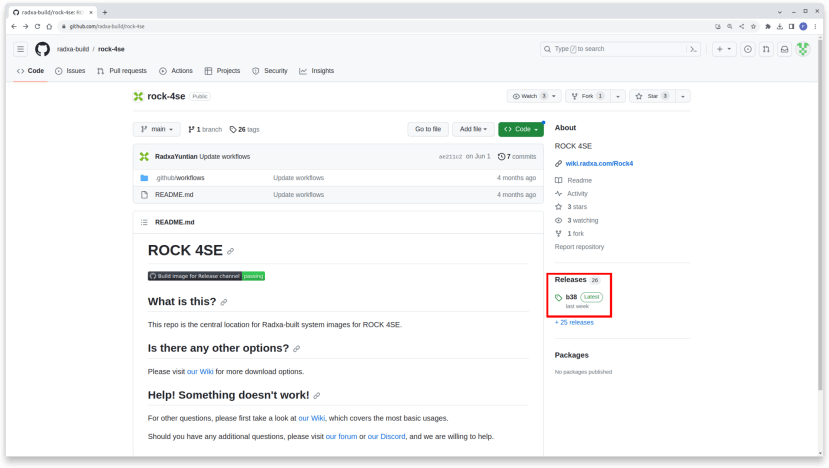
Visit the Radxa image page on GitHub to grab the latest Bullseye CLI image: https://github.com/radxa-build/rock-4se
Click Releases and download the latest CLI image - the filename will be something like this depending on the build number:
rock-4se_debian_bullseye_cli_b38.img.xz
Allow the image file to download - it is about 270 MB in size
There is no need to expand the compressed file
eMMC
You can flash the image to a microSD card but one of the advantages of the ROCK SBC’s is their support for eMMC memory which is faster, more durable and reliable than SD cards. I used a 16GB eMMC module as the image is quite small and you don’t require a lot of storage space for messaging.
balenaEtcher is suitable for flashing the images and it’s available for Mac / Windows & Linux:
- Clip the eMMC module into the USB reader. It should click into place on the connectors, then insert the reader into your host PC
- Select the downloaded image - the eMMC module should be automatically selected as the destination
- Press the Flash button and wait for it to finish
First boot
Once the image has been flashed to the eMMC module, eject the USB reader from the system and un-clip the module from the reader then insert it on the connectors on the underside of the ROCK. It should click into place when fitted correctly.
All you need for the first boot is to connect an Ethernet cable and the USB-C power supply to the board as we will SSH into it remotely from our Dev Host from Part 1
- Power on the supply and the green LED should light up straight away and after about 30 seconds, the blue LED should flash with the heartbeat to signal that the OS is running.
- Now SSH in from your Dev Host:
- The default hostname is rock-4se and the login credentials are radxa / radxa:
$ ssh radxa@rock-4se
Once logged in, set a secure password:
$ passwdThen do some system cleanup. Firstly remove the rock user:
$ sudo userdel -r rockThen disable the failing dnsmasq service and disable a few extraneous services that are not being used, to make your system more secure:
$ sudo systemctl disable dnsmasq.service
$ sudo rm /etc/systemd/user/default.target.wants/pulseaudio.service
$ sudo systemctl disable bluetooth.service
$ sudo systemctl disable radxa-adbd.service
$ sudo systemctl disable avahi-daemon.service
Now update the system and install any updates, followed by a reboot to make sure the system is up-to-date:
$ sudo apt update
$ sudo apt upgrade
$ sudo reboot
Now you should have a solid base system with no unit errors to work on for the application installation.
Static IP
The ROCK MQTT broker will play a key role in our LAN infrastructure so we want to set it up with a static IP address that doesn’t change unexpectedly.
Choose a suitable IP address for your LAN and create the following configuration file named eth0 in /etc/network/interface.d/ Files in this directory are sourced by /etc/network/interfaces so they are isolated from any future system updates to prevent them from being changed unexpectedly.
To make maintenance easier settings for each interface can be placed in separate files and they will take precedence over the defaults. In our case we will just have the one file with the settings for the eth0 interface. All the other interfaces will remain with default settings.
auto eth0
iface eth0 inet static
 address 192.168.1.60
 netmask 255.255.255.0
 gateway 192.168.1.254
 dns-nameservers 192.168.1.254 8.8.8.8
Now reboot the system, SSH in again to check you still have access and make sure there are no networking errors:
$ sudo reboot
$ ssh radxa@rock-4se
$ sudo systemctl status networking.service
Here’s what good looks like:

SSH Security
The default configuration of the SSH daemon is stored in /etc/ssh/sshd_config and it’s set up for convenience rather than security, so let's tighten this up to avoid any unauthorised access.
Put the changes in a file in the directory /etc/ssh/sshd_config.d/ Filenames must end in .conf so that they supersedes configuration in sshd_config and they won't be overridden by future updates.
The most important change is to move from password authentication to key based authentication.
Open a terminal on your Dev Host and check that you have an ED25519 key pair in ~/.ssh:
$ ls ~/.ssh
authorized_keys  id_ed25519  id_ed25519.pub  known_hosts
If not you can generate a new set of keys with the following command. When asked to generate a password, if you just press enter, no password will be required. This is less secure but more convenient and is OK if you protect the key pair on your host. Accept the defaults and the key pair will be generated in ~/.ssh
$ ssh-keygen -t ed25519 -C "ROCK MQTT broker"Now we can add the public key to the ROCK MQTT broker with the following utility:
$ ssh-copy-id radxa@rock-4seOnce the key is copied over, you should be able to login without being asked for the password, sshd will authenticate the session using the keys:
$ ssh radxa@rock-4se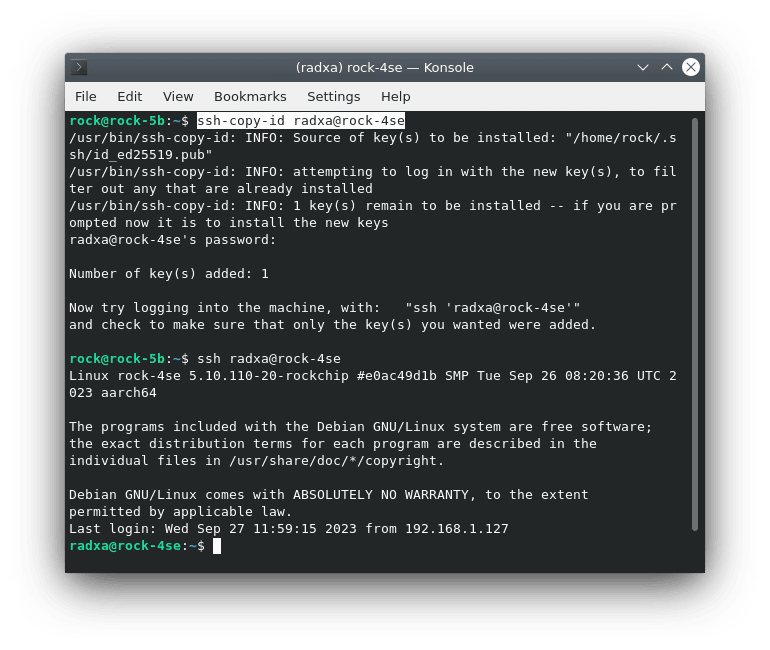
Now that we can login to the ROCK 4SE remotely using public key authentication, password logins can be disabled to increase security somewhat.
Create a file named security.conf in /etc/ssh/sshd_config.d/ with the following contents, where the last line is the IP address of your broker. This will prohibit password authentication and only allow logins from the radxa user on the same subnet:
PermitRootLogin no
PasswordAuthentication no
UsePAM no
X11Forwarding no
AllowUsers radxa
ListenAddress 192.168.1.60  # broker IP
If you miss-configure sshd you can lock yourself out, to avoid doing that, run a check on the configuration before restarting the ssh daemon:
$ sudo sshd -TThis should output all the configuration settings or flag up any issues that need fixing.
Now restart sshd from the terminal session and make sure you keep this session open so that you remain logged in, in case you need to fix any issues.
$ sudo systemctl restart sshdOpen a second terminal on your Dev Host and see if you can still login with the public key:
$ ssh radxa@rock-4seYou can now test that password authentication fails with:
ssh -o PubkeyAuthentication=no -o PasswordAuthentication=yes radxa@rock-4se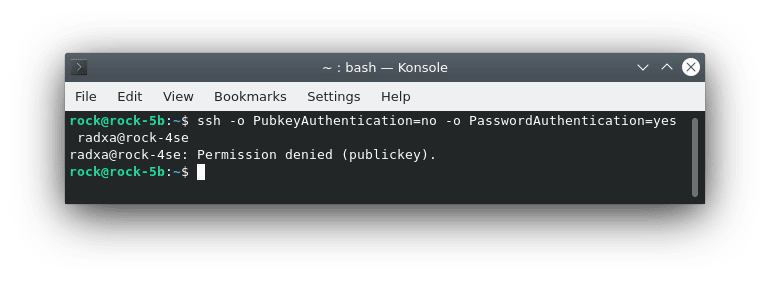
SSH access is now secured so that only the chosen user can login from the local network.
Libgpiod
The OKdo case for the ROCK 4SE comes with heatsinks and a 3-wire cooling fan with Dupont connectors. In this next section we will use the recommended method for accessing GPIO from Linux using Libgpiod which is installed in our distribution. We will use it to start the fan when the system boots and turn it off when it shuts down.
Tip: Documentation for Libgpiod: https://git.kernel.org/pub/scm/libs/libgpiod/libgpiod.git/
I found it was safe to connect the red fan lead to 5V and black to GND on the GPIO header and I chose PIN 11 (GPIO4_C2) for the blue control cable. Full details of the ROCK 4 GPIO pinout and specs are available in the Radxa documentation:
https://docs.radxa.com/en/rock4/hardware/rock4-gpio

The ROCK 4SE has 5 banks of GPIO registers, GPIO0 to GPIO4, each bank has 32 lines but they are unlabeled so you need to calculate the line number for each pin to use with gpiolibd.
Use the formula Xn = (X * 8) + n to get the line number where A = 0, B = 1, C = 2, and D = 3.
So for example:
GPIO2_A7 -> gpiochip 2, line (0 * 8) + 7 = 7
and for our fan control pin:
GPIO4_C2 -> gpiochip 4, line (2 * 8) + 2 = 18
The gpiod package contains several command line utilities to help manage and control the GPIO, including gpioset which is used to set a pin or group of pins high or low.
Use this command as superuser to set GPIO4_C2 high:
$ sudo gpioset 4 18=1and low with:
$ sudo gpioset 4 18=0Adding these commands to a systemd service turns the fan on at boot time and off again when the system shuts down.
Create a systemd unit file named fan.service with the following contents to start and stop the fan. Make it executable then copy it to /etc/systemd/system/ on the ROCK 4SE
[Unit]
Description = Fan start / stop service
Documentation = https://git.kernel.org/pub/scm/libs/libgpiod/libgpiod.git/tree/README?h=v1.6.2
Before = shutdown.target

[Service]
Type = oneshot
RemainAfterExit = yes
# Set gpiochip4 line 18 high (GPIO4_C2)
ExecStart = /usr/bin/gpioset 4 18=1
# Set gpiochip4 line 18 low
ExecStop = /usr/bin/gpioset 4 18=0

[Install]
WantedBy = graphical.target
Now when the system starts the fan will come on fully and turn off when it shuts down.
Mosquitto
MQTT and the Mosquitto broker was introduced in the previous article [link to Par 2] but we used the public cloud hosted broker at https://test.mosquitto.org/
This time we are setting up our own locally hosted Mosquitto broker giving us direct control over our messaging.
Install the mosquitto package on the ROCK 4SE with the following command:
$ sudo apt install mosquittoThe post-install script will automatically enable the broker’s systemd script so that it will run on startup and it will start it running. You can check with the following command:
$ systemctl status mosquitto.service
Anonymous access
Although we have really locked down SSH access to the ROCK 4SE, we are initially going to configure the Mosquitto broker with anonymous access to make testing our applications easier. Once we have finished testing we will secure this service as well, but that’s an article in itself.
Mosquitto’s default configuration file is in /etc/mosquitto/mosquitto.conf and it’s set to block all access to the broker, so we’re going to open up this configuration to allow anonymous access from the local network. This will allow any client on the same network to publish or subscribe to the broker without authentication.
Rather than edit mosquitto.conf, we will override its settings by creating a config file ending in .conf in the directory /etc/mosquitto/conf.d/
Create a file named access.conf with the following contents - this will allow anonymous access on port 1883 which is the default for MQTT protocol - change the IP address of the listener to match your broker’s IP:
$ sudo vi /etc/mosquitto/conf.d/access.conf

per_listener_settings true
listener 1883 192.168.1.60
allow_anonymous true
Then restart the broker and check everything is running as expected:
$ sudo systemctl restart mosquitto.service
$ sudo systemctl status mosquitto.service
If everything looks good we can now test the broker on our network using anonymous access.

Logging
Apart from doing the same tests that we did for the public test server, we can use the logging facility to check that everything is working as expected. This is also the place to go if there are any issues during operation.
The default location of mosquitto logs is /var/log/mosquitto/mosquitto.log
Create a log configuration with one of the following logging levels, error, warning, notice, information, all - use all for debugging but turn it down a bit once everything is working to save your storage:
$ sudo vi /etc/mosquitto/conf.d/logging.conf

log_type all
Then restart mosquitto:
$ sudo systemctl restart mosquitto.serviceWe can follow any activity in the log (as sudo) using the tail command to show the last 10 lines in the file:
$ sudo tail -f /var/log/mosquitto/mosquitto.logNow if we open up another terminal session on the Dev Host and subscribe to the broker we will see the client attach in the logs - anonymous clients get automatically generated ID’s:
$ mosquitto_sub -h rock-4se -t test
Open a third terminal on the Dev Host and publish to the test topic:
$ mosquitto_pub -h rock-4se -t test -m "Hello"You should see the message in the subscriber session and the entries in the log (not including the message). Notice the PINGREQ / PINGRESP entries keeping the subscriber client connection alive so that it doesn’t get automatically disconnected by the broker.

Summary
That’s it! Now you have a nicely configured ROCK MQTT broker that you can run on your LAN with secure SSH access and an active cooling fan to keep it from getting too hot in the case.
The Mosquitto MQTT broker is all set up for anonymous access from anywhere on the local network making it suitable for testing purposes only. In a future article, I will cover securing the broker for production but for now, it’s reasonably secure for the next step which will be setting up the Portenta Machine Control and publishing data to the MQTT broker.
References
MQTT: The Standard for IoT Messaging: https://mqtt.org/
Mosquitto: https://www.mosquitto.org/
Mosquitto config: https://mosquitto.org/man/mosquitto-conf-5.html
OpenSSH: https://www.openssh.com/
Comments