MQTT: Part 5 – Python Remote Client
Follow article
 Dave from DesignSpark
How do you feel about this article? Help us to provide better content for you.
Dave from DesignSpark
Thank you! Your feedback has been received.
Dave from DesignSpark
There was a problem submitting your feedback, please try again later.
Dave from DesignSpark
What do you think of this article?
MQTT series covering the development of networks on ROCK SBC’s and Arduino Portenta Machine Control with VSCode, Arduino CLI and Python
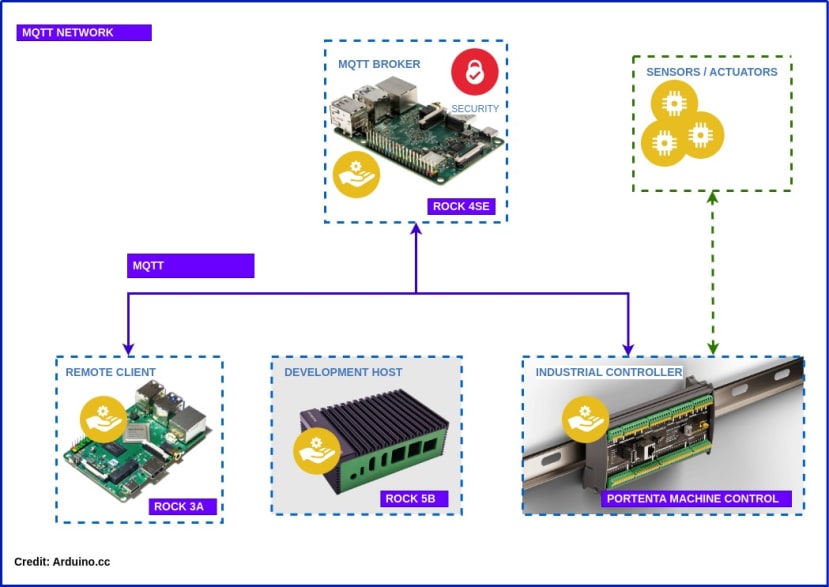
This fifth article in the series completes our IIoT network by adding a remote MQTT client running on a ROCK 3 Model A SBC (256-3910) . The Python application running on the ROCK receives sensor readings from the Portenta Machine Controller (PMC) developed in Part 4 , processes the data and then fires back control signals over MQTT to switch the PMC’s I/O.
In an industrial scenario, the ROCK board could be accessing multiple sensors from different devices and running an AI algorithm against them, or be acting as a dispatcher connected to cloud services doing the processing.
Even if you don’t have a PMC you can play along using the Python simulator provided in the DesignSpark GitHub repo.
We also cover setting up Python virtual environments that don’t interfere with the Python version running on the OS, to run your applications in.
By the end of this blog, you should have a working IIoT network that looks something like the diagram above for use in Industrial Control, Building HVAC, Smart Agriculture or even controlling your own micro-brewery!
Parts List
ROCK 3 Model A (256-3910)
Okdo 65W Plug Adapter (243-6357)
USB-C Power Cable
ROCK 3A
We have chosen the ROCK 3 Model A board for this application due to its low power requirements and flexible storage options.
In the example application we connect to an MQTT broker over Ethernet and log sensor values to a file on the on-board eMMC storage, but it’s also possible to add NVMe SSD storage to the ROCK 3A and use a database instead. This can then be shared over the network.

Portenta Machine Control
We are using the same setup for the PMC as in the previous article The PMC polls thermocouples attached to its dedicated temperature probe inputs and publishes the readings to an MQTT broker.
Previously the sensor readings being read by the M4 core were being passed via RPC calls to the M7 core which was also performing some processing logic to control the PMC’s I/O. This might be the case where the PMC is a self-contained controller where it is just publishing its sensor reading for remote logging and monitoring purposes, for example.
In this post, we modify the code running on the M7 core so that it publishes the sensor data over MQTT whilst waiting to respond to command codes received back from the ROCK Remote Client.

M7 Core
To modify the Arduino code running on the PMC, open VSCode and load up the pmc_thermo_m7_rc.ino code which will run on the main M7 core. This is an updated version of the code discussed in the previous article. The M4 code remains the same, which is nice.
The M7 code will now be responsible for starting up the M4 core, connecting to the MQTT broker, publishing the sensor readings sampled by the M4 core and subscribing to inbound command messages being generated by the Remote Client application running on the ROCK board. These commands will now control switching of the I/O when all three probes exceed a set temperature.
The main difference is the addition of the callback() method which is called whenever inbound MQTT messages are received and this extracts the message payload containing the control string used to activate the I/O channel, turning on and off the red LED above.
The green LED is still controlled by the M4 core as previously. It just blinks to indicate that the application is running.
pmc_thermo_m7_rc.ino
#include "Arduino.h"
#include "RPC.h"
#include <SPI.h>
#include <Ethernet.h>
#include <PubSubClient.h>
#include <Arduino_MachineControl.h>
using namespace machinecontrol;
using namespace rtos;

#define IOCH01 1
float T1, T2, T3;

byte mac[] = { 0xDE, 0xED, 0xBA, 0xFE, 0xFE, 0xED };
IPAddress ip(192, 168, 1, 61);  // PMC IP
IPAddress server(192, 168, 1, 60);  // Broker IP

void callback(char* topic, byte* payload, unsigned int length) {
  String buffer = "";
  for (int i = 0; i < length; i++) {
    buffer += (char)payload[i];
  }

  if (buffer.length() > 0) {
    if (buffer == "OFF")
      digital_outputs.set(IOCH01, LOW);
    else if (buffer == "ON")
      digital_outputs.set(IOCH01, HIGH);
  }
}

EthernetClient ethClient;
PubSubClient client(server, 1883, callback, ethClient);

float copyTemperatureOnM7(float temp_ch0, float temp_ch1, float temp_ch2) {
  T1 = temp_ch0;
  T2 = temp_ch1;
  T3 = temp_ch2;
  Serial.println("M7: TemperatureOnM7 T1 " + String(T1) + " T2 " + String(T2) + " T3 " + String(T3));
  client.publish("test/thermos", ("PMC0," + String(T1) + "," + String(T2) + "," + String(T3)).c_str());
  return 1;  // Note: must return a value!
}

void setup() {
  RPC.begin();  // Init RPC, also boots M4 core
  Serial.begin(115200);
  RPC.bind("copyTemperature", copyTemperatureOnM7);

  Ethernet.begin(mac, ip);
  digital_outputs.setLatch();
  digital_outputs.set(IOCH01, LOW);
  client.connect("pmcClient0");
  client.subscribe("test/activate");
}

void loop() {
  client.loop();
}
Compile and upload the code to the M7 core:
$ arduino-cli compile --fqbn arduino:mbed_portenta:envie_m7
$ arduino-cli upload -p /dev/ttyACM0 --fqbn arduino:mbed_portenta:envie_m7
As soon as the code has loaded the PMC will reset and the M4 core will blink the green LED at 1-second intervals and start sampling the thermocouples.
Open the serial monitor in the VSCode Terminal to see the sensor readings:
$ arduino-cli monitor -p /dev/ttyACM0
Remote Client
A Remote Client running on an SBC like the ROCK is capable of receiving multiple sensor inputs from several different devices in an IoT network and processing them to output control signals to one or more controllers.
It allows for more advanced processing to take place, for example using AI algorithms. The Remote Client can handle multiple connections including to displays and logging facilities, all from the same or multiple applications running on it.
Application code running on the ROCK can be developed in various languages including C/C++, Java, Go, Python, etc. In this case, our remote client application is written in Python which has convenient modules for interacting with MQTT brokers.
You can download all the example code from the DesignSpark GitHub onto your Linux Dev Host that we built in Part 1:
$ git clone https://github.com/DesignSparkRS/pmc-thermo.gitYou will also need the MQTT broker that we built. All the details are in Part 3
If you don’t have the PMC board you can run the simulator written in Python which generates mock sensor data and receives control signals. Run this a separate Terminal session on your Dev Host:
(rc_venv) python3 pmc_simulator.pyVirtual Environment
Before running the Python remote client code it’s necessary to install some additional Python packages. For this example, we will create a Python virtual environment and install the packages into it. This is useful for testing purposes as it isolates the Python version and additional packages from the Python environment installed by the OS.
On your Dev Host change to the remote_client directory, then install the virtual environment support:
$ cd remote_client
$ sudo apt install python3-venv
Now create the virtual environment within the remote_client directory. The first command will create a subdirectory named rc_venv and the next command activates the virtual environment. As a result, the prompt will change to indicate that you are now working in a virtual environment:
$ python3 -m venv rc_venv
$ source rc_venv/bin/activate
Now add the required Python packages to the virtual environment:
(rc_venv) pip install pyyaml paho-mqttRun the remote_client.py application:
(rc_venv) python3 remote_client.pyWhen you have finished testing you can exit the application with Ctrl + C, twice and then deactivate the environment:
(rc_venv) deactivatePython Code
remote_client.py is a complete Python MQTT application client composed of the main classes shown in the diagram below. The full code is in the DesignSpark GitHub:

Listener is responsible for registering with the MQTT broker by subscribing to a topic. When messages are received, it puts them onto a FIFO message queue which is attached to MessageHandler.
   def on_message(mqttc, obj, msg):

        msg_handler_queue.put(msg)

        LoggingHandler.log_to_console(CsvDecoder.decode(msg))
The topic the Listener is monitoring is passed in when it's created. It would be possible to have multiple Listeners all attached to different topics or even different MQTT brokers but in our case, we just have the one.
   listener = Listener("test/thermos")

    listener.run()
MessageHandler waits for messages to appear in the queue from the Listener. When one arrives, it pulls it off the queue, decodes the message using the CSVDecoder which unpacks the sensor readings into separate variables which are re-packed into a tuple and dispatched to the ActionHandler via another queue. A formatted representation of the message is also given to LoggingHandler which logs them to a file.
class MessageHandler():

    def dispatch_message(in_queue, out_queue):

        while True:

            message = in_queue.get()

            dev, t1, t2, t3 = CsvDecoder.decode(message)

            out_queue.put((dev, t1, t2, t3))

            LoggingHandler.log_to_file(f'{dev}, {t1:.2f}, {t2:.2f}, {t3:.2f}')
MessageHandler runs in its own separate thread where the queues are passed in as arguments to the target method, dispatch_message().
message_handler = Thread(target=MessageHandler.dispatch_message, args=(msg_queue, action_queue))CSVDecoder decodes the CSV format of the MQTT messages passed to it, converting them to a format suitable for the application. This could be changed to suit say a JSON format message quite easily. It returns a tuple containing the device name as a string and three sensor readings as floating point values.
    def decode(message) -> (str, float, float, float):

        msg_str = message.payload.decode('utf-8')

        dev, t1, t2, t3 = msg_str.split(',')

        return (dev, float(t1), float(t2), float(t3))
ActionHandler is the class responsible for processing the sensor values. It pulls the readings off the queue from the MessageHandler and uses a Rule which returns true or false which determines what action to take. In this example, a command to turn “ON” the PMCs I/O is sent if the three sensor values are all greater than 25 degrees Celsius and if they drop back, then an “OFF” command is sent.
class ActionHandler():

…

    def test_rule(t1, t2, t3):

        is_tripped = Rule.rule(t1, t2, t3)

        if ActionHandler.previous_event != is_tripped:

            if is_tripped:

                ActionHandler.send_command("ON")

            else:

                ActionHandler.send_command("OFF")

            ActionHandler.previous_event = is_tripped


    def task(queue):

        while True:

            dev, t1, t2, t3 = queue.get()

            if not math.isnan(t1) or math.isnan(t2) or math.isnan(t3):

                ActionHandler.test_rule(t1, t2, t3)
Here's the simple Rule class that does the comparison. You could change this easily to make the rules far more sophisticated.
class Rule():

    trip = 25.0

    def rule(t1, t2, t3) -> bool:

        if t1 >= Rule.trip and t2 >= Rule.trip and t3 >= Rule.trip:

            return True

        return False
Here’s the ActionHandler method that sends the “ON” and “OFF” commands as MQTT messages.
class ActionHandler():

…

    def send_command(command: str):

        mqttc.publish("test/activate", command, qos=0)

        LoggingHandler.log_to_console(command)

…
ActionHandler also runs in its own thread as its a network operation with the queue being passed in.
action_handler = Thread(target=ActionHandler.task, args=(action_queue, ))In our example code, ActionHandler is very simple but it could be replaced by an AI algorithm, for example, to optimise the output of a solar array by sending tilt and rotation commands to a motorised array controller according to power output and solar conditions or to generate a maintenance alert message when adverse vibrations are detected in a motor gearbox, or whatever…
LoggingHandler is composed of a couple of Python logging classes; Console logger writes debug messages to the console so that activity can be seen and bugs tracked. It also contains a File logger which in our example logs all received messages to a file on the ROCK’s filesystem.
class LoggingHandler():

    file_logger = logging.getLogger("fileLogger")

    console_logger = logging.getLogger("root")

…
The logging objects are configured from a separate YAML file which contains all the details of how they are constructed and the format of the log messages.
    with open('logger.yaml', 'r') as f:

        config = yaml.safe_load(f.read())

…
LoggingHandler could be replaced by a more advanced, centralised logging application or cloud service where the logs can be stored and analysed by AI systems or visualised by applications like Grafana.
Deployment
Once you’ve tested the code on your Dev Host it can be deployed out to the ROCK 3A over secure copy.
SSH into the ROCK 3A and create a directory to hold the remote client software:
$ ssh radxa@rock-3a
$ mkdir -p ~/remote_client
On the Dev Host, copy the Python script and logger config files to the ROCK:
$ scp logger.yaml remote_client.py rock@rock-3a:~/remote_clientBack on the ROCK session, create the virtual environment, source the environment and add the dependencies:
$ sudo apt install python3-venv

$ cd remote_client

$ python3 -m venv rc_venv

$ source rc_venv/bin/activate

(rc_venv) pip install pyyaml paho-mqtt
Now you can run the remote_client.py application in the ROCK session:
(rc_venv) python remote_client.pyIf you hold all the thermocouples together with warm fingers the red LED should light up when the temperature reaches 25 degrees Celsius. When they cool down again it should go off.
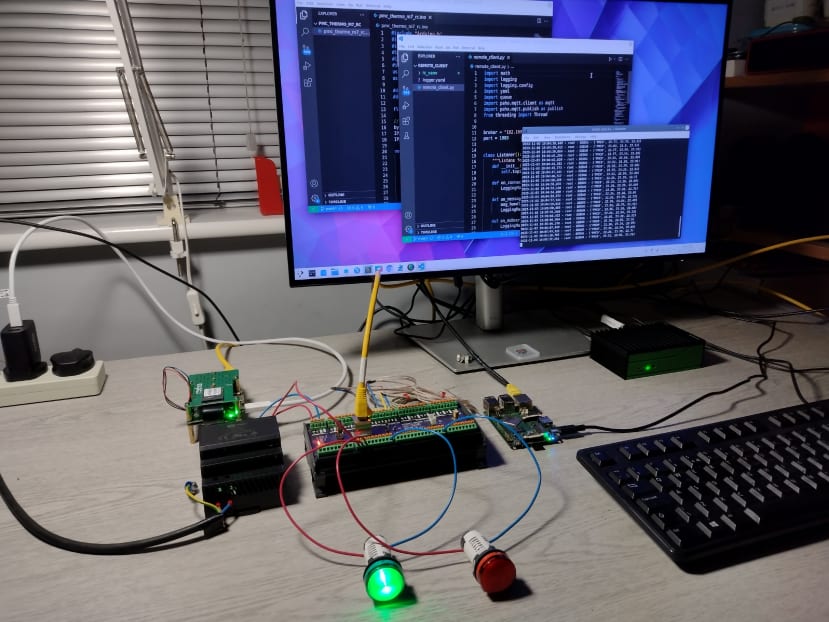
Here’s the whole network with the ROCK 5B Dev Host, ROCK 4SE MQTT server, Portenta Machine Controller with 24V DC power supply and ROCK 3A remote client on my test bench.
Summary
If you’ve reached this far you should now have a complete IoT network based around MQTT messaging which you can use as a basis for your own applications.
In this post we covered writing a complete Python application acting as a remote client capable of receiving sensor readings, processing them and generating control commands as a result, that can be forwarded to control hardware.
Hopefully, this demonstrates the power of MQTT messaging and the flexibility with which it can be used, giving you plenty of ideas for your own projects.
Up to now, we have been sending unsecured messages across the network. In the next and final instalment, we will look at securing the MQTT transactions to keep our network safe from eavesdroppers.
References
DesignSpark GitHub: https://github.com/DesignSparkRS/pmc-thermo
Python Paho: https://pypi.org/project/paho-mqtt/
PyYAML: https://pypi.org/project/PyYAML/
Comments