MQTT: Part 1 - Developing IIoT Networks
Follow article
 Dave from DesignSpark
How do you feel about this article? Help us to provide better content for you.
Dave from DesignSpark
Thank you! Your feedback has been received.
Dave from DesignSpark
There was a problem submitting your feedback, please try again later.
Dave from DesignSpark
What do you think of this article?
This is the first in a series of posts that will guide you through developing embedded systems in Linux using ROCK SBCs and the Arduino Pro Portenta Machine Control (PMC).
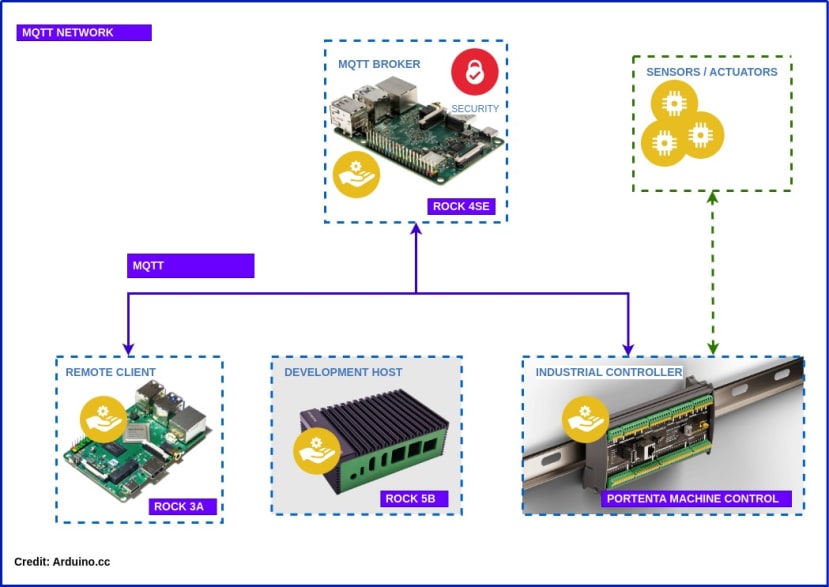
The articles will focus on creating distributed IIoT networks based on MQTT protocol, allowing the acquisition of sensor data and remote control of outputs in an industrial control system.
In this post, we show how to set up a ROCK 5B (249-3159) Linux Development Host where you will do all your coding in Python and C/C++ using Visual Studio Code (VSCode) and GitHub. We will also install the Arduino CLI toolchain and create a test application controlling the digital outputs on the PMC.
By the end of the series, you should have a working IIoT network that looks something like this for use in Industrial Control, Building HVAC, Smart Agriculture or even controlling your own micro-brewery!
Parts List
ROCK 5B (249-3159)
USB-C Power supply (243-6356)
USB-C Power Cable https://www.okdo.com/p/deltaco-usb-c-to-usb-c-cable-5gbit-s-5a-1m-white/
32GB eMMC Module (256-5009)
Arduino Portenta Machine Control (222-6773)
24VDC / 4A Power Supply (190-4203)
24VDC Red LED (017-7529)
24VDC Green LED (610-2691)
Do you like what you read? Visit your profile and preference center to opt in to our DS newsletter and never miss great tech articles again!
Step 1: Rock 5B
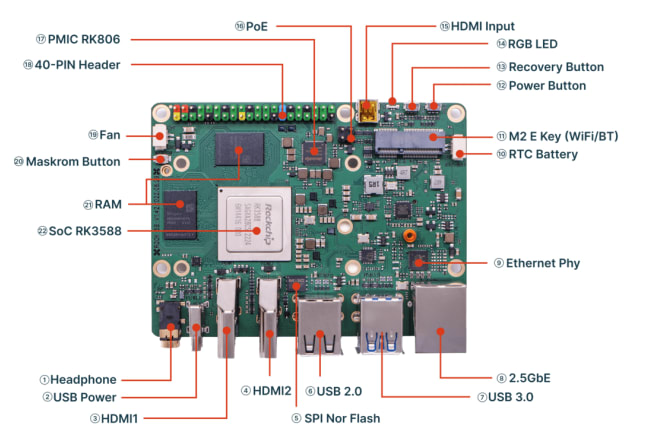
ROCK 5B is a compact SBC based on the Rockchip RK3588 SoC. This is a 64-bit Octa-core Arm® CPU with 4 x Cortex® A76 cores running at 2.4GHz and 4 x Cortex® A55 cores running at 1.8GHz. The board is available in 8MB and 16MB 64-bit RAM versions and has twin HDMI outputs capable of up to 8k resolution. There's also storage options of SD Card, eMMC module and M.2 NVME or SATA SSD drives.
Networking is via Gigabit Ethernet or WiFi / Bluetooth with the addition of a wireless module.
Proper 64-bit OS images are available including Debian Bullseye with KDE desktop, Ubuntu Server (Jammy), Android 12 plus several other 3rd party options like Armbian and RebornOS.
A nice solid aluminium heat-sinking case to protect your ROCK 5B is available, so it makes a compact and powerful development host for creating embedded systems.
Step 2: Portenta Machine Control
The Portenta Machine Control from the new Arduino Pro range is a low-power Din Rail ready, industrial controller solution based on the Portenta H7 module. It’s got one inside.
The H7 is a dual-core STM32H747 MCU from STMicroelectronics, including a Cortex® M7 running at 480 MHz and a Cortex® M4 running at 240 MHz. Both processors share all the in-chip peripherals and can run Arduino sketches on top of the Arm® Mbed™ OS, Native Mbed™ applications, MicroPython / JavaScript via an interpreter and TensorFlow™ Lite.
Communication is via Ethernet or Bluetooth and the board also hosts a whole range of 24V analogue and digital I/O options with support for CAN, RS485 / RS422, encoders and temperature probes.
Both cores communicate via Remote Procedure Calls (RPC) allowing calling functions on the other processor seamlessly, letting you to segregate your applications, running 2 processes at once in real-time.
There are several options available for application development and a number of Open Source C/C++ libraries are available to speed this up. We will be installing the Arduino CLI interface on the ROCK so we can use the VSCode editor and tools.
So it’s got everything you need for controlling proper industrial equipment.
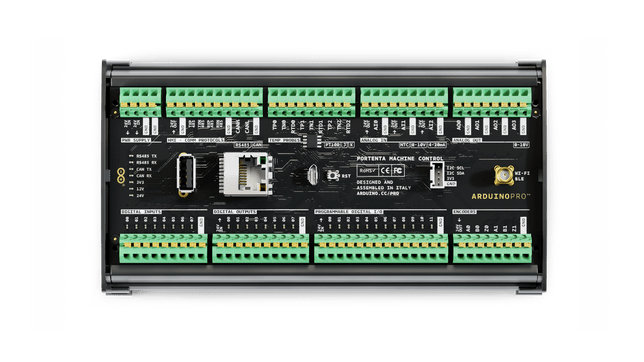
Credit: Arduino.cc
Step 3: Debian Bullseye KDE
We’ll begin by setting up the ROCK 5B by installing Debian Bullseye with the lovely KDE desktop and a 5.10 kernel.
Using your PC visit the OKdo Software Hub and download the latest Debian Bullseye image for the ROCK 5B
When it's downloaded, clip a 32GB or larger eMMC module onto the USB writer, plug it into your PC and flash the image using your favourite tool. I like BalenaEtcher as it works with the compressed image and it validates the installation. If you’re not sure how to do this then detailed instructions are on the OKdo Getting Started pages:
Before ejecting the eMMC module from your PC, open the config partition and edit the before.txt file - this runs once, when the OS starts up and helps to configure the system, then the file is deleted.
I remove the radxa user stanza so that there is only the rock user installed. I also comment out the disable_service ssh which is a double negative to allow ssh access. Finally, change the locale to match your language, my locale is GB.
Here’s the contents of my before.txt:
add_user rock rock
user_append_group rock sudo
user_append_group rock audio
user_append_group rock video
user_append_group rock plugdev
user_append_group rock render
resize_root
#disable_service ssh
disable_service smbd
disable_service nmbd
regenerate_ssh_hostkey
update_locale en_GB.UTF-8
Now unmount your eMMC from the PC and clip the module into place on the bottom of the ROCK 5B. You should hear it click into place when it's seated correctly.
- Connect up your monitor, keyboard and mouse and attach an Ethernet cable then power on the board by plugging in the power supply.
- After only a few seconds the board will boot. The green LED should be solid and the blue LED should start blinking the heartbeat. You can login with the rock user and password rock
- Take some time to configure KDE to your liking. I’m not going to cover this as everyone has their own preferences and it’s fairly intuitive, the Config app in the taskbar is your friend for this. It’s also advisable to change the password and update the system. When you’ve finished, reboot the board for all the settings to take place.
- Tip: Use ‘sudo dpkg-reconfigure locales’ to fix the locale if it isn’t set - I set mine to en_GB.UTF-8
From now on we will be working on the ROCK desktop unless I say otherwise.

Step 4: GitHub
Now that we’ve got our OS how we like it, let's set up GitHub to allow you to version control your source code and share it with others. I’m assuming you already have a GH account, if not follow these instructions to create one:
To setup SSH access so you can push and pull code without using passwords, create a key pair in ~/.ssh using your GitHub email and accept the defaults:
$ ssh-keygen -t ed25519 -C "your_name@your_email.com"Now in the browser, sign-in to your account and navigate to the keys page and click the New SSH Key button:
Give the key a title and set the type to authentication, then in the Terminal, list the public key and copy and paste it into the GitHub SSH page:
$ cat ~/.ssh/id_ed25519.pubTest you now have access in the Terminal:
$ ssh -T git@github.comFinally setup your GitHub identity in the ROCK Terminal:
$ git config --global user.name “your_user_name”
$ git config --global user.email "your_email"
That’s it you're all set to create repos and control your source code in GitHub.
Step 5: Visual Studio Code
There are lots of code editors / IDE’s to choose from and we all have our favourites. I’m currently using Visual Studio Code (VSCode) from Microsoft. It’s a powerful and flexible editor that can handle most languages that I use and it’s very well documented and covered widely in YouTube tutorials. There’s a version for Arm64 Linux so it can be installed on ROCK boards.
Visit the VSCode download page and grab the latest version for Arm64 on Linux. Detailed instructions of how to install it on Linux are here but it's pretty straight forwards with a one-liner - change the filename to suit your download filename:
$ sudo apt install ~/Downloads/code_1.81.1-1691620868_arm64.debThis will install VSCode and update the Debian package repo so you can receive updates as they occur. It will also add a menu item in Applications -> Development -> VSCode so you can open it and set it up:

VSCode is super-configurable which can be a bit daunting at first but you soon get used to it and once you do, you can use it for most coding projects. More on that later.
- Click through the welcome screens and just choose the defaults at this stage. I’ll hand hold you through the basic configuration steps where we will, first of all, add support for Python:
- Click the Extensions icon in the LH taskbar and search “python” then add the Python extension from Microsoft and let it install, then mark it done.
- Add Black Formatter by searching “black formatter” in the extensions and install it. There are instructions on how to set it up on the extension page.
- Open the User configuration by using the command pallet. Press Ctrl + Shift + P then search preferences: Open User Settings (JSON) - it will appear as you type:
- Add the following json code into the configurations editor to setup Black & Flake8:
- "[python]": { "editor.defaultFormatter": "ms-python.black-formatter", }, "flake8.args": [ "--max-line-length=200", "--ignore=E402,F841,F401,E501", ],
This is what my User Settings look like:

That’s all the extensions configured now so we can add a couple of command line utilities for Python; Bandit and Safety can scan your Python code for vulnerabilities and help you fix them before something bad happens:
$ pip install --user bandit safetyLogout and back in again so ~/.local/bin gets added to your PATH by .profile.
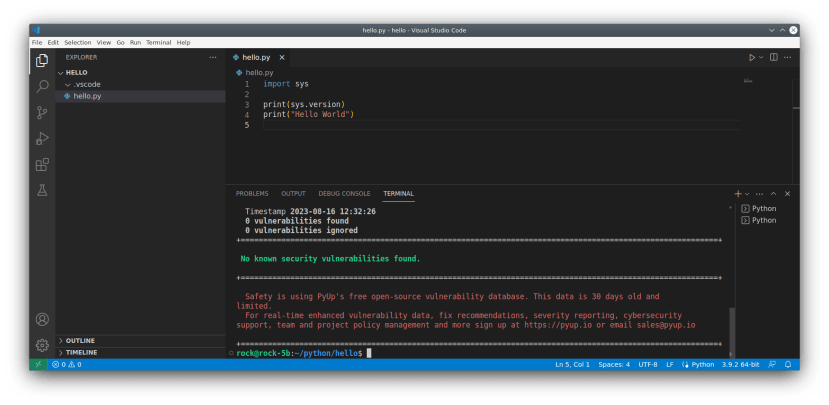
To test, create a directory to hold the hello world project, then open it in VSCode and click Trust (you do trust yourself, don’t you!)
$ mkdir -p ~/python/hello
$ code ~/python/hello
In the VSCode window, click the Explorer icon in the LH taskbar and add a new file named hello.py with the following contents:
import sys
print(sys.version)
print("Hello World")
Press Ctrl + Shift + I to allow Black to format the document. Also Flake8 will complain if it finds any errors in the Problems tab at the bottom of the window.
Click the Run arrowhead button in the top right of the window to see the output in the Terminal pane at the bottom of the window.

We can scan our source code with Bandit to check for any vulnerabilities by running it from the VSCode Terminal - this will scan all the files in the current directory recursively:
$ bandit -r .Bandit didn’t identify any issues -phew!

And finally a safety check of all the Python packages installed in our system. Safety scans all the modules installed, not just those used in the code. Run it from the VSCode Terminal again:
$ safety checkThis time Safety found vulnerabilities in pip, setuptools and wheel packages! We can update the python packages with:
$ python3 -m pip install --upgrade pip setuptools wheelThen run safety again to make sure it's clear.
That’s VSCode all setup to handle Python code.
Step 6: Arduino CLI
In this next section, we’re going to set up the Arduino CLI environment so that we can compile and flash code on the Portenta Machine Control. Once installed we can edit code in VSCode and run the tool chain from the VSCode Terminal, which is neat.
Install the latest CLI using the Arduino script:
$ curl -fsSL https://raw.githubusercontent.com/arduino/arduino-cli/master/install.sh | shAfter it’s finished, run the provided script as sudo to setup udev rules for Arduino Mbed OS boards:
$ sudo /home/rock/.arduino15/packages/arduino/hardware/mbed_portenta/4.0.4/post_install.shNow logout and back in again so ~/bin gets added to your PATH by .profile
Start by creating a CLI configuration file in /home/rock/.arduino15/arduino-cli.yaml using the utility:
$ arduino-cli config initThen update the local cache of available platforms and libraries by running:
$ arduino-cli core update-indexNow connect the PMC to the ROCK with a USB cable. You don’t need the 24V power supply connected to flash the board. After connecting, it should be recognized by running:
$ arduino-cli board listThe output should look like this:

We can see for the above output we need to install the arduino:mbed_portenta core:
$ arduino-cli core install arduino:mbed_portentaThen run core list to check it’s installed:
$ arduino-cli core list
We can see from the above output that the correct core is now installed so we’re good to go.
Step 7: PMC Test
Let's do a simple test to check our CLI toolchain and make sure we can flash the PMC. We all love blinking LED’s so hook up a couple of 24V LED’s (017-7529) and (610-2691) to the Digital Outputs of the PMC.
Disconnect everything before building the circuit so there's no power and double-check everything before connecting it again.
Digital Output channels 00 and 01 are connected to the positive terminals of the LED (red leads) and the negative side to the GND connectors (blue leads).
Connect the 24V power supply (190-4203) to the PWR SUPPLY terminals, making sure you have the correct polarity. The digital outputs also require a 24V input on the first pin of the connector marked 24V IN.
Check all your connections are correct before connecting the USB cable to the ROCK and plugging in the 24V power supply.

Let's create a test sketch by using the utility from the ROCK Terminal:
$ arduino-cli sketch new Arduino/ToggleDigitalOutputsThen open the directory in VSCode:
$ code /home/rock/Arduino/ToggleDigitalOutputs/Now override the template code by copying and pasting the following C/C++ code into the editor and saving the file - this will toggle the 2 LED’s in opposite sequence every second:
/*
 Portenta Machine Control - Digital Output Toggle
*/
#include <Arduino_MachineControl.h>
using namespace machinecontrol;
#define CH00 0
#define CH01 1
uint8_t state = LOW;

void setup() {
 digital_outputs.setLatch();
}

void loop() {
 digital_outputs.set(CH00, (state == HIGH) ? state = LOW : state = HIGH);
 digital_outputs.set(CH01, (state == LOW) ? state = HIGH : state = LOW);
 (state == LOW) ? state = HIGH : state = LOW;
 delay(1000);
}
Open the VSCode Terminal and compile. The first time you do this it will take a few seconds as it will download any libraries used in the code before compiling it. It will also check if you have the latest version if you already have a library installed.
Compile the sketch to run on the M7 core by passing the FQBN string:
$ arduino-cli compile --fqbn arduino:mbed_portenta:envie_m7 .Tip: Don’t forget the space with a dot at the end of the command!
Providing everything compiled OK, you will get error messages and pointers to what needs fixing if not, then it's time to flash the code:
$ arduino-cli upload -p /dev/ttyACM0 --fqbn arduino:mbed_portenta:envie_m7 .All being well you should be in blinking heaven, so pat yourself on the back!

If you want to, you can save your work for future reference by creating a repo in GitHub and pushing the code up, but that's another episode, so see you next time.
References
OKdo downloads: https://www.okdo.com/software-hub/
GitHub: https://github.com/
VSCode downloads: https://code.visualstudio.com/download
Arduino CLI: https://arduino.github.io/arduino-cli/