MQTT: Part 6 - Security
Follow article
 Dave from DesignSpark
How do you feel about this article? Help us to provide better content for you.
Dave from DesignSpark
Thank you! Your feedback has been received.
Dave from DesignSpark
There was a problem submitting your feedback, please try again later.
Dave from DesignSpark
What do you think of this article?
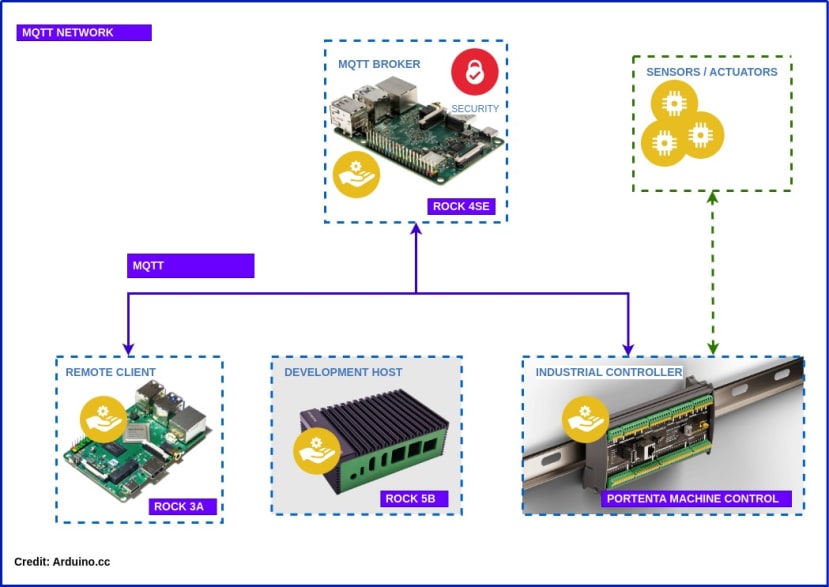
MQTT series covering development of networks on ROCK SBC’s and Arduino Portenta Machine Control with VSCode, Arduino CLI and Python
In Part 3 of the series we built a self hosted MQTT broker based on the ROCK 4SE with Mosquitto, which was configured for testing purposes.
In this article we revisit the Mosquitto broker and secure the MQTT protocol for production use, using MQTT over TLS with client certificates.
We show how to setup your own Certificate Authority and how to create and distribute self-signed certificates to the broker and clients. This ensures end-to-end encryption of data and only allows client access if they possess valid certificates.
Finally we run tests to ensure that everything is working as expected and the broker is secure.
By the end of this blog you should have a working IIoT network that looks something like the diagram above for use in Industrial Control, Building HVAC, Smart Agriculture or even controlling your own micro-brewery!
Hardware
You’ll need access to your own MQTT broker. We’re using the one we built earlier based on the ROCK 4SE with 4GB RAM (249-3159) .
The tools we will use for creating the Certificate Authority are Open Source and run on Linux so we will deploy them on the ROCK 5B (220-9536) Dev Host we built in Part 1 but you can use any Linux host for this.

Anonymous Access
Before we start tightening up our security let's check the current access rights configured in Mosquitto. These should be stored in the /etc/mosquitto/conf.d directory. You can name your config files as you like but they must end in .conf - ours is called access.conf
SSH in to your MQTT server and cat the contents of the Mosquitto configuration:
$ ssh radxa@rock-4se

$ cat /etc/mosquitto/conf.d/access.conf

per_listener_settings true

listener 1883 192.168.1.60

allow_anonymous true
This configuration allows any client on the network to publish and subscribe over MQTT on port 1883, which is the default.

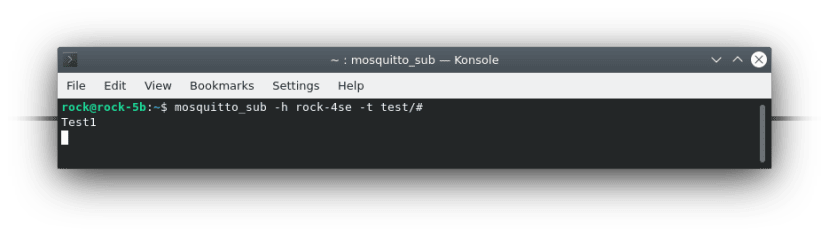
We can now do a test to make sure that anonymous access is working:
On your Dev Host, install the Mosquitto clients package if you haven’t got it already.
$ sudo apt install mosquitto-clientsThen subscribe to the test topic - specify the hostname or IP of the broker and the MQTT topic. It defaults to port 1883:
$ mosquitto_sub -h rock-4se -t test/#Open a second terminal instance and publish a message to the test/test topic by adding the message parameter:
$ mosquitto_pub -h rock-4se -t test/test -m 'Test1'
You should see the message output in the subscriber to prove that everything is working ok.
MQTTS
Now we have proved remote clients are able to publish and subscribe to messages anonymously, we can increase the security of our transactions.
There are multiple options for securing Mosquitto - all the details can be found in the documentation:
https://mosquitto.org/man/mosquitto-conf-5.html
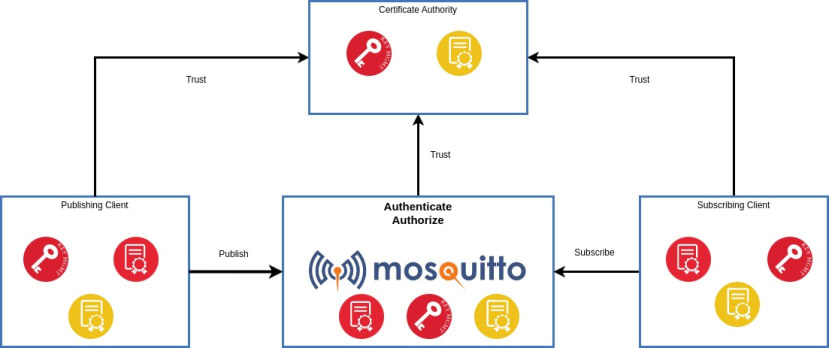
We will be using MQTT over TLS with client certificates. This provides a very high level of security where each connection to the broker is encrypted end-to-end. Only clients with valid, signed certificates are allowed to connect to the broker.
To do this we will create our own Certificate Authority (CA) to Self Sign certificates, hosted on our Dev Host. There are also free and commercial CA’s that can automate the process for networks with large numbers of devices.
OpenSSL can be used to create all the necessary keys and certificates as well as handling certificate signing requests. The Chain Of Trust for the CA, broker and clients is shown in the diagram.
Certificate Authority
Our CA is really just a series of directories held in a secure location that will contain cryptographic keys and certificate files. The tools to do this are in OpenSSL which is already installed. Most of the commands you will use require root privileges.
Create a secure location on the Dev Host for the Certificate Authority files as root:
$ sudo -s
# mkdir -p /srv/ca/certs
# cd /srv/ca/certs
Now generate a Root Certificate and Private Key for your own Highly Trusted Certificate Authority, entering the relevant details after each prompt:
# openssl req -new -x509 -days 365 -extensions v3_ca -nodes -keyout root_ca.key -out root_ca.crt

Generating a RSA private key

.+++++

............................................................................................................................+++++

writing new private key to 'root_ca.key'

…

Country Name (2 letter code) [AU]:GB

State or Province Name (full name) [Some-State]:Greater London

Locality Name (eg, city) []:London

Organization Name (eg, company) [Internet Widgits Pty Ltd]:The Trusted CA

Organizational Unit Name (eg, section) []:Authentication Dpt.

Common Name (e.g. server FQDN or YOUR name) []:Highly Trusted CA

Email Address []:boss@Highly-Trusted-CA.com
The Common Name (CN) must not be the same as for clients.
The command generates a new Public Key file root_ca.key which is read & write for root only. This key is very important and must be kept securely and held on the CA device only.
It also generates the Root Certificate root_ca.crt which is publicly readable but writable only by root. This key must be distributed to all the devices that need to connect.
The CA uses its own Private Key to sign the Root Certificate which is why this is called a Self-Signed Certificate. Once each device has a copy of this certificate, a Chain Of Trust is established. Because each device's certificate is signed by the CA and the device has a copy of the CA Root Certificate, it can be sure that the device it's communicating with is authentic.

Broker Certificate
The broker requires its own Private Key and Signed Certificate. This is a two step process, first to generate the key and a signing request. The signing request is used by the CA to generate the signed broker certificate.
Create a directory for the broker files under the CA directory:
# mkdir -p /srv/ca/broker
# cd /srv/ca/broker
Generate a new Private Key and Certificate Signing Request for the broker:
# openssl req -new -newkey rsa:2048 -nodes -keyout broker.key -out broker.csr \
-subj "/CN=rock-4se"
The CN string must be FQDN of broker as this authenticates the server
This generates the brokers Private Key broker.key and a Certificate Signing request file broker.csr in the broker directory.
The second step is to pass the Certificate Signing Request broker.csr file to the CA so that it can generate the signed certificate:
# openssl x509 -req -CA ../certs/root_ca.crt -CAkey ../certs/root_ca.key -CAcreateserial \
-in broker.csr -out broker.crt
This generates a third file in the broker directory, broker.crt which is the broker's signed certificate.

Client Certificate
In a similar way to the broker, we now need to generate a Private Key and a Signed Certificate for each client.
Create a client directory under the CA directory:
# mkdir -p /srv/ca/client01
# cd /srv/ca/client01
Create the new Private Key and Certificate Signing Request:
# openssl req -new -newkey rsa:2048 -nodes -keyout client01.key -out client01.csr \
-subj "/CN=client01"
You can use a meaningful Common Name here.
Then submit the request to the CA:
# openssl x509 -req -CA /srv/ca/certs/root_ca.crt -CAkey /srv/ca/certs/root_ca.key -CAcreateserial -in client01.csr -out client01.crt
Broker Security
Now we have all our keys and certificates, we need to securely distribute them to the broker and any clients. If you have secured SSH on the broker and clients, this is a 2 step process.
On the Dev Host copy the root certificate, broker private key and signed certificate to the radxa users users home directory on the broker:
# cd /srv/ca
# scp certs/root_ca.crt broker/broker.crt broker/broker.key radxa@rock-4se:~/
SSH in to the broker and move the root certificate to the mosquitto CA certificate store and change ownership to root:
$ sudo mv root_ca.crt /etc/mosquitto/ca_certificates/
$ sudo chown root:root /etc/mosquitto/ca_certificates/root_ca.crt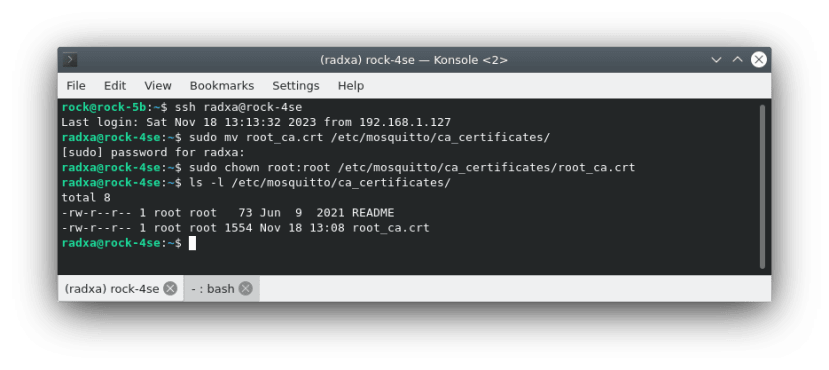
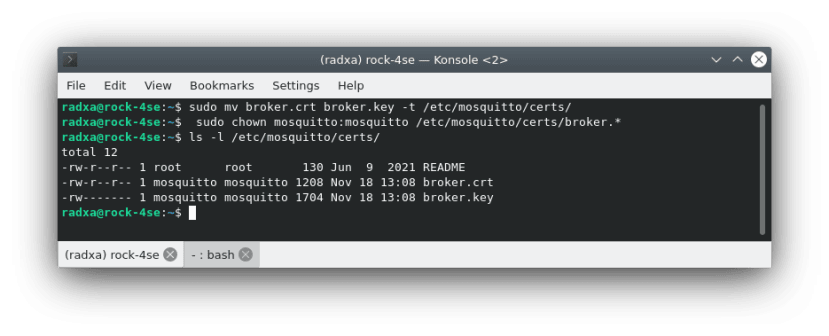
Now move the broker’s private key and certificate to the mosquitto certificate store and change the ownership to mosquitto:
$ sudo mv broker.crt broker.key -t /etc/mosquitto/certs/
$ sudo chown mosquitto:mosquitto /etc/mosquitto/certs/broker.*
The broker now has the correct key and certificates in place - it just remains to configure secure access which we will do later.
Client Security
Now setup a key store on the Dev Host so we can test client access.
Under the normal user, create a directory and copy the client Private Key and Signed Certificate - the ownership should be changed to your user:
$ mkdir -p ~/client01
$ cd  ~/client01
$ sudo cp /srv/ca/client01/client01.key .
$ sudo cp /srv/ca/client01/client01.crt .
$ sudo chown $USER:$USER client01.*
Now the normal user can run tests without being root and has access to the correct key and certificates.

Mosquitto Config
Before testing, the Mosquitto broker must be configured to add secure access over TLS with client certificates.
SSH into the broker and edit the config file /etc/mosquitto/conf.d/access.conf. We want to block anonymous access on port 1883 and only allow certificate authentication on port 8883. The end-to-end traffic will then be securely encrypted and only clients with a valid certificate will be able to connect:
It should look like this:
# Allow each listener its own settings
per_listener_settings true
# Default unencrypted port
listener 1883
allow_anonymous false


# Default encrypted port
listener 8883
certfile /etc/mosquitto/certs/broker.crt
keyfile /etc/mosquitto/certs/broker.key
cafile /etc/mosquitto/ca_certificates/root_ca.crt
tls_version tlsv1.3
require_certificate true
use_identity_as_username true
Then restart mosquitto - there should be no errors:
$ sudo systemctl restart mosquitto.service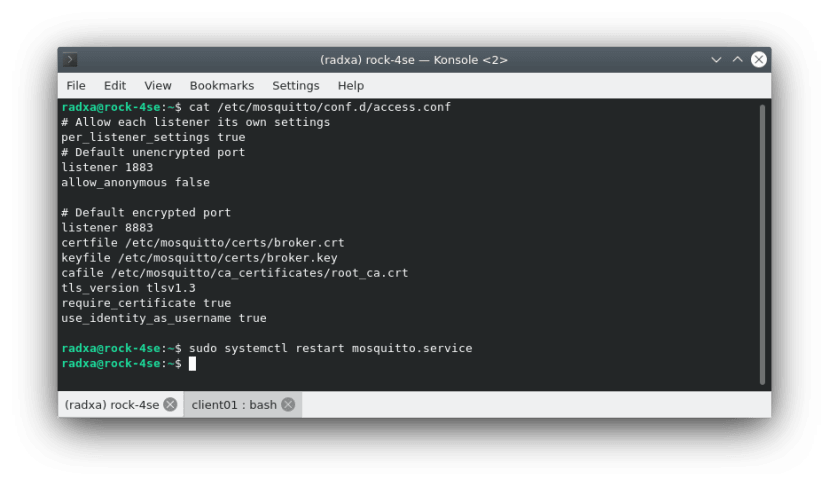
Secure Access
Now back on our Dev Host we can run a similar test to at the start but this time using secure MQTTS.
Subscribe to a test topic using the usual host but this time pass port 8883 (default secure access) the root certificate path and client key and signed certificate paths:
$ cd ~
$ mosquitto_sub -h rock-4se -p 8883 --cafile /srv/ca/certs/root_ca.crt --cert ~/certs/client01/client01.crt --key ~/certs/client01/client01.key -t test/#
Now publish using the same secure client details from another session on the Dev Host:
$ mosquitto_pub -h rock-4se -p 8883 --cafile /srv/ca/certs/root_ca.crt --cert ~/certs/client01/client01.crt --key ~/certs/client01/client01.key -t test/test -m 'Test 2'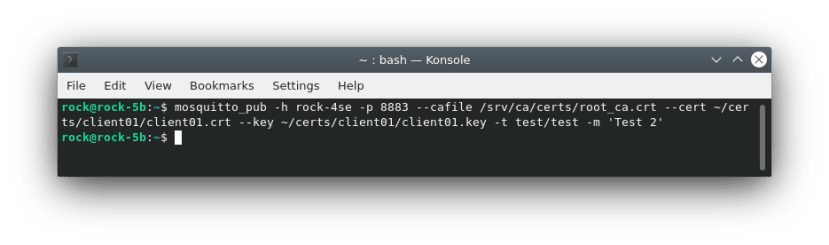
You should see the message output in the subscriber client.

We should also check that anonymous access is denied - the connection should be refused.
$ mosquitto_sub -h rock-4se -p 1883 -t test/#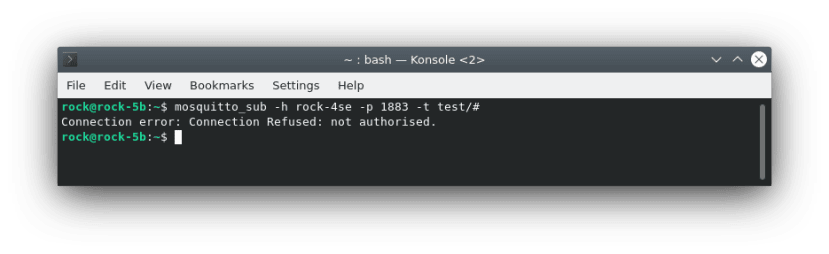
Troubleshooting
There are a lot of files that all need to be in the right directories and have the correct access rights. Most issues will be to do with errors in one or more of these cases.
Both broker and client need read access to a copy of the CA Root Certificate. They must also be able to read their own Private Key and Signed Certificate files.
If you are getting “Connection Refused” errors check the paths to the key and certificate files, their ownership and access rights with ls.
For example, on the broker the Private Key and Signed Certificate files must be owned by the mosquitto user.
The log on the broker in /var/log/mosquitto/mosquitto.log may be able to help diagnose any issues - this is only accessible as root.
For security reasons, It is important that the Private Key files have read & write access only for the owner but the copy of the CA Root Certificate must be owned by root and any user must have read access.
Summary
In this post, we covered securing and testing MQTT protocol over TLS with self-signed certificates.
If you have followed along you should now have a secure MQTT server and be able to secure client access over the network.
If you have a very large number of clients it may be beneficial to look at some of the different services that allow you to manage certificates for fleets of devices now you understand how MQTTS works.
References
Mosquitto project: https://mosquitto.org
The Complete MQTT Series:
- Part 1 - Developing IIoT Networks
- Part 2 - Protocol
- Part 3 - Broker
- Part 4 - Industrial Controller
- Part 5 - Python Remote Client
- Part 6 - Security - (This Part)
Comments