The Fight to Repair - Part 5: Battery Post-Mortems with Andy Sinclair, the Vape Travesty, Dogmatism and Hacking My Headphones.
Follow article
 Dave from DesignSpark
How do you feel about this article? Help us to provide better content for you.
Dave from DesignSpark
Thank you! Your feedback has been received.
Dave from DesignSpark
There was a problem submitting your feedback, please try again later.
Dave from DesignSpark
What do you think of this article?
I finally hacked my headphones. (About Time!). But really the ‘win’ is more than that: We now have a freewheeling discussion about the role of design in sustainability. Bring it on...
As part of a series of articles, this one will focus on:
- Refusing to give up, I explored the ‘Internal Resistance’ of LiPos as a possible indicator of ‘battery health’. Unsurprisingly, ‘it’s more complicated than that’.
- Inspired by previous work on critique of Disposable Vapes, I ‘trust the process’ and digs further into why our wastefulness of batteries is also rooted in our behaviour as consumers.
- As well as a mini History of ANC Headphones, I also finally fixed mine with a nifty ‘hack’ (taking inspiration from another blog hacking Vape batteries into Drones)
- A great tip for prototyping devices with LiPos!
Interview with Embedded Firmware Engineer, Andy Sinclair.
How it started: Engineering Projects, with an Activist approach...

For regular readers of DesignSpark, you’ll know that I did a fun ‘Tech Art’ project with Don Robson, called RadioGlobe. I knew Don from my time at Dyson - where he worked in Motors, and anything ‘real tricky’ in the tech side of things. As they say, “It’s not what you know, but who you know”, and with Don, it’s apparently both, as when I was stuck on how to understand the inner workings of batteries and power management, he connected me with Andy Sinclair, Embedded Firmware Engineer, now at Nordic, but also a Dyson alumni.
Above: Andy and Jude discussing the details of LiPos and Electronic Design considerations.
The WhatsApp messages with Andy have arguably been the backbone of my thinking on the matter of LiPos, and I deeply value his rare ability to be so experienced, and yet so open to ‘simple’ questions - and to respond in such a coherent and concise manner that is not jargon heavy, and remains curious to new avenues of thought. If you’ve worked for any length of time in any technical discipline, having such people in your network is invaluable to say the least.
Although I recorded this interview with him somewhat after the fact, it’s still a good run through of the journey we took, and I think covers some useful technical details, but also gives some perspective on what factors influence the industry at large. Safe to say, Andy is speaking on his own terms and is not representing the views of any of his current or previous employers, but it certainly helps that he’s working with some of the best in the business, and if for example you really wanted to get deeply into the study of batteries, I would recommend checking out some of the Nordic IC Dev Hardware and Resources. There is no sales ‘plug’ here, just an honest link-back for what could be useful links for anyone wanting to go further than I have here.
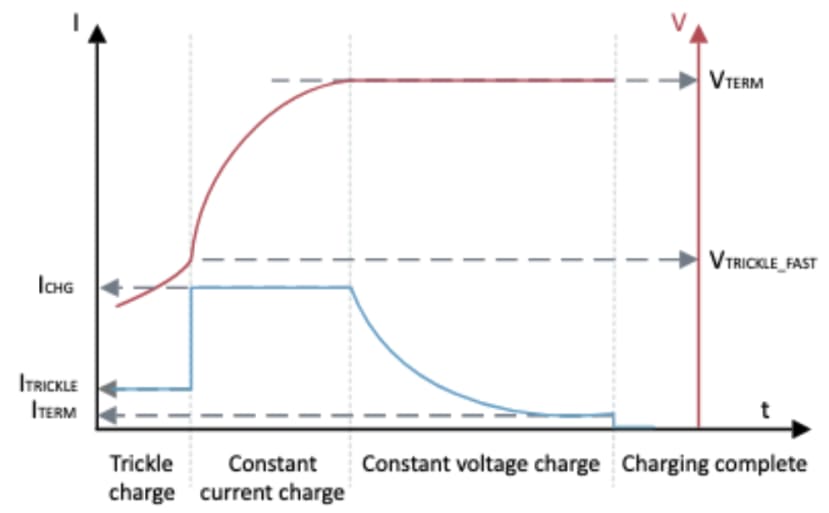
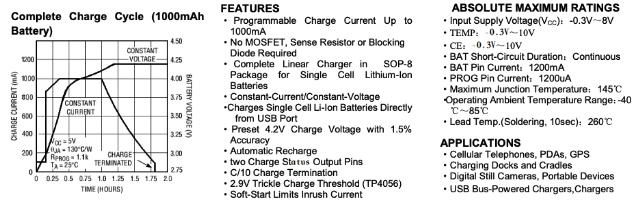
Anyway, perhaps the most useful thing I learned about LiPo charging is this graph, showing how the different profiles of Voltage and Current occur for charging a battery.
This gave me a better understanding of what was happening when the current dropped whilst using a USB monitoring device (although the voltage stays the same, as the TP4056 PCB is just drawing 5v as in its specification. This also gave me a feel for which batteries were charging effectively, as they tended to charge for longer and get to smaller and smaller increments of current (say 0.10A), before shutting down.
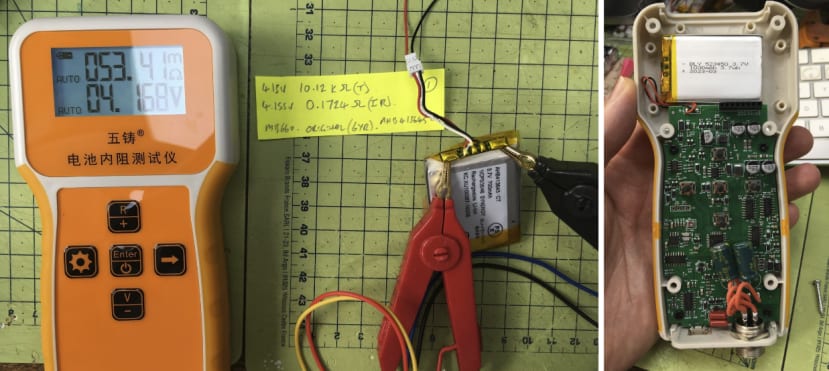
Another interesting line of enquiry from Andy was to check the Internal Resistance of the batteries, for any anomalies. Despite no obvious ‘issues’ (see table below), it was good to realise that one should not check resistance of a battery with a standard multimeter, (it will likely overload/short), and hence seems a useful little device to have around in an R&D lab, as a means to check general health of a battery (any dig changes in IR may suggest something has degraded or changed and further analysis is needed).
These devices start from £35 on AliExpress and despite a loose panel mount connection, (that I took apart and tightened up easily enough), seemed pretty well made (even the LiPo is pretty fair quality by the looks of it!) - and will likely get you some ‘quick and dirty’ relativistic test data, before you pony up for the serious £3k kit from RS Pro (or go to a lab that has calibrated and certified gear) for your proper compliance tests and such.
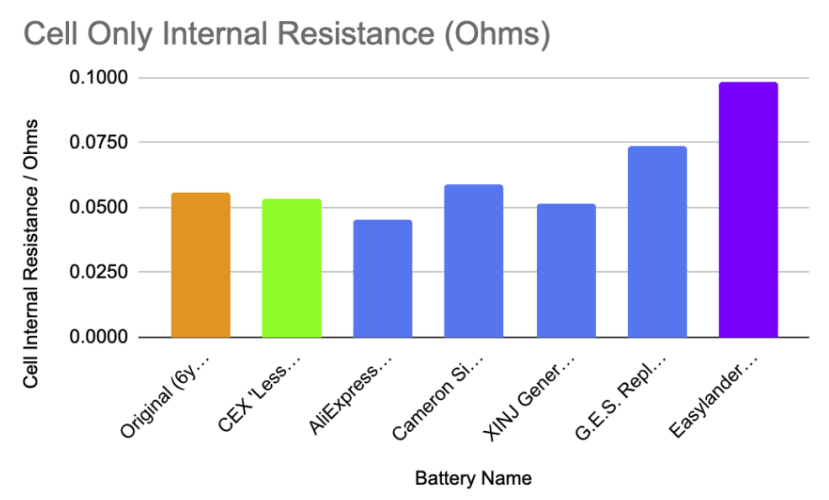
Essentially, there was no major difference between batteries, and in Andy’s opinion, not enough to qualify any apparent ‘reverse characterisation’, so it seemed fair to rule this out (for good!). Interestingly for a larger capacity (1100mAh) "Easylander" battery, this was notably higher, but also looked proportional to the almost 1.5x larger capacity and near 1.5x internal resistance, although this could also be a slightly lesser quality battery in some regard. It is of course a bit of a risk on “Ali Express” - not being negative about them, but yet get what you pay for, so it’s fair enough all things considered.
A useful insight was that Internal Resistance can mean that the battery performs less well, and triggers a ‘cut off’ in the discharge circuit earlier/prematurely, so its capacity will be reduced. This is something to consider, and perhaps explains why so many appliances quote a long battery life time, which when you use it often comes in less. Perhaps these are the ‘factory new’, not the ‘been in a warehouse for 1 year, but still consumer new’ figures.
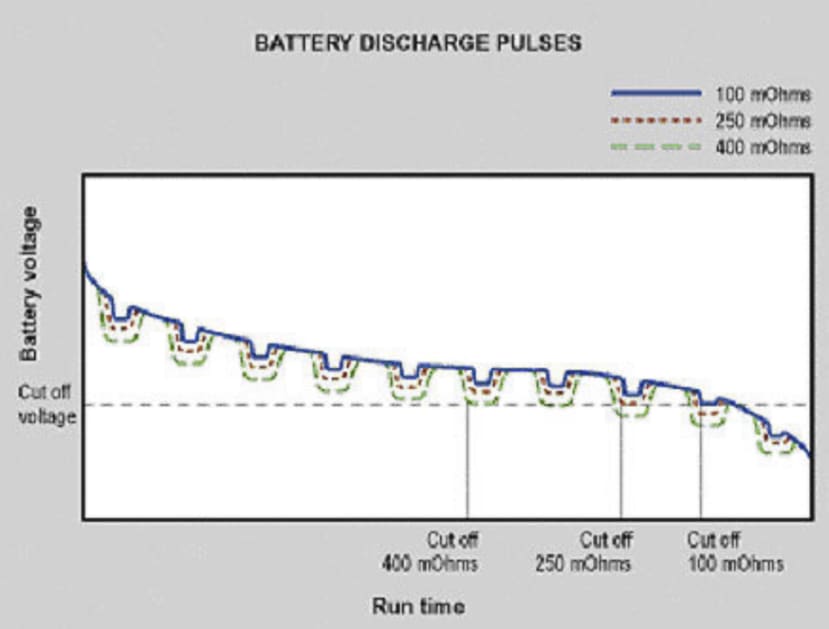
A useful resource from Battery University (link) shows how the Internal Resistance is higher for batteries with the same capacity, but will stop discharging sooner. Factors like age, but also heat (higher than 50C is problematic) will be detrimental to battery life. Perhaps I’m going too far with analog here, but it feels like having two identical runners, but one has arterial cholesterol (Internal Resistance) in their arteries, so cannot ‘output’ running power as well as the other, and so taps out sooner in an endurance race.
Dogmatism, Engineering and R2R.
In case you hadn’t realised, this whole process goes far and beyond what is ‘reasonable’ to repair one’s headphones. At no point would I wish to preach that individuals should spend probably 100 hours over 3 months, and spend around £500 on materials and travel, to fix a pair of headphones which originally cost £350, and indeed, a good second hand pair can be purchased for less.
The emphasis is of course to ‘fall in love with the problem’, which I feel I have, and that ‘process’ of going ‘down the rabbit hole’, and using a dogmatic mentality to keep digging, as a way to motivate oneself to keep learning is perhaps something I picked up from Dyson, in NPI.
This is not to imply Dyson engineers all behave like me, but I think I can say without offending Sir James, that there is a certain sort of dogmatic relentlessness to Engineering. From a distance it can certainly be labelled as a ‘sunk cost fallacy’, where an obsessive engineer does not quit, when [to others] it’s look to be almost 99% likely to be a waste of their time. And it’s a rare manager who can tell the difference between madness and genius, when someone is in the thick of it.
And yet everything changes when you uncover that 1%. It can literally change fortunes and lives.
You go from certified crazy to evident genius in a heartbeat. It’s often so fast that you need to remind yourself who was actually cheerleading from the sidelines, and in contrast, who just swooped in at the end for the good times. Loyalty and understanding are rare traits that I treasure deeply. This is how I pick clients, and to a greater or lesser extent, many trusted people in my life: They understand there is a touch of madness in trying to do something new or ‘think different’ - as for a long time, by definition, it is unfamiliar and does not make any sense at all.
I have a TEDx talk at Imperial College London about this very point, if you want to get into it deeper.
Above: TEDx on 'Why Creativity Loves Uncertainty".
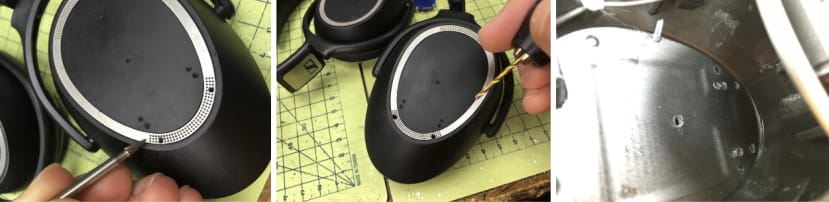
Getting Hacked Off / Hacking My Headphones.
Getting back to the situation with the Headphones, I didn’t want to sign-off the project feeling defeated by the circuitry and/or firmware which, by process of deduction, seems almost certain to be the issue - and not the battery as I initially believed/hoped. As per my point above, sometimes you are just wrong! But it’s what you do next what counts, as my old boss at Sugru used to say...
In terms of starting points, I still maintain that starting with the Battery as my ‘prime suspect’ for the fault was a rational first step, as even if I were an embedded hardware / software expert (as many of the folks I spoke to are), this does not mean that it is easy to do a post mortem on a product without any of the technical documents or schematics or firmware code, which are of course proprietary and Sennheiser are not going to just hand over (and yes - I did ask! No luck!).

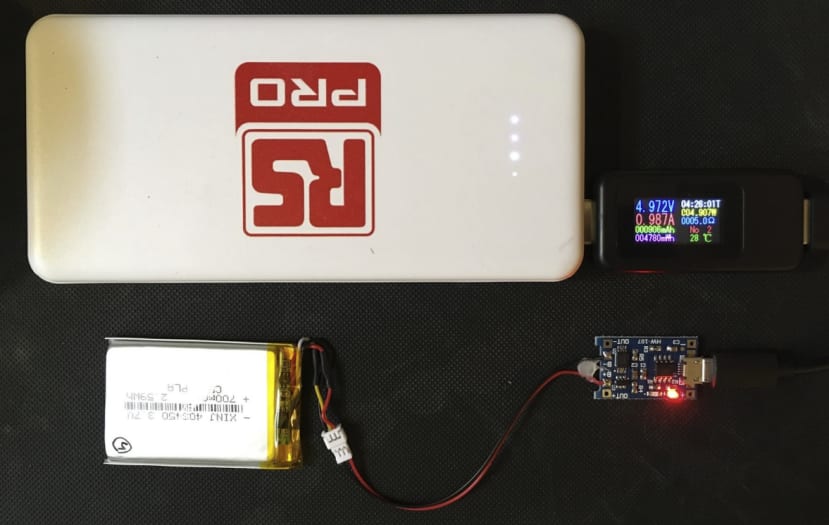
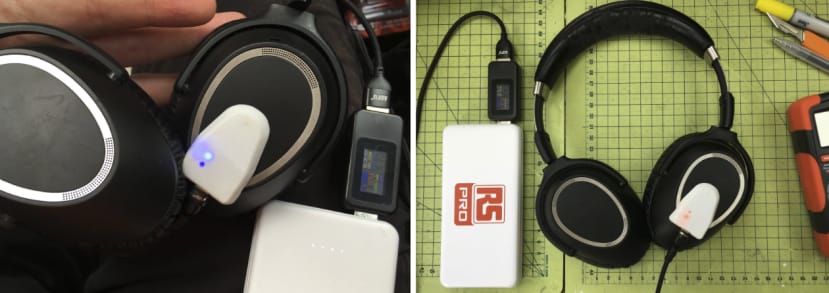
So the next best thing, and I believe in keeping with the spirit of the project on R2R, was to see if I could ‘hack’ the device to get it working again. Once again, I checked with Andy Sincalir if my idea was plain crazy, and pleasingly he thought it would work... so here is my hack of my Headphones using a very cheap (£1/$1) LiPo charging board, and some JST connectors to FINALLY repair my beloved headphones...
Vapes & TP4056 Charging Board.
And why it pays to explore the periphery of a subject.
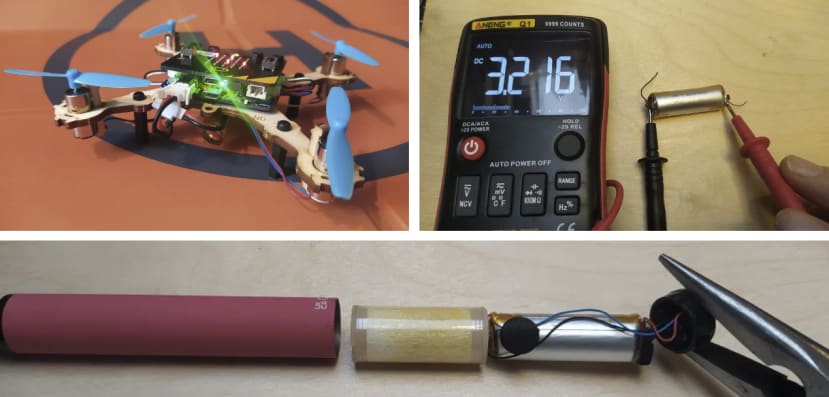
If you’re thinking I just ‘found out’ about the TP4056 by diligent research, this was actually not the case, and perhaps to further validate (or pardon) this engineering mindset, I would not have found out about these terrifically useful little boards, had I not previously been on a rant about how Single Use Vapes (e-Cigarettes) were treated as ‘disposable’, and sent to landfill - despite more often than not containing RECHARGEABLE LiPo Batteries in them.
I was so revved up about this, I even pitched DesignSpark to commission a mini-blog/project series that was authored by the wonderful Jo Hinchliffe - who showed that you can make drones fly, and mp3 players run for hours with LiPo batteries found in Single Use Vapes. Some estimates of such batteries anticipate 500 charges (when new) - and yet these go into landfill after one use. Indeed, I have not been able to find any evidence that ‘single use’ Vapes use ‘single use batteries’, they all seem to be ~550mAh, 3.7v batteries (like 13400 size).
Safe to say Jo and I are not the only one who picked up on this environmental (and engineering) travesty, and thanks to the activism of people like Laura Young, who started off as a small social media rant, got her story all the way to UK Parliament - where a ban seems to be underway in the UK at the time of writing this.

As for how to use these, I got some great insights from the legendary Big Clive, who I realised was also using them to make a similar case. To be clear, this is not about being Anti-Vape, this is about being Anti-Waste, and that ‘disposable’ vapes really are a terrible idea for the environment, and really should as a bare minimum be rechargeable and refillable.
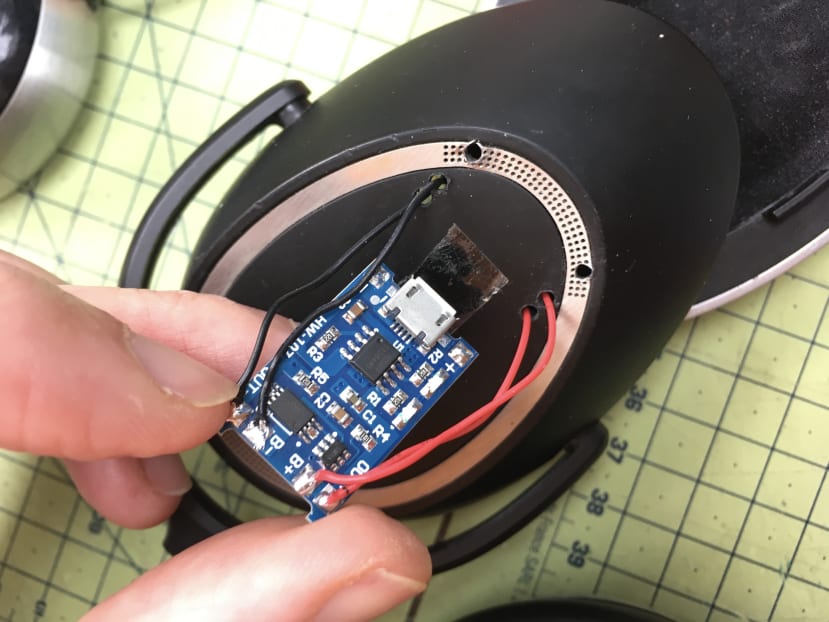
So here is the TP4056 in action with my Headphones, and below is the journey to get there. Hope it’s useful not just as a R2R battle-cry, but also a really useful little bit of hardware to get you able to prototype a LiPo battery safely into your devices. (Note: Max rating is 1200mAh - so not for really big LiPo or Li-Ion cells).
Let’s Begin...
The TP4056 is a commonplace LiPo battery charging board. It takes 5v USB power, and ‘trickle charges’ a LiPo battery, starting at 4.2v and drops down to 2.9v. It does all the clever stuff of doing this safely, and works on a variety of Lithium Cells which are rated at 3.7v output. It also has a ‘protection circuit’ to prevent overcharging, and over dis-charging.
My original Sennheiser battery was rated at 700mAh capacity, and I realised that there was space for a slightly higher capacity 1100mAh battery, (TP4056 can handle up to 1200mAh), giving a theoretical boost of ~157% capacity, for only about 1mm extra thickness, which the Sennheiser had room for.
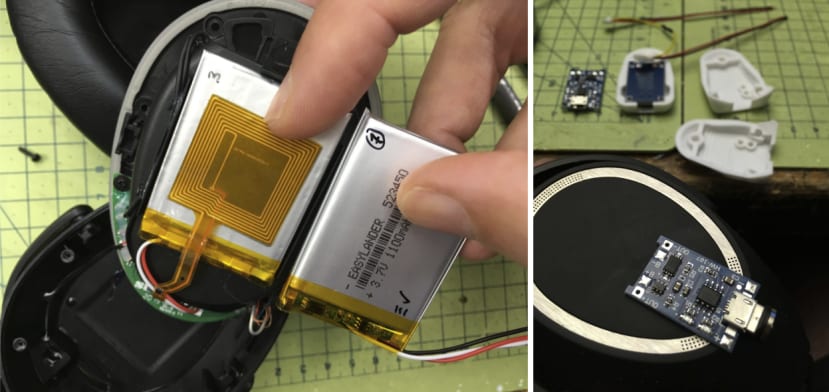
From my original comments on ‘decoding battery numbers’, you’ll note that going from a 413645 to a 523450 means I was only adding 1.1mm thickness and there was room for the extra 6mm length (and of course it was slimmer by 2mm). In short - a bit of a squeeze, but nothing to damage the battery, or product for that matter.
“Wiggle Room” is Essential in Design for LiPos.
It should be noted, that the ‘extra room’ is not sloppy design toleranced on Sennehiser’s part, and is in fact a wise thing to do, as if a battery does swell up - as it the case over time - then there is a bit of ‘room’ to swell, and not buckle the device. Once again, this is where I am at pains to point out this is a ‘hack’ and is not ‘recommended practice in design’. I am doing this; a. as a professional; and b. as someone who is aware I need to ‘keep an eye’ on this over time. As a side note, it has occurred to me that one could remove the NFC coil which would bring it back to about the same ‘free space’ or Wiggle Room again.
Hot Chips...?
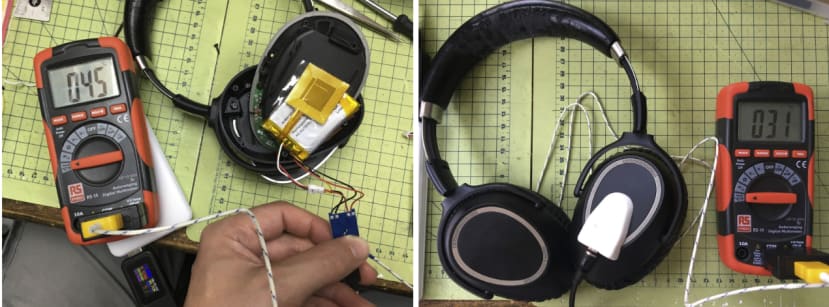
One thing to note here was that the TP4056 units do get a bit hot when charging. The PCB back gets up to around 45C, which if it were sitting directly on the battery would be not ideal, given that most LiPos warn against exceeding 50C, as it diminished performance and can increase likelihood of fires.
Later on, after I’d finished the ‘hack’, I did a check by putting the thermistor probe in between battery and internal casing, and fortunately it didn’t get above 31C after some hours of charging. I could perhaps add some aluminium plates or vents if this were higher, but seemed fine for now. (And at the time of writing, I’ve been using it solidly for a fair few weeks now - with no issues).
Enclosure Design
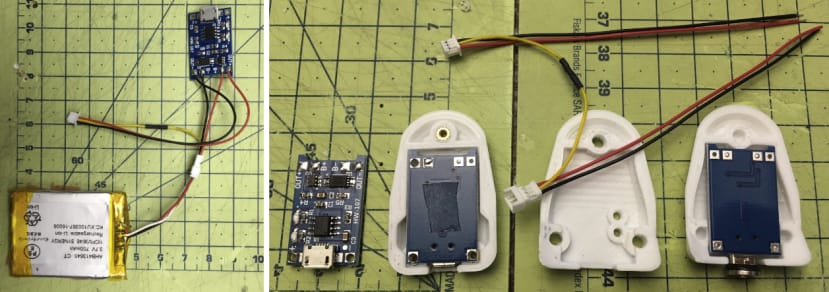
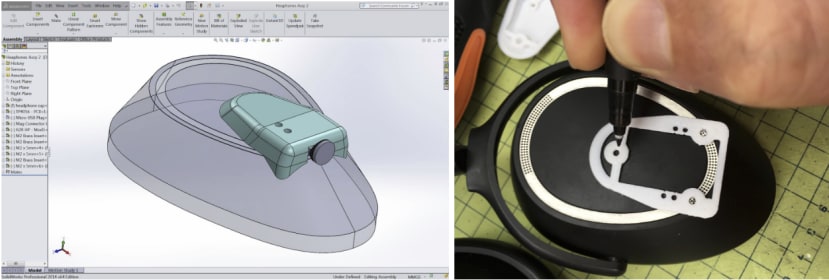
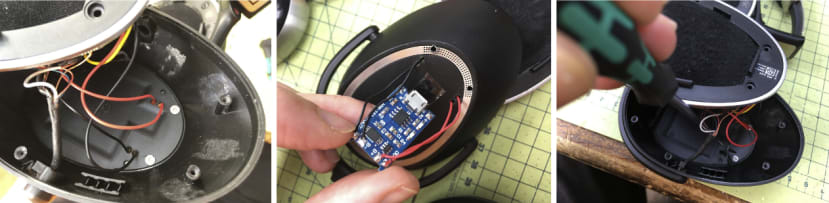
The circuit from the initial sketch looked like the once above, the only difference being I ‘upgraded’ the battery as mentioned. Initially I had tried to make the enclosure as small as possible by using the ‘redundant’ GND and VCC (5v) lines as mounting points, but regrettably, it turns out they were integral to the rest of the circuit, so drilling them out to accommodate M2 bolts was stupid in hindsight! Luckily I purchased a 5 pack for £3.65 (free P&P), so not a big issue. But I made it wider to work without butchering the PCB, and the result was pretty straightforward.
A nice design touch I’m rather pleased with, was this little ‘drill guide’ 3D Print I made. I learned this from textiles and carpentry, and it’s a really useful technique, and arguably goes back to how artists used to transfer sketches on paper onto huge walls, (check out the Da Vinci dramatisation on Amazon Prime to see it in action).
Anyway, it took a simple ‘cut off’ action in CAD, and took only about 5 mins to print - but potentially saved hours of potential chaos caused by incorrectly drilling a hole, and it stabilises drilling as well in general to have a hole-guide.
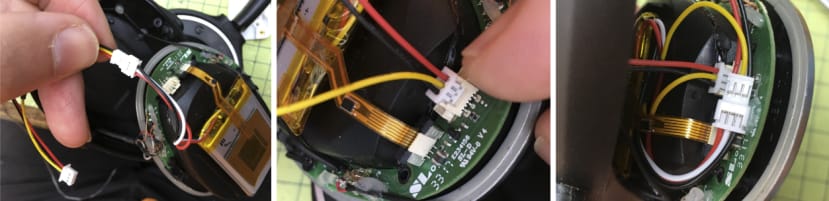
I was then able to connect up my JST connectors, as shown. To be clear, you do not need to do this, but given this is a prototype, I liked that I could easily un/plug batteries for future testing, so this was preferable to re/soldering in future. If I learned anything at Dyson - it was that when you think something is certain and a ‘one-off’, it rarely is, and designing for revisions pays off in the long run.
With care, I threaded the two red and two and two black wires, and soldered them to the PCB. (In truth, I did this wrong the first time, and was glad I always double check wiring before switching things on - and caught the mistake! Check twice, power on once.
As shown, the screws are tightened via the ‘back’ or inside, and are ‘low profile’ screws that you can buy, or quite often just file down to be less than 1mm thick. This allowed me to keep things flush, and slightly inset the screws by slightly countersinking/recessing them so as to avoid pressure on the battery.
For anyone who has followed my work in 3D Printed Tech knows - I’m a huge fan of Threaded Brass Inserts, and this is no exception, with some nice low profile M2 ones being used here to bring a reliable connection between the components. (Some tips and tricks here at DesignSpark).
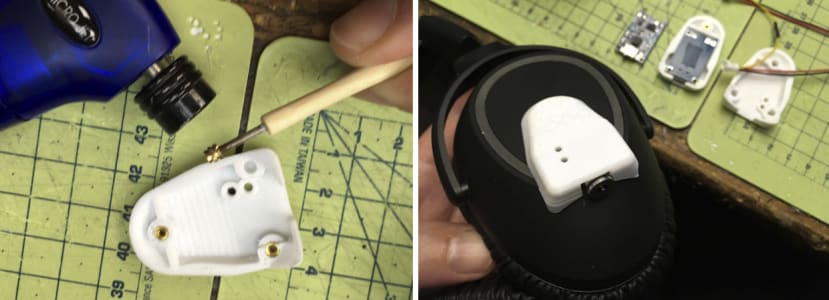
The Inserts are placed into the 3D print (PLA), ‘hot’, either by using a mini blowtorch as shown, or with a soldering iron tip (not your best one perhaps!).
Lastly, I added a magnetic ‘quick fit’ connection to the USB Micro port, as this would reduced mechanical wear and tear on the un/plugging on the TP4056 PCB, but also because they are kinda cool, and have been on my radar as a fun thing to utilise for some time. They can of course be removed if I was travelling and needed to recharge without this ‘special’ cable, i.e. just using a normal Micro USB.
Lastly, I added a tiny blob of Hot Melt into the holes near the LED lights, so as the light was more diffuse, and also protected the device from any rain or dirt better. I checked that all was ‘looking normal’ with the USB power metre, and at the time of writing have recharged and used it multiple times.
So there we have it! The final result - my headphones not just working, but upgraded:

So there we have it! The final result - my headphones not just working, but upgraded:
- Larger capacity battery...
- Around 60% extra playback.
- A networking ‘Icebreaker’ - hah!
- Magnetic charger. Nice.
- Didn’t end up in landfill, FTW.
- Components cost <£20.
- Time (*cough*) - a lot!
- Learning - loads.
- Value to other projects.
- Met some great people along the way.
- Deeper understanding of R2R.
Up Next...

Contents:
Prologue:
Pre-Departure Notice - How an Attempt to Repair my Headphones Turned into a 3-Month Journey with a Grand Finale at the Recycling Centre.
Main Articles:
Intro - The Fight to Repair with Jude Pullen, for RS DesignSpark.
Part 1 - LiPo Battery Basics, Headless Laptops & Safety First.
Part 2 - Returning to Hong Kong, My Design Conspiracy Theories and Meeting Dr Lawrence.
Part 3 - Falling in Love With The Problem of R2R, Looria, and Pre-Purchase Reparability Considerations.
Part 4 - Ken Pillonel’s Ingenious iPhone Hack, and Repairability as a Disruptor.
Part 5 - Battery Post-Mortems with Andy Sinclair, Vapes, Dogmatism and Hacking My Headphones.
Part 6 - Legislation Loopholes, Eco Black Mirror, Chunky Fashion, and R2R Business Models and The Case for Standardisation.
Part 7 - Design, Engineering & Electronics Recommendations for R2R.
Encore:
Part 8 - Visit to End of Life Processing Plant - SWEEEP Kuusakoski Ltd
Part 9 - Interviews with Industry Experts on Right to Repair.
Contact: If you have any other questions, or would like to collaborate, please get in touch (link).
Disclaimer: This series has been created for discussion purposes and is not a 'how to' guide. Jude Pullen is a chartered engineering professional, and has sought additional expert advice alongside his endeavours to explore this subject safely. For additional information please see DS Terms of Use.
Comments