The Fight to Repair - Part 1: LiPo Battery Basics, Headless Laptops & Safety First.
Follow article
 Dave from DesignSpark
How do you feel about this article? Help us to provide better content for you.
Dave from DesignSpark
Thank you! Your feedback has been received.
Dave from DesignSpark
There was a problem submitting your feedback, please try again later.
Dave from DesignSpark
What do you think of this article?
I reviewed 3rd Party Batteries to fix my headphones and made a few mistakes - so you don’t have to!
I also explained why writing this blog series is a fun way to cover a ‘story’ for publication, as a form of 'Applied Journalism'.
As part of a series of articles, this one will focus on:
- In the first part of this F2R Series, I explored LiPo Battery Basics, avoiding thermal fires, and sourcing 3rd party batteries... and realises it’s gonna be harder than I thought!
- I looked back at the intricate history of Modular Phones, and why this serves as a cautionary tale of the balance between ideals and commercial / consumer reality check.
- I looked at other R2R provocations trending right now, like a $60 Headless Macbook Pro!
Where it all started - Wanting to Repair my Fancy Noise Cancelling Headphones.
The Teardown and what I learned about LiPo Batteries not all being made equal!
If you’re read any of my other work for DesignSpark, there is a common pattern - I do a ‘thing’, realise there's more to it, so pitch to a client to get funding to ‘go deeper’ - and then it becomes a vehicle for a deeper learning and usually, such is my way, some philosophical provocation and debate.

This is generally the ‘formula’ that has seen me through the Pandemic and has more or less kept me working non-stop as a consultant for 3.5 years since leaving LEGO as a Tech Scout. I think it’s an exciting way to work, so thought it’d be useful to share my process for anyone else freelancing in tech, and welcome any comments also.
I’ve always been someone who learns because I have a pressing reason to learn a skill or subject, or engage with a group of people.

This project started with my wanting to replace the battery for my Sennheiser MB 660 headphones, but having later looked into other products, I realised this blog ended up covering some good ‘fundamentals’, and I’d like to think it goes a bit beyond just a teardown, and also explores what is going on inside, as well as some engineering tips and anecdotes along the way I’ve picked up from working at a bunch of very different companies.
It should also be said, as a ‘generalist’ much of my knowledge has been picked up from domain experts / enthusiasts over the years, so if you are one, please weigh in and leave comments, tips, and questions!
Top Tip on Repairing: Check if someone’s done this before, and gauge how hard this is going to be for you to repair.
Without spoiling some of the ‘punchlines’ of blog posts to come later on, this is actually where there is a fascinating tension between a Brand and the Right to Repair mindset... A YouTube Repair video has typically been something you only look at when things go wrong - but what if this were part of your purchasing decision upfront. [Marketeers in ESG/CSR/B-Corp/etc. - listen up!].
Chances are someone has uploaded a video of what you’re looking for if it’s a reasonably popular product in the last 10 years or so (or has a cult following)... I was not disappointed that someone had indeed uploaded a “Teardown” or “Battery Replacement” video for my headphones. Thanks “Oniyaki”!
This looked like a pretty reasonable repair job, with just screws and a bit of double sided tape. I have seen some more complex videos (e.g. Bose QC45s - and will come back to this later) which need tricky soldering, re-wiring, heat-guns, re-glueing, and much much more risk that you’d slip and damage something critical and irreparably damage the device. So even for me, there are some headphones models I’d honestly not attempt to repair - and hence with this knowledge - I’d also not buy them. [Yes, Marketeers, really!!]
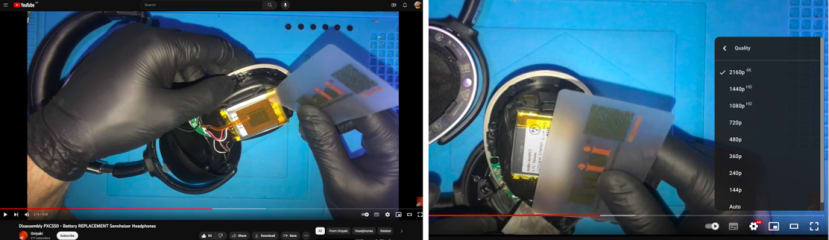
Pausing the video: This is where you can hopefully see a Serial Number, Model Number or SKU Number - anything that can be typed into google to find a replacement battery.
LiPo Battery Basics.
Below are close-ups of the removed original battery, (how to remove said battery comes later) and despite being a bit crumpled from removing from the sticky tape, they are not swollen or leaking, so after 6 years, this really is just a case of them ‘getting old’ and not working optimally. Anecdotally I’m told that anything beyond 3 years for a LiPo is pretty good.
Interestingly, I did find out later that the number “413645” can actually be decoded. I learned that from phoning up my Ex-Dyson buddy Don Robson (the mastermind behind the code of my RadioGlobe), who put me in touch with Andy Sinclair (Also Ex-Dyson), and who has considerable years of work with firmware and power management (including batteries) in consumer goods.
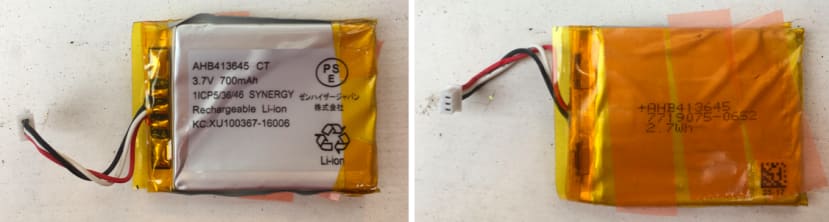
Above: Original Sennheiser Battery. Yellow 'Kapton' Tape used to secure and avoid shorting. JST plug, with 3 wires.
He told me that the numbers of LiPo batteries had a format:
The first set of numbers - 41 - were the thickness, but you divide by 10, so 4.1mm thick.
The next two sets of two numbers - 36 and 45 - were the width and length of the battery in mm.
The overall size includes the PCB, though this can be a bit extra (with tape/flex) so assume +1-2mm.
These are worth noting and checking to reject any blatant fakes that are not even the right size.
The typical ‘rated voltage’ of LiPo batteries is 3.7v, though when you hook these up to a multimeter, you often get closer to 3.9v or 4.0v. This is because 3.7v is a ‘Nominal’ voltage, and in fact a healthy LiPo can even get up to 4.1v - and this is exactly why you need some circuitry in your appliances to ‘smooth out’ any variations. Conversely, if you measure the battery voltage with a multimeter and find it to be less than 3.0v volts, this is generally speaking out of specification, and is a ‘dud’.
AdaFruit’s Lady Ada has written a very solid 101 primer on this here, and here, and it certainly helped my general understanding of the battery basics, and probably averted some accidents! Although it didn’t explain my ‘not charging properly issue’ - hence this Blog existing!
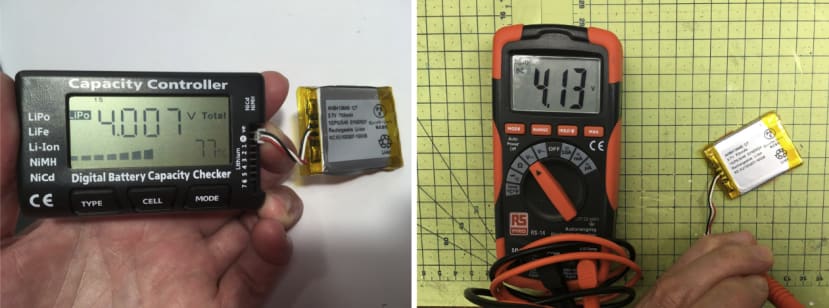
So I tested the voltage on the left image using a LiPo battery tester, (bit of a fudge to connect the Red and Black pins, but there you go!) I got readings of 4.0v and 77% charge. It’s worth noting this is only a ‘single cell’ LiPo, and if you have a ‘multi cell’, this is where the numbers from each ‘cell’ are indicated on the test contacts. In the second image, I double checked with a multimeter and got pretty much the same 4.0v reading.
Observing The Charging Fault.
So this left me in a bit of a puzzle as to why this battery was seemingly okay, but didn’t charge properly. The charging indicators were behaving in a weird way, as shown...
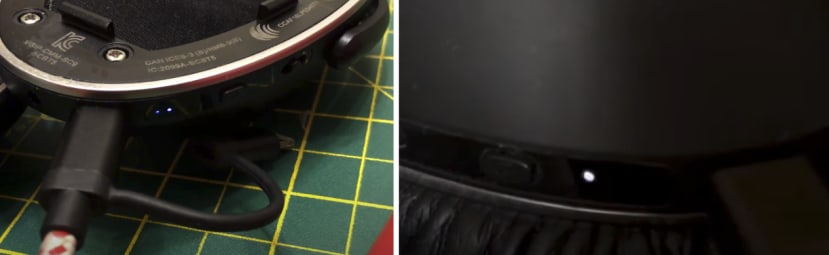
Above Left: For reference, the first video shows the headphones charging properly (which I took weeks later - when I fixed them in an unusual way). It has one steady light, then one flashing to charge the next ‘level/bar’ up, of which there are 5 in total. When fully charged, the lights ‘pulse/strobe’ and cycle through all 5 dots, then it shuts down.
Above, Right: In contrast, the second video shows the original fault / not charging properly: It begins with the first dot charging, then it jumps to strobe effect [from the manual ‘strobing’ means it’s fully charged], and then shuts down within seconds! When you go to use the headphones, they only last about 20-30 mins max.
Totally puzzled, I asked Dave Pike (from ConnectorGeek Ltd.) about this and we agreed I may as well try a 3rd party battery or two - as clearly with everything being so non-functional, there was not much to lose. I also have Dave to thank for encouraging me to turn this into a blog and pitching this to DesignSpark: We both felt this was a timely example of exactly how user repair service should not be done, but wanted to understand why it is like this for many appliances, and try to see the commercial perspective of why this is not as straightforward as it might seem. So the adventure began...
Quick Tip: I do recommend searching online in case someone has indeed already done the hard work for you! And you can then make a call on if you feel up to the challenge, or should see it on eBay for ‘spares and parts’ which is an often overlooked alternative to landfill, if you can be bothered.
Do you like what you read? Visit your profile and preference center to opt in to our DS newsletter and never miss great tech articles again!
Thought Piece: Repairing with Nothing to Lose. The Thrill of Trash to Treasure!
I think a great example of ‘Upcycling’ and lateral thinking mindset is the ‘Headless Macbook’ trend I’ve seen emerging, (thanks to Luke Miani)... and sometimes you have to hand it to the nerds who realise that a Macbook with *only* a broken screen for $60 on eBay, is in fact a crazy cheap desktop computer with a backlit keyboard and trackpad for $60, and only needs a screen - which you probably had anyway! (I even checked on eBay at the time of writing this and can confirm that circa. 2019 broken screen Macs for ~£80 do indeed exist, with some genuinely impressive specs - this is arguably a compelling alternative to getting my son a Raspberry Pi 4B 8GB for £75 to do his school homework on).
In summary, this is why I think communities like DesignSpark, Hack-a-Day and Instructables (do share any more good ones!) may well be the perfect kind of people to do more R2R hacks in future!
Above: Engineers to the R2R Rescue: Luke Miani’s “Headless” / Upcycled $60 High-Spec Desktop Mac!
But I digress (as I said I would)...
Back to Batteries.
Getting back to the task at hand - most YouTubers will have posted the specification / model number - usually with Affiliate Links in the Description also. Below is where I got to with said link...

However, as demonstrated here, Links go out of date and these were broken / ‘unavailable’ product links, not to mention Amazon-Italy, and I’m based in the UK, so getting comfortable with Serial Number and what it all means is likely essential for your repair, and probably like me, will help you with your day job in Design / Engineering!
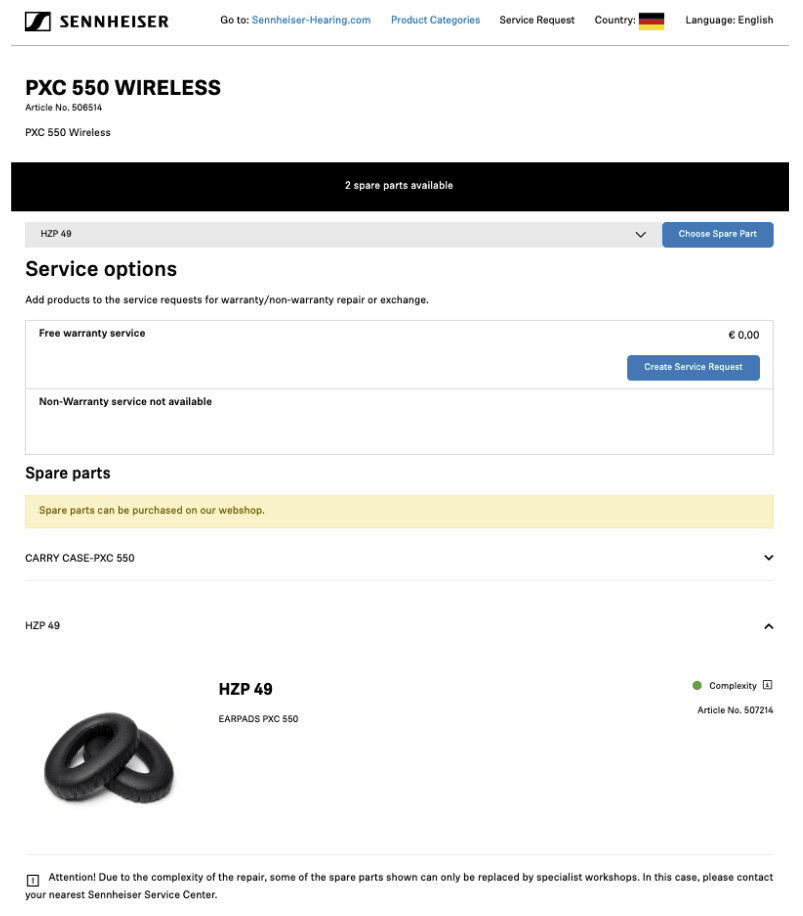
One also learns that the same headset can be called different things in different countries, so in the UK; it’s the “MB 660”, but more information was available on the US version (or SKU) called “PXC 550”. So it pays to do a search even if you think you know it all already.
Spares & Accessories - Nope!
In case you were wondering - I did look up the official website, to see what spares could be purchased, but no batteries were available, and indeed, even after emailing both Sennheiser and EPOS directly, they could not give a link or means to contact a 3rd party repair. Something which the new legislation looks like it is trying to redress, and make mandatory. Watch this space!
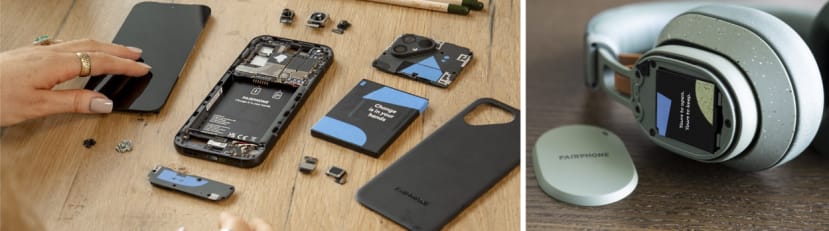
However, a counter-argument to this is Fairphone who is providing replacement batteries, against the status quo of most smartphones’ glued-on-screens!
And in case you hadn’t guessed where I was going, they also make Headphones (Fairbuds) now, but more on that later.
Can Modularity Be Commercially Viable?
Although I think it is laudable that Fairphone’s Fairbuds have replaceable batteries, it’s clear to anyone who’s old enough to remember user-replaceable mobile phone batteries, that Fairbud’s battery even looks like a mobile phone battery! For me this hints that Smartphones may well be the driver of such consumer goods changes as if the legislation closes loopholes and sets real penalties, this will be one of the most affected industries to see a need for change.
I think it may not be impossible that as Asia spins up its factories to make such batteries (again), these become a ‘go-to’ for product developers who naturally will pick similar OEM batteries which they can use in similar devices with comparative charge capacity / power consumption.
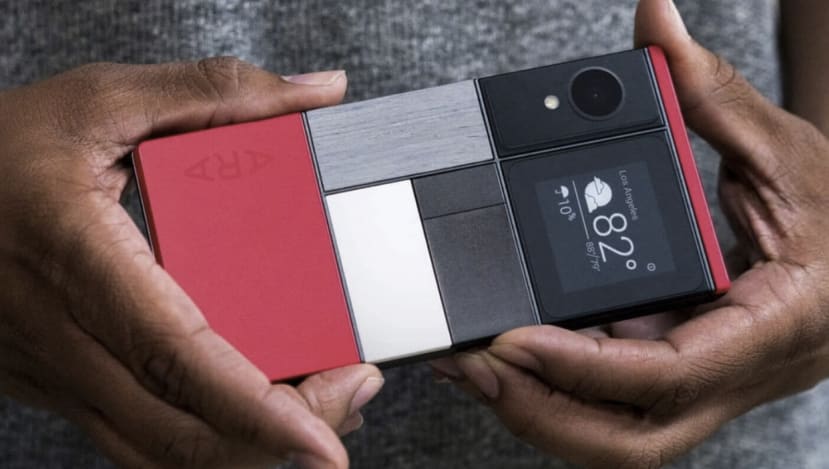
If you are interested in modular tech, I would recommend checking out PhoneBloks, as although Modu was arguably the first truly modular (and very small) small phone, it is arguably not a true smartphone, being more of a ‘miniphone’.
It is perhaps telling that PhoneBloks really got the public enthusiasm going, and I think quite reasonably took the offer at the time to partner with Google to scale the idea, and it became Project Ara in 2013. However, for one reason or another, Google pulled the plug and focussed on software. Yet all was not lost as this no doubt fuelled Fairphone (2015) to take perhaps a less ambitious route of ‘totally modular’ or ‘open canvass’, to instead go for an ‘upgradable modules’ approach - which perhaps, is why they are still going, and in my opinion are one of the few companies that have made sustainable alternatives that don’t feel like a disappointing alternative to say an iPhone, Samsung or a Nothing Phone. Arguably each is a statement for whichever user chooses their phone, but judging by various reviews, Fairphone certainly delivers fair quality tech performance, at a fair price, with the opportunity to update with ease.
Back to the task at hand...
This is where the hunt for 3rd Party Batteries really begins.
It is also why I called this blog series the ‘Fight to Repair’. Despite being a Chartered Engineer, my headphone repair journey has been far from easy! Indeed, it even feels like a kind of ‘Privilege to Repair’ - because as you will see, this quest to find a good replacement battery would end up costing me a good proportion of what a new headset would cost, and many reasonable people would just not bother, recycle/bin it, and get a new one.
So, the reason for going down this rabbit-hole was because:
- I was already doing some work on Lithium Battery tech (learning);
- I had wanted a reason to learn more about it for my own design projects (paying it forward);
- I pitched it to DesignSpark and they liked it (got paid / had some budget to do research);
- I was also hooked on the principle of not trashing this headset for want of a new battery!
So...Armed with my magic number of “AHB413645” as my Battery Serial Number and the specification of between 650-700mAh (the ideal capacity for this device) and 3.7v (typical for most LiPos), and a key detail that this battery has 3 wires (one being for a thermistor - more on that later)... I was now able to search on eBay, Amazon and AliExpress with a reasonable degree of confidence.
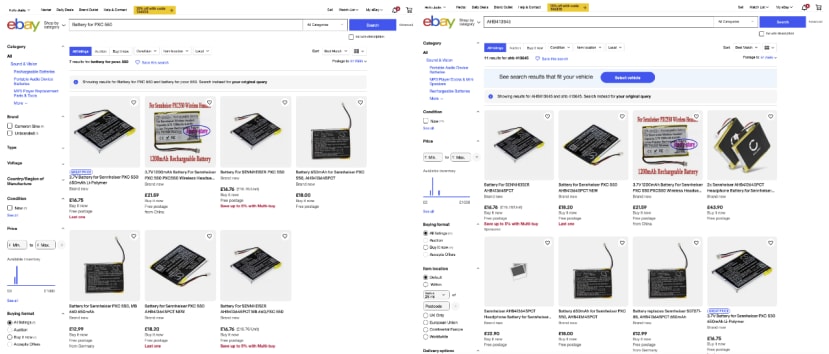
Above: eBay had good pricing and good vendor reviews, but no specific product / item reviews.
That said, if a 99%+ score is from a company that just sells batteries with many products shipped, this is not usually a terrible risk, but again, I need to be frank that this is far from accessible to the ‘general public’, and so remains a Fight to Repair for many.
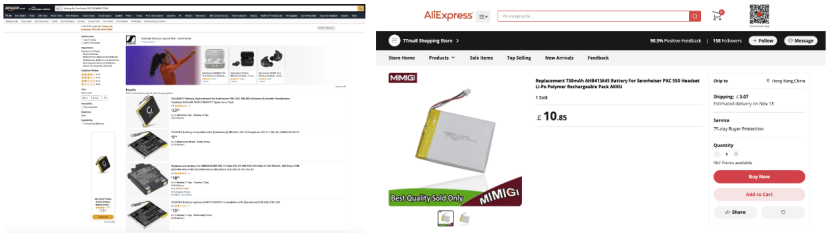
Above Left: Amazon may have a better review system, but bearing in mind these are plagued by ilegitimate reviews, you need to read them carefully to see if any sound credible. Again, it’s a bit of a risk.
Above Right: Ali Express (at the time of this project) was a new one for me, (late to the party!), but I’d heard good things, and gave it a shot. Delivery times are slow (UK is around 10 days I’ve found). Prices really are impressive, but like the others - quality is a risk.
That said, much on Amazon and eBay may well be ‘dropshipping’ via sites like this, so arguably this is perhaps no more of a risk than going through more familiar vendors such as Amazon or eBay!
I spent a little money getting ‘direct from China’ on AliExpress, as well as the one I’d bought on eBay previously. So I had a good collection of batteries to test out.
Next up was to disassemble and switch out the battery...
My Own Teardown.
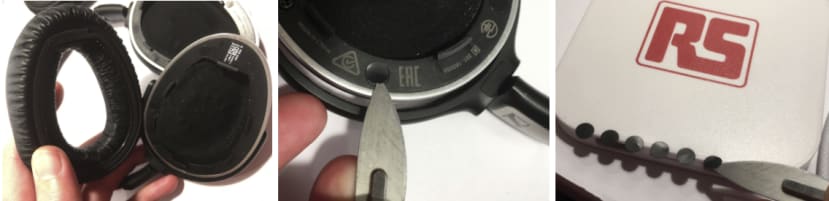
Pop off the headphone earmuffs by pulling the pads off away from the snap fits. There are ‘vanity covers’ in the form of stickers which conceal the main screws underneath. When removing it makes sense to put these on a plastic surface to avoid dust sticking to the adhesive.
In case you’re wondering, the earmuffs are relatively new, and Sennheiser did have these replacements for sale in Spares and Accessories, (just sadly no batteries!).
Unscrew 6 screws around the headset, and using your nails (or a spudger / plastic pry tool), separate the two halves. Take care not to wrench apart, as the cables inside are short and may snap if yanked. [For the keen eyed among you, I opened the wrong side first, and the battery was on the other side!]
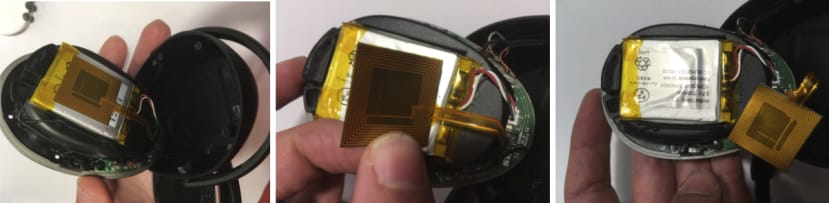
Gently separate the two halves, ensuring the wires are not wrenched. This orangey ‘square’ is a flexible NFC Aerial (although I initially thought this may have been a Capacitive Sensor - but this is on the other side).
A small digression; it may interest some readers to know that Capacitive Sense technology itself has been around for over half a century, with the Aladdin Lamp in 1954, and in what I feel is a very profound story, was later developed by E A Johnson into what became the first commercial Touch Screen in 1965. I say ‘profound’ because it was not a touch screen for a smartphone, but developed as a way to prevent human error in flight control centres - as complex flight codes could be pressed, rather than types in, on a keyboard, hence reducing error and deaths.
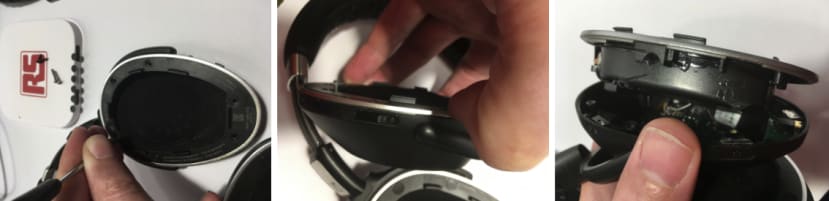
Anyway, carefully peel back the flexible NFC Aerial, which has double sided tape on the back. You can leave the ribbon connector attached, as shown.
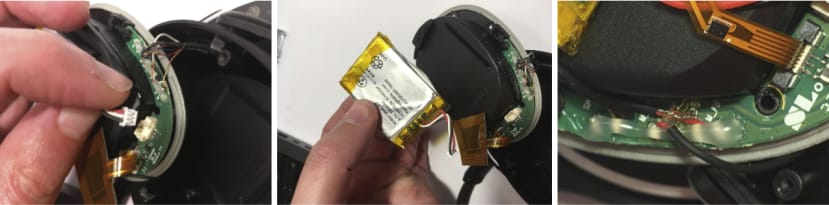
Carefully unplug the plug (a 1.25mm JST 3-pin connector) for the battery as shown. Ideally you can use a pair of plastic lab tweezers or even insulated plastic pliers if you have them... just take care not to short the red and black wires when using metal tweezers.
The battery should come out with some careful slow pulling away from the double sided tape. You can use a spudger or old credit/store card to help gently pry this away, but never use a sharp / metal tool, as this could puncture and possibly short the LiPo battery - causing a fire risk, either immediately or later.
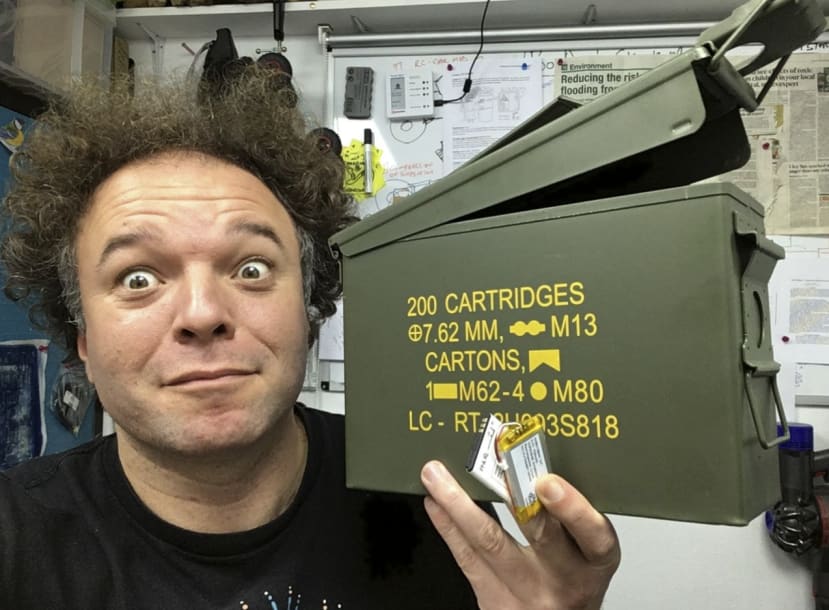
In fact, I used a Military Ammunition Box from eBay for about £15 as my box for ‘dubious LiPo batteries’, as these are of course explosion rated, and were stored outside, so hopefully wouldn’t burn my house down in the event of a thermal runaway through a fault.
Safety First
When exploring the workings on LiPo batteries, I should point out, I was wearing a safety visor throughout all these steps, not wearing synthetic (ie flammable) clothes, was able to escape outdoors easily, and had a bucket of sand and a fire extinguisher at hand! It sounds a little overcautious perhaps, but if you consider I’m replacing a battery which may be faulty, and having to bend/twist it a little to get it out, this could result in a rupture of gases, and potentially fire. Also be aware the gases from LiPos are extremely hazardous when burning (yet another reason this repair is only for engineers or industry pros!).

Switch-Out and Reassembly.
I now had a good selection of batteries, and after adding some replacement of the double-sided tape, to hold it in place (and ‘reduce vibration’, I was later told), I put them back in - taking care to note the polarity of the wires: As it turns out there are some 3rd party batteries (to be fair not claiming to be Sennheiser replacements, but with a similar 700mAh, 3.7v specification) which have Red and Black the other way around, so please do check small details like this, so you don’t fry your Headphones!
Good news is that you can either manually unplug the JST metal contacts and change them over, although this is certainly fiddly, as you need to lift the connections with a scalpel (if interested, see later blog for how to do this).

Battery back in, the step in reverse top put back together. Job done! Or so I thought...
When things don’t go according to plan.
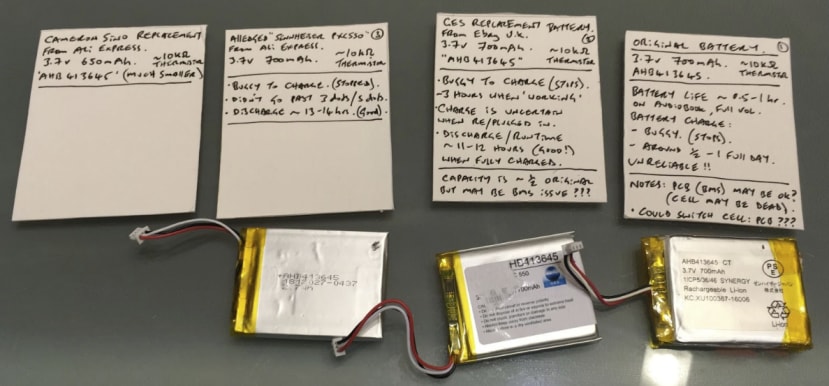
Here are some of the batteries I tested, and rather disappointingly, none of them really delivered close to what the original battery did in terms of life, with the best being around 11-12 hours playback (with noise cancelling on full). With that said, this is roughly half what it was when new (20 hours is Sennheiser’s specification), and far better than the impractically low 1/2 hour I had before.
However, what I did find with all of these batteries was that the charging is ‘buggy’. The same issue of charging for a bit, then registering that it’s full, then stopping, occurred again and again. Worse still I couldn’t observe any clear pattern between one third party battery or another.
As any Engineer knows, the only thing worse than an ‘unknown fault’, is an ‘unknown and intermittent fault’, meaning it’s going to be tricky to isolate one fault, but that it could be many and they may or may not be connected.
At this point, in my estimation, one of three things were happening:
- Either the batteries were ‘fine’, but the Headset was faulty.
(To give context, these are 6 year old headphones, and although not neglected or abused, have had fair wear and tear, sweat, light rain occasionally, and a few drops, etc. so this could be it). - The 4 batteries I had were all wrong in some factor I had not considered or was aware of. (Perhaps the Original Battery has a resistor or IC chip to ‘verify’ or ‘address’ it in some way).
- The Headphones themselves might have a particular profile of the battery characteristics that it ‘looks for’ in the Firmware and if it does not detect it - it shuts down / charges erratically.
(Please note, this is not necessarily a nefarious ‘planned obsolescence’ move by a company, it could also be for safety).
Some would say that I should cut my losses here, as in normal circumstances I’d have spent £10-£25 on a replacement batteries, and although I need to unplug/replug the USB cable to ‘force’ it to charge fully, it generally does after 2-3 attempts, which is tolerable, if not ideal.
For the sake of a thorough investigation and understanding more about how Lithium Polymer batteries work, and are integrated into products, I carried on further. Truthfully, I was interested to know if companies really do ‘chip’ batteries or products (like Printer Inks) to make it deliberately harder to self-repair, and if so, what are the legitimate reasons for this, besides financial gain?
For the avoidance of doubt, I’m also not insinuating or claiming Senneheiser did this, or even if they do that it is not without good reason - my aim is simply to try to understand more, and you can be the judge on whether this has ethical/design merit.
Writing for Discussion: Exposés vs Straw Men.
I’ve also found that writing for ‘provocation’ is also a way to start discussions with people who are actively working on the issues in question, but likely cannot go on record as a ‘company representative’.
I do not have to ask a Sennheiser engineer/designer “So... did you or did you not chip these headphones?”, which they will not be at liberty to say either way, but rather to speak to consumer goods designers/engineers in general to ask their thoughts on this, as a ‘Straw Man’ or ‘Talking Point”.
There are times when you need a hard-hitting investigative expose, such as VW’s DieselGate scandal, but this series of articles is more about opening a wider discussion on design for sustainability, a subject many companies are reviewing presently.
Next...

Contents:
Prologue:
Pre-Departure Notice - How an Attempt to Repair my Headphones Turned into a 3-Month Journey with a Grand Finale at the Recycling Centre.
Main Articles:
Intro - The Fight to Repair with Jude Pullen, for RS DesignSpark.
Part 1 - LiPo Battery Basics, Headless Laptops & Safety First.
Part 2 - Returning to Hong Kong, My Design Conspiracy Theories and Meeting Dr Lawrence.
Part 3 - Falling in Love With The Problem of R2R, Looria, and Pre-Purchase Reparability Considerations.
Part 4 - Ken Pillonel’s Ingenious iPhone Hack, and Repairability as a Disruptor.
Part 5 - Battery Post-Mortems with Andy Sinclair, Vapes, Dogmatism and Hacking My Headphones.
Part 6 - Legislation Loopholes, Eco Black Mirror, Chunky Fashion, and R2R Business Models and The Case for Standardisation.
Part 7 - Design, Engineering & Electronics Recommendations for R2R.
Encore:
Part 8 - Visit to End of Life Processing Plant - SWEEEP Kuusakoski Ltd
Part 9 - Interviews with Industry Experts on Right to Repair.
Contact: If you have any other questions, or would like to collaborate, please get in touch (link).
Disclaimer: This series has been created for discussion purposes and is not a 'how to' guide. Jude Pullen is a chartered engineering professional, and has sought additional expert advice alongside his endeavours to explore this subject safely. For additional information please see DS Terms of Use.