Raspberry Pi 3 Gets Click Convenience
Follow article
 Dave from DesignSpark
How do you feel about this article? Help us to provide better content for you.
Dave from DesignSpark
Thank you! Your feedback has been received.
Dave from DesignSpark
There was a problem submitting your feedback, please try again later.
Dave from DesignSpark
What do you think of this article?
Extensive range of Click boards can now be used with the Pi 3.
mikroBUS™ is an open standard from MikroElektronika, that specifies an add-on board and socket standard with pinout, silkscreen, board size and placement etc. Pin functions are specified for:
- Analogue I/O
- Reset
- SPI
- Vcc @ 3.3v
- Ground
- PWM output
- Hardware interrupt
- UART TX/RX
- I2C
- Vcc @ + 5V
In other words a set of connections that will support a wealth of add-on boards with all manner of capabilities, such as many different types of sensors, wireless modules and motor drivers etc.

A selection of Click Boards. Image source: mikroe.com
In use Click Boards are plugged into “shields” which enable interfacing with popular development platforms, such as Arduino, Beaglebone and now, the Raspberry Pi 3 (896-8660) .
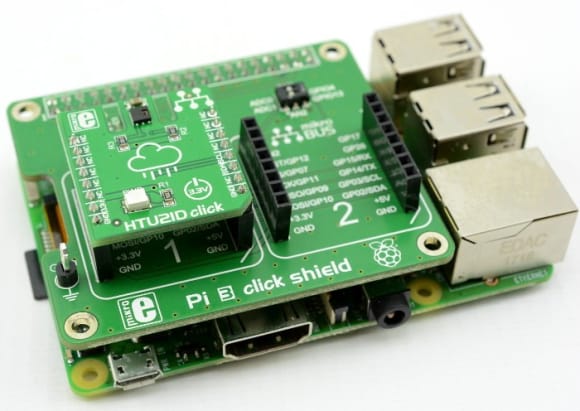
Pi 3 Click Shield
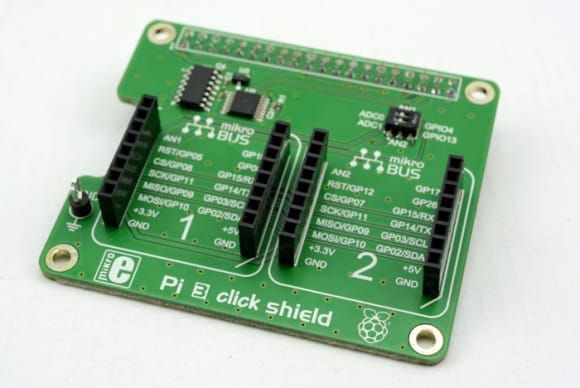
Click shields were created for the Pi 1 and 2 platforms — and you might rightly ask, “but don’t Pi 2 and 3 both have a 40-pin header with the same pinout?” And the answer to which is that, yes, they do. However, the Pi 1 shield could only accommodate a single Click board and while the Pi 2 shield could accommodate two, these had to be digital. Whereas the new Pi 3 shield can accommodate 2x Click boards that are either analogue or digital interfacing, thanks to an integrated dual-ADC.
It should be noted that in addition to the Raspberry Pi 3 model B, the Click Shield is also compatible with the 2 B, 1 A+ and B+. Furthermore, in addition to use with Click Boards, it’s also useful for when you just need to add a channel or two of ADC inputs for a Raspberry Pi.
Provided Examples
MikroElektronika’s LibStock website provides code examples for Click Boards, however, these are typically for microcontroller platforms and written in C/C++. Whereas the language of choice for the Raspberry Pi — and in particular when used in education — is Python. In recognising this MikroElektronika have created Python demos for 7 Click boards when used with the shield, which are made available both via LibStock and GitHub. The demos are for Click boards:
- 8x8 Click (923-5974)
- Accelerometer Click (882-8900)
- Colour Click (923-5999)
- LoRa Click (136-0767)
- Relay Click (820-9858)
- Signal Relay Click (136-0802)
- Weather Click (912-5170)
In addition, the ZIP file downloaded via LibStock contains a demo to read the onboard ADC. Presumably this will also make it onto the GitHub repository at some point.
Testing with HTU21D Click
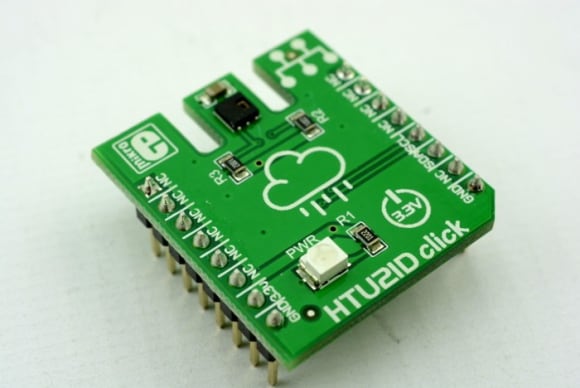
To try out the shield we took the HTU21D Click (862-4828) , which carries a high-precision relative humidity and temperature sensor; a board we previously used in the Internet Connected Greenhouse. With the hardware connected we next cloned the Greenhouse project repo.
$ git clone https://github.com/DesignSparkrs/connected-greenhouse.git
The Connected Greenhouse used an Intel Edison module for reading sensors and driving actuators, and a second Edison module for reading control panel switches and driving indicators. Everything was integrated using MQTT and Node-RED. The control system Python script, sensors-mqtt-pub, making a good starting point as this was responsible for reading the HTU21D and a lux sensor.
The first change we had to make was to set the I2C bus to 1, rather than 6 as used with the Edison. We then chopped out the importing of GPIO, MQTT and SMBUS libraries, since these were not needed, along with all the lines which dealt with the lux sensor, MQTT and driving status LEDs.
Soon we ended up with:
#!/usr/bin/python
# -*- encoding: utf-8 -*-

import sys
import time
import htu21d

# I2C bus, sensors and config, LED

bus = 1

temphum = htu21d.Htu21d(bus)
temphum.use_temperature = True

# Main loop

while True:
           try:
               temperature = round(temphum.temperature, 2)
               humidity = round(temphum.humidity, 2)
           except (KeyboardInterrupt, SystemExit):
               raise
           except:
               temperature = humidity = 0.00
               print "Failed to read HTU21D"

           print temperature, humidity

           time.sleep(1)
Upon executing the Python script the temperature in degrees Celsius and percent relative humidity were printed out to the terminal.

Final thoughts
The Pi 3 Click Shield is a neat way of adding a host of different capabilities to the Raspberry Pi, allowing you to quickly prototype new designs, and assemble fun projects with sensors, actuators and LoRa wireless etc. And thanks to Click Shields that enable support for other platforms, such as Arduino and BeagleBone, Click boards can be reused with these with minimal additional outlay.
Comments