Is it hot in here?
Follow project
 Dave from DesignSpark
How do you feel about this article? Help us to provide better content for you.
Dave from DesignSpark
Thank you! Your feedback has been received.
Dave from DesignSpark
There was a problem submitting your feedback, please try again later.
Dave from DesignSpark
What do you think of this article?
 The Engineering Edge Podcast - Keeping Bees Buzzing, looked at hive monitoring, now follow this project which uses a thermistor to gauge the temperature and in response, start a voice message, turn a fan on or off, and tweet about it.
Parts list
| Qty | Product | Part number | |
|---|---|---|---|
| 1 | OKdo Raspberry Pi 4 Basic Kit (UK) 4 GB | 200-7274 | |
| 1 | Microchip MCP3008-I/P, 10-bit Serial ADC Pseudo Differential, Single Ended Input, 16-Pin PDIP | 669-6064 | |
| 1 | Thingatron (https://www.rs-online.com/designspark/thingatron-1) | ||
| 1 | RS PRO Desk Fan 100mm blade diameter 1 speed 5 V dc with plug: USB | 135-8869 | |
| 1 | Mini travel speaker (https://www.ebay.co.uk/i/174388957610) | ||
| 1 | Breadboard Prototyping Board 80 x 60 x 10mm | 102-9147 | |
| 1 | MIKROE-512, 10 piece Breadboard Jumper Wire Kit | 791-6454 | |
| 1 | NTC THERMISTOR 10K 3% | 538-0654 | |
| 1 | RS PRO 10kΩ Carbon Film Resistor 0.25W ±5% | 707-7745 | |
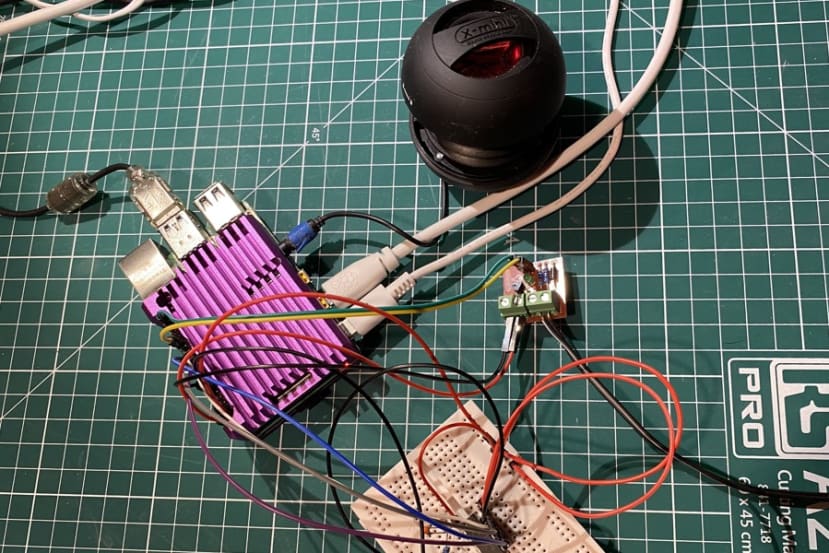
I don't have a beehive, but I do have a home - so I made my own sensor system. A thermistor gauges the temperature, and, if it's too hot, a Raspberry Pi turns a fan on and says "It is hot". As the sensors on the beehives were remote, I also got it to tweet a message - so I could tell how hot it is in my lab, without being there. If it gets cold, the fan turns off and again it says something and sends a tweet.
This project uses Node-RED to program the Pi.
I split this project into three parts, each building on the one before:
1) Thermistor, Pi and Fan
2) Speak the Result
3) Tweet the Result
Thermistor and Pi
This part describes how to use a sensor (thermistor) to control a load (fan). It also demonstrates using a function node to translate the data from the sensor into a human-recognisable value.
I used an analogue to digital converter to translate the readings from the thermistor to something the Pi can use.
This part of the project is broken down into three further steps:
A) Connect the thermistor to the Pi and get the results in a Node-RED debug node.
B) Use a Node-RED Function node to transform the thermistor reading to a human-recognisable figure in degrees Centigrade
C) Connect a fan to the Pi and switch it on and off using the data from the thermistor.
Parts explained:
Thermistor: (see picture below) These are low-cost temperature sensors and are used, for example, in fire alarms. Their resistance decreases as the temperature increases. At low temperatures, the resistance of a thermistor is high and little current can flow through them. At high temperatures, the resistance of a thermistor is low and more current can flow through them. The output is only linear over a small range. The datasheet will provide more information.

Resistor: This is to act as a potential divider for signal conditioning - this is explained in "What inputs can I use with my Raspberry Pi? Part 2 - Proportional sensors"
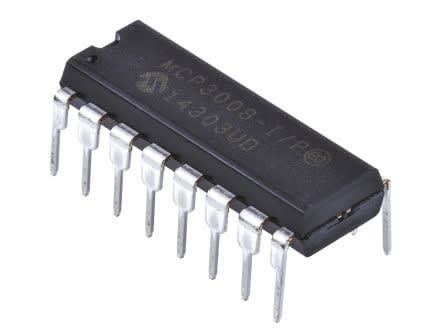
MCP3008 Analogue to Digital Converter: (See below) This chip can be used to convert the analogue sensor readings from the thermistor to a digital signal - which the Pi can then use.
Step A
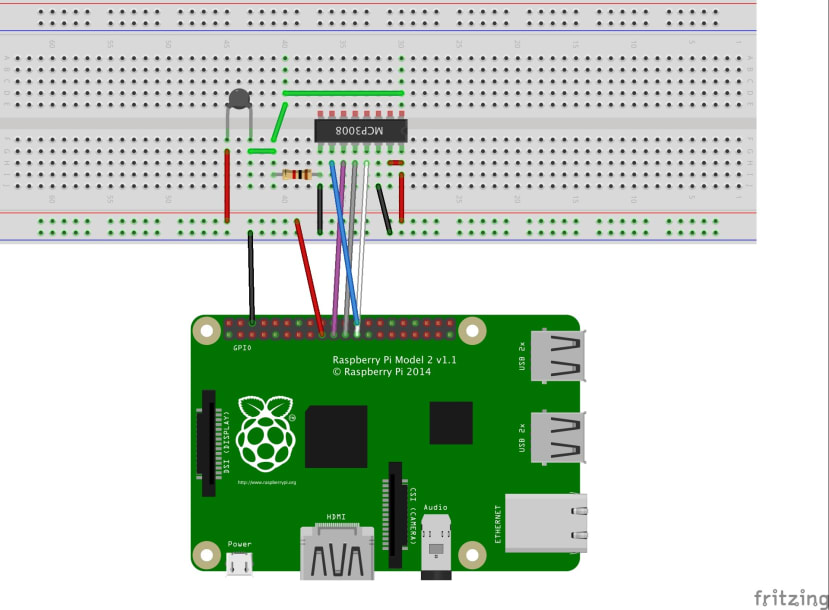
a) Wiring the Parts
As always, it is advisable to wire the connections before powering up the Pi.
| MCP3008 (pin) | Wire Colour | GPIO Physical Pin | Other |
|---|---|---|---|
| VDD (16) | Red | 1 (3V3) | MCP3008 VRef (15) |
| VRef (15) | Red | 1 (3V3) | n/a |
| AGND (14) | Black | 6 (GND) | n/a |
| CLK (13) | White | 23 | n/a |
| Dout (12) | Grey | 21 | n/a |
| Din (11) | Purple | 19 | n/a |
| CS/SHDN (10) | Blue | 24 | n/a |
| GGND (9) | Black | 6 (GND) | Resistor |
| CH0 (1) | Green | n/a | Thermistor AND Resistor |
| n/a | Red | 1 (3V3) | Thermistor |
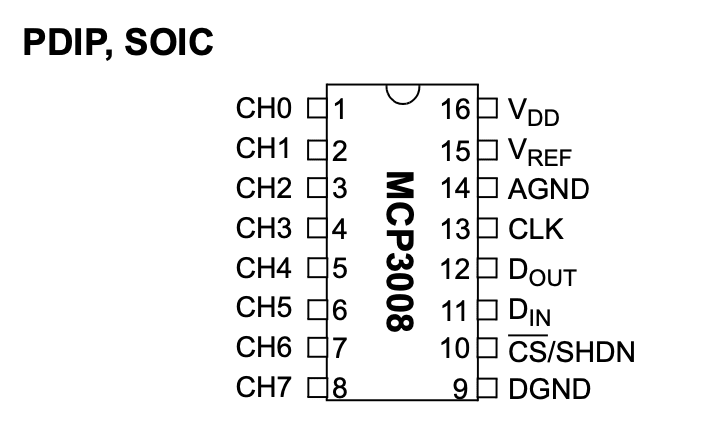
The datasheet for the MCP3008 (e.g. Microchip MCP3004/3008 gives a diagram of which leg of the chip is which. There will be an indentation or ink blob on the chip to mark the end where Pin 1 is.
It does not matter which way round the thermistor is connected, as long as one leg is connected to both the MCP3008 CHO (Pin 1) and also the resistor, and the other is connected to 3V3.
Likewise, it does not matter which way round the resistor is connected, as long as one leg is connected to both the MCP3008 CHO (Pin 1) and also the thermistor, and the other is connected to GND.
b) Install Node-RED
Note: DO NOT USE THE 'RECOMMENDED PROGRAMS' link on the Pi menu, instead go to the "Running on a Pi" section at https://nodered.org/docs/getting-started/raspberrypi and follow the instructions there - use the code:
bash <(curl -sL https://raw.githubusercontent.com/node-red/linux-installers/master/deb/update-nodejs-and-nodered)And say "Yes" to installing the Pi Nodes.
Wait a long time
Once it is installed run the code:
sudo systemctl enable nodered.serviceThis will make Node-RED automatically start every time the Pi boots up.
You can then go to a browser and type in localhost:1880 to access Node-RED
c) Install the node-red-node-pi-mcp3008 node
To be able to read from the Analogue to Digital converter, we need a Node-RED node. Fortunately, one is already made, but it is not in the default palette.
You can install the node-red-node-pi-mcp3008 node using the “manage palette” option in Node-RED (It is also possible to install it using npm, but “manage palette” is recommended.)
First, check the prerequisites on the website:
As of November 2020, this means we need to enable the SPI on the Raspberry Pi.
You can do this by clicking on the Raspberry Pi (top left corner), Preferences, then Raspberry Pi Configuration. Select the Interfaces tab and ensure SPI is enabled.
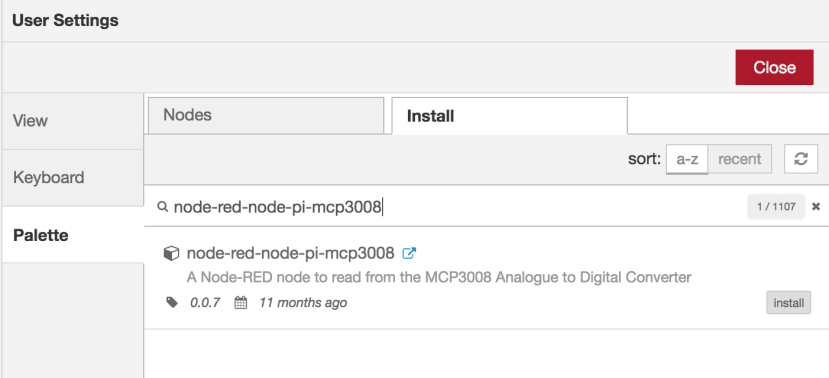
Then in Node-RED, click the menu, then Manage Palette and then the Install tab.
In the box next to the magnifying glass, search for “node-red-node-pi-mcp3008”. Click the small “install” button to the right of the “node-red-node-pi-mcp3008” selection. Follow the on-screen instructions.
The node will now appear in the node menu palette in the “Raspberry Pi” section as “A/D Converter”.
d) Write the Node-RED flow
Drag into your flow an inject node and an A/D converter node and connect them together. Connect a debug node to the output side of the A/D converter node.

Inject node
Double click the inject node, change the payload to type “string” and put a 0 in the payload box. This is to tell the A/D converter node to look at Channel 0 on the MCP8003 chip.
Change the “Repeat” from “none” to “interval” and change the interval to “every 10 seconds”. This means we will get a reading from the thermistor every ten seconds.
Tick the “inject once at start” button and click “Done”
A/D converter node
Double click the A/D converter node and change the Input pin to “A0”. The Device ID should be CE0. Click “Done”.
Debug
Click the “Debug” tab on the right-hand side (under the Deploy button) Then click deploy.
A number should appear every ten seconds. This will be a number between 0 and 1023, depending on the temperature.
Grasp the thermistor with your fingers. The number should rise (assuming the ambient temperature is cooler than the temperature of your fingers!). When you let go, the number will drop again.
Switch
Now put a “switch” node between the A/D converter node and the payload. Change its name to “Hot or Cold?” Select from the drop-down menu and change “==“ to “<“ and select a number that’s less than the figure you got when you held the thermistor, but warmer than the ambient number. Add another rule (by clicking the “add” button on the bottom right) and change the “==“ to “otherwise“.
You will see there are two output pimples on the switch node now. We need a separate debug node on each.
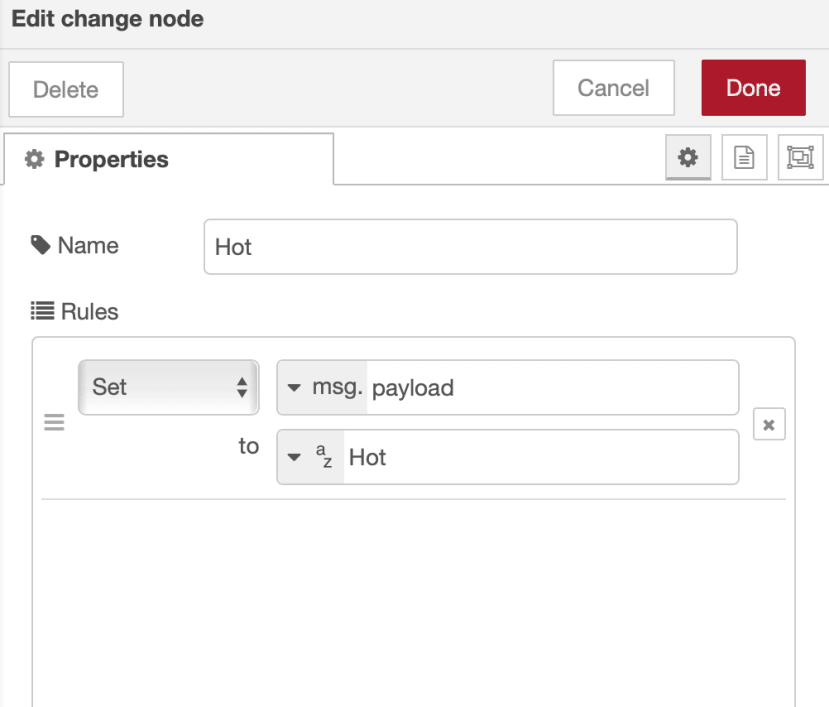
Now add two “change” nodes. Put these between the switch and the debug nodes.

Change the name and the payload on the one connected to the “<“ pimple to “cool” and for the “Otherwise“ pimple to hot. Deploy.
The debug tab should now say “Hot” when you hold the thermistor and “Cool” when it cools again.
Now we can add the fan.
e) Connect the Fan
Make an open collector driver, as described in The Thingatron Project and connect it to the breadboard and Pi.
The fan is the load and the 5V supply from the Pi is the power for the load (and not a battery).

(Note: the wiring of the Thingatron is not listed in the table below see The Thingatron Project )
| Wire Colour | Raspberry Pi Physical Pin | Load (Fan) |
|---|---|---|
| Red | 1 (3V3) | |
| Red | 1 (3V3) | |
| Black | 6 (GND) | |
| White | 23 | |
| Grey | 21 | |
| Purple | 19 | |
| Blue | 24 | |
| Black | 6 (GND) | |
| Pink | 2 (5V) | |
| Orange | 35 (GPIO19) | |
| Yellow | n/a | -ve on Fan |
| Green from Load | 2 (5V) | +ve on Fan |
Note: Using a breadboard for electronics is great for prototyping and making sure something works, but for a more robust solution, solder the components on to Veroboard or a custom-designed PCB.
f) Add the fan to the Node-RED flow
Add a Raspberry Pi Output Node (rpi gpio out). Set the pin to GPIO19-35 and initialise the state of the pin to low. Insert two more change nodes to the flow, and connect them to the Raspberry Pi Output Node. Change the message payload on one change node to “0” and name it “Off” and the other to “1” and name it “On”.
Connect the input of the “Off” switch to the output of the “Cool” switch. Connect the “On” switch to the output of the “Hot” switch. Add a Raspberry Pi GPIO Output Node to your flow, and select physical pin 35 and name it “Fan” Connect the “On” and “Off” switch nodes to the Raspberry Pi GPIO Output Node.

The fan should now turn on when it is hot and turn off when it is cool.
g) Transform to human-recognisable temperature
We could leave the project here - but here's a nice extra step ...
The thermistor sensor’s resistance changes with a change in temperature. The output from the sensor is given as a value between 0 and 1023.
We could just use this value, as we did above. However, we can also write Function Nodes (in Javascript) to change this value to a voltage and another to calculate the resistance of the thermistor at that moment. Finally, we can use a Function node to change that resistance to a temperature in Degrees C.
These nodes are described here: Getting a human-understandable value.
I can now put temperature values into the "Hot or Cold" change node - and switch the fan on if the temperature is above 24 Deg C (for example) and off if it's below that.
The Node-RED flow to this point is:

Speak the Result
Now the thermistor is giving me good results, I can now get the Pi to say if it's hot or cool. For this, I used a travel speaker that plugs directly into the audio jack of the Pi, and e-speak.
The set up for this is described here.
The string you want the Pi to speak must be in quotation marks in the inject node msg.payload, so put two more change nodes each after the hot and cool change nodes. Make this change the payload to "It is hot" and "It is cool". Connect both of these nodes to an exec node.
In the exec node:
Command: espeak
+Append:
msg Payload (tick)
--stdout | aplay
Output: when the command is complete - exec mode
Deploy and click the inject node. If the words are coming out of your monitor (via HDMI) you may need to right-click on the speaker on the menu bar, and select "analog" to force the sound to the audio jack. Also, note to self: make sure the speaker is plugged into Pi and turned on.
This does get a bit annoying when the temperature is not changing but it keeps telling you it is hot / cold, so an rbe node inserted before the exec node means it will only speak if the input ("It is hot" or "it is cold") changes.
Tweet the Result
This used the project Twitterbots are us to insert a Twitter output node after rbe node.

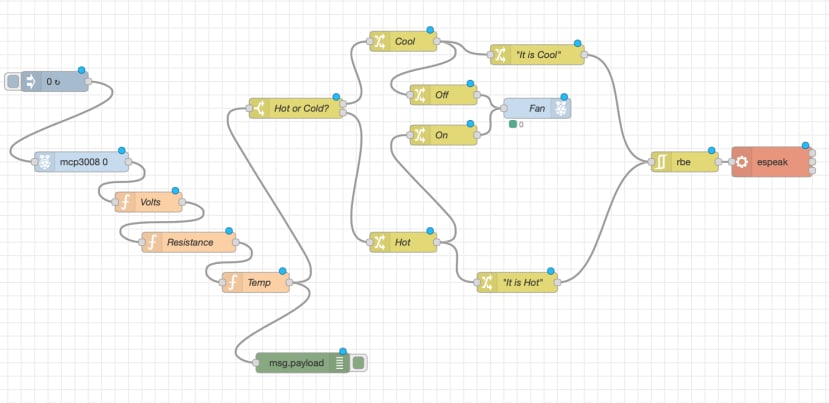
The final Node-RED code of the complete project is:
And the final result was heard on The Engineering Edge Episode about bees, which can be listened to again here!
Comments