Getting a human-understandable reading from a sensor.
Follow project
 Dave from DesignSpark
How do you feel about this article? Help us to provide better content for you.
Dave from DesignSpark
Thank you! Your feedback has been received.
Dave from DesignSpark
There was a problem submitting your feedback, please try again later.
Dave from DesignSpark
What do you think of this article?
 The output from sensors are often just a number between 0 and 1023. This project uses Node-RED functions to change that to a human-readable resistance, voltage or temperature - use whichever parts apply to your project.
Parts list
| Qty | Product | Part number | |
|---|---|---|---|
| 1 | OKdo Raspberry Pi 4 Basic Kit (UK) 4 GB | 200-7274 | |
We can write a Node-RED Function Node (in Javascript) to change the value from a sensor to a voltage, and another Function Node to calculate the resistance of the sensor at that moment. Finally, we can use a third Function node to change that resistance (in the case of a thermistor) to a temperature in Degrees C.
With thanks to James Macfarlane and Andy Stanford-Clarke for the help with the Javascript code.
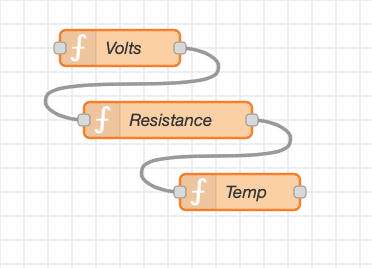
The three steps are split in to three different function nodes (“Volts”, “Resistance” and “Temperature”), so you can re-use any of the parts which apply to your projects. However, you could put it all together in to one function node.
You do not have to understand the calculations or the Javascript programming to be able to use these function nodes - you can just copy and paste them in to your flows.
You can use the first two function nodes for many different types of sensor. Be sure to put the correct values of steps and Vref into the “Volts” and the resistance of the resistor used as the potential divider in the “Resistance”.
The final node “Temperature” is specific to the particular thermistor used and all the information will be given on the data sheet.
Then copy the code and import it by:
In the Node-RED flow page click on the Menu (three horizontal lines at the top right)
Click Import
Click Clipboard
Paste the flow into the grey box
Click Import
Click somewhere on the flow screen (white area in the middle) to drop the code. Click Deploy
Code to import in to Node-RED:
It will paste three nodes like this:

Or you can add each code to each Function Node yourself - link the output of the Voltage one to the input of the resistance node, and the output of the resistance node to the input of the temperature node:
Function Node Content for Voltage
var n=msg.payload;
const steps = 1023;
const Vref = 3.3;
var Vadc = Vref * n / steps;
msg.payload = Vadc;
return msg;
Function Node Content for Resistance
var Vadc=msg.payload;
// Vin is the voltage from the ADC.
// R1 and R2 must be in same units (e.g. K or ohms)
const R2 = 10e3;
var R1 = R2 * (3.3/Vadc - 1);
msg.payload = R1;
return msg;
Function node Content for Temperature
var R1=msg.payload;
const A1 = 3.354016e-03;
const B1 = 2.569850e-04;
const C1 = 2.620131e-06;
const D1 = 6.383091e-08;
const Rref = 10e3;
var k = R1/Rref; // We make a substitution here to simplify things.
var T;
if (k > 0) {
 T = 1.0 / ( A1 + B1*Math.log(k) + C1*Math.pow(Math.log(k),2) + D1*Math.pow(Math.log(k),3) );
} else {
 T = 0.0;
}
var Tc = T - 273.15 // Turn from Kelvin into degrees C
msg.payload = Tc;
return msg;
You just need to add an input at the front of the Voltage node, and a debug node (or thing you wish to control) after the final node. I often use a switch node here, so I can say if it's below a certain value do a, if not, do b.
And there's your human-readable sensor reading!