Start Enabling Machine Vision: For When The Machines Rise Up Against Us
Follow article
 Dave from DesignSpark
How do you feel about this article? Help us to provide better content for you.
Dave from DesignSpark
Thank you! Your feedback has been received.
Dave from DesignSpark
There was a problem submitting your feedback, please try again later.
Dave from DesignSpark
What do you think of this article?
For those of us who have been around the block more than once, our first conscious introduction to the concept of machine vision was probably in the original Terminator movie when we were treated to the red-hued, augmented-reality perspective of the T-800 Terminator.

In this view, we could see the Terminator acquiring image data, processing it in real-time and making decisions based on salient information extracted from the data stream. Interestingly, those who were quick (and were familiar with the instruction set, from programming their Atari 800 [or in this case, Apple II]) could spot that the T-800 was running through 6502 assembly code. Thinking about it: that is probably why the machines became self-aware in the first place. Note to dodgy military hardware contractors: If you are going to develop killer robots with neural-network CPUs that are capable of learning, don’t give them access to their own source code – of course they are going mess with it! At the very least, take out the comments and obfuscate the code; I mean, this is chapter one of ‘Evil Programming for Dummies’ stuff…
But I digress. The point I was getting to was that the Terminator did have all the components of a real machine vision application in that it had stereoscopic image acquisition from the eye cameras (complete with adjustable optics and multispectral imaging) which would allow depth perception across the full range of distances and low visible-light operation. Digital image processing techniques were then employed in the neural network ‘learning computer’ to extract the required information from the environment that would allow the Terminator to make decisions that could be acted upon by the ‘living tissue over hyper-alloy combat chassis’. Not all that far removed from a self-driving car then, really.
Of course, the Augmented Reality (AR) overlay on the image data would not be needed by the Terminator itself – that was there for us, the audience – but it was rather prescient of that other direction in machine vision technology and how AR glasses might be used in the near future to supply extra context data about the environment to people forced to operate in meatspace. The obvious first adopter for this kind of display is the military, who have been using AR in the form of heads-up displays (HUDs) in aerospace operations for many years, and may want to extend its benefits to infantry forces. However, there is a balance to be determined when presenting information, to prevent enhancement becoming a dangerous distraction.
All that aside, until recently, putting together the optics and frame grabber or camera with a processing unit capable of real-time image processing for a machine vision application was prohibitively expensive and unless you had your own well-funded research lab, industrial automatic inspection or industrial robot guidance were where you were most likely to find this gear. The good news is that low-cost machine vision is something you can get your paws on now and we didn’t need the Terminator’s “Judgment Day” nuclear apocalypse in order to get it.
Introducing the Intel® RealSense™ ZR300
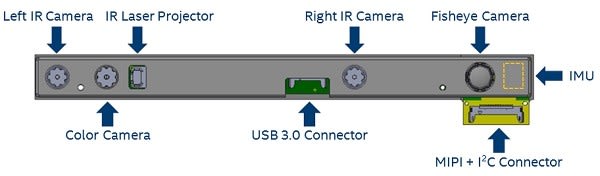
The ZR300 camera is a bit like having your own computer imaging lab attached to your Intel Joule™ as it is jam-packed with goodies. Connecting to the imaging ASIC embedded in the unit is:
- a full HD 1080p RGB colour camera
- a left and right VGA (640 x 480) IR camera pair for stereoscopic imaging
- an IR laser projector (to help determine depth of field in low texture scenes; i.e. those with large flat surfaces, like interior walls)
There is also:
- a VGA (640 x 480) monochrome fisheye camera
- a six degree of freedom (6DoF) inertial measurement unit
- timestamp synchronisation to a 50µs reference clock
Inside the ZR300 casing, these features are laid out like this:
What all this means is that, with one unit, you can implement applications for:
- object recognition, localisation and tracking
- person recognition, tracking and gesture recognition
- 6DoF Simultaneous Localisation And Mapping (SLAM)
Basically, everything you need to start building your own Terminator vision system – the living tissue over hyper-alloy combat chassis is not supplied, so you will have to source that yourself. Mind you, I’m not sure where a Terminator’s USB 3.0 connector is hidden…
Connecting The ZR300 To Your Intel Joule
What we can easily connect to, as we mentioned before, is an Intel Joule. This gives us access to some great sample software that makes use of Intel’s RealSense Object Library, Person Library and SLAM library APIs for the ZR300. These provide a prodigious ‘quick-start’ to any robotics project that needs to be aware of its surroundings (so that it can operate autonomously in that environment) and/or needs to be able to recognise any objects or people that it is likely to encounter.
Assuming you have read my previous post, you will have a pretty good idea of how to set up your Intel Joule to run Ubuntu 16.04 LTS. This time round though, we need to make a hardware mod and a BIOS mod to get our imaging projects going.
Hardware Mod
The image processing applications that we will be running are pretty compute-intensive and will get your Atom processor rather hot under the collar without changing the passive heatsink that comes with the kit for an active cooling solution – i.e. a heatsink with a fan. Once you have installed this mechanism, making sure that the airflow is downward into the heatsink to force the air out across the vanes, you will be ready to hook up the rest of the gear which includes:
- The ZR300 – connect this to the USB A connector on the Joule dev board using the USB 3.0 cable included with the ZR300 kit. The back of the ZR300 has a magnet allowing you to attach 2 different fittings that come with the camera kit, one of which is a block to allow you to set the ZR300 on a standard camera tripod. There are also fixing screw holes to allow you to attach a bracket that is also included in the kit (see images below)
This time round, we will be connecting our powered USB hub (for the keyboard, mouse and any other USB peripherals) into the USB-C Connector, meaning that we will need a standard USB A to USB C adapter of some form, which is not supplied as part of the kit. - For completeness, I will add that you will also need the correct cabling (852-5352) and/or adapters to allow you to connect your monitor to a micro HDMI connector on the Joule board and you will need a power supply (018-8769) that can deliver at least 3A at 12V.


BIOS Mod
Once we have the hardware setup, we will need to turn up our power all the way to 11 – well, 8 actually as we set up the power limit in BIOS:
- On power-up, before Ubuntu starts to load, hit the [F5] key to get us into the device manager of the BIOS.
- We follow the menu tree: System Setup > CPU Configuration > CPU Power Management
- Once there, make sure that ‘Power Limit 1 Enable’ is set as <Enabled>:
- We then move down a couple of places and set the ‘Power Limit 1 Power’ to ‘ludicrous speed’, otherwise known as 8:
- Finally, we save these settings and reboot to open a whole new vista of fun


Installing The RealSense SDK
With those mods done, we are nearly ready to rock n’ roll. All we need to get on board now is the SDK with its sample software.
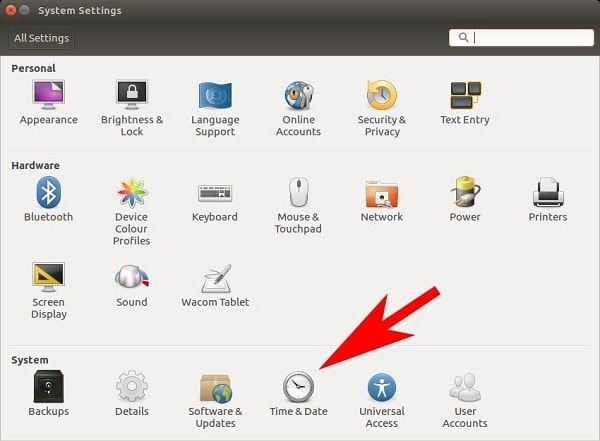
Time
First off though, you will need to make sure your Joule is set to the right time for your locale. The Joule doesn’t come with a real-time clock battery so you would normally set up Ubuntu to automatically update the time and date from the internet during installation. The easiest way to make sure this is the case for your Joule is to click on ‘System Settings’ which is usually the last default icon on the launch bar. At the bottom of the System Settings window (under ‘System’) is ‘Time & Date’:
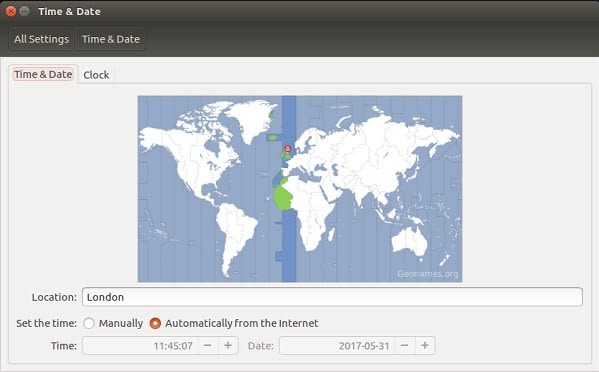
Click on that and make sure you have the ‘Automatically from the Internet’ radial button set for the ‘Set the time’ property:
Of course, if you have an uncontrollable urge to set the time manually, you can do that from this window or in the command line with a format like this:
$ sudo date –s “13:20 7/31/2017”
This command will also tell you what day a particular date in the future will fall on if you happen to set that date…
Repository
The next step is to add the RealSense repository to the Ubuntu package manager:
$ echo 'deb "http://realsense-alm-public.s3.amazonaws.com/apt-repo" xenial main' | sudo tee /etc/apt/sources.list.d/realsense-latest.list
$ sudo apt-key adv --keyserver keys.gnupg.net --recv-key D6FB2970
$ sudo apt update
Install Runtime and Samples
To do this we simply install the package from the repository we just added:
$ sudo apt install librealsense-samples beignet-opencl-icd
While we are at it, we may as well install the camera access utilities:
$ sudo apt install librealsense-utils
With this installed, we can preview the live video streams from each camera on the ZR300 by using:
$ cpp-capture
Finally, we can install the RealSense SDK so that we can develop our own apps:
$ sudo apt install librealsense-object-recognition-dev librealsense-persontracking-dev librealsense-slam-dev
..and clone the sample software from Github so we can check out the source code to see how these examples were put together and build them ourselves. Start by installing Git and other prerequisites:
$ sudo apt install git cmake libjpeg-dev libopencv-dev
It is usually already installed, but you may need to add build-essential to the install list above if you find yourself unable to compile the sample software. Next, we clone the samples from Github. I put this into a new folder called ‘Projects’:
$ mkdir Projects
$ cd Projects
$ git clone http://github.com/IntelRealSense/realsense_samples
$ cd realsense_samples
If you want, you can then build the examples:
$ mkdir build
$ cd build
$ cmake ..
$ make
Once the build has finished, we can plug in our ZR300 and we are ready to work machine vision magic.
Sample Software
The complete set of sample software has been pre-built from the RealSense SDK (you will find these executables in /usr/bin) so you can just run these without building everything yourself. These executables have rs_ prefixing each example name: for instance, the precompiled executable for the ‘slam_tutorial_1_web’ example is ‘rs_slam_tutorial_1_web’.
If you do build these examples yourself, you will find each shiny new executable in the folder containing the source code for that example, under the ‘build’ folder. So in my case, the ‘slam_tutorial_1_web’ executable will be found in: /Projects/realsense_samples/build/samples/slam_tutorial_1_web.
There are separate sets of samples that make use of the Object Library, Person Library and the SLAM Library. Each sample set starts with a basic tutorial application that shows how to use the library functions in anger. Following on from this, subsequent tutorial apps build on what was shown before so that by the end of the sample series for each SDK library, some pretty involved machine vision or spatial awareness computing is going on. The libraries, and therefore the sample software examples, are all written in C++.
It’s beyond the scope of this article to go through the examples, but what we can do is take a brief look at a multi-mode example that brings together many of the ZR300’s resources in one web-browser based application. This should give you a taste of what you can jump straight into on your first day with the ZR300 attached to your Intel Joule.
slam_or_pt_tutorial_1_web
This example displays a live stream from the colour camera and from the fisheye. At the same time, the web page output in the browser will display a SLAM occupancy map of the area along with input and tracking FPS (frames per second) data for the fisheye camera, the depth camera the gyroscope and accelerometer.
The source code for this is in /realsense_samples/build/samples/slam_or_pt_tutorial_1_web
We can start the pre-built executable for the example from the command line from any directory using:
$ rs_slam_or_pt_tutorial_1_web
This will start a web server that you will then need to manually connect to a web browser:
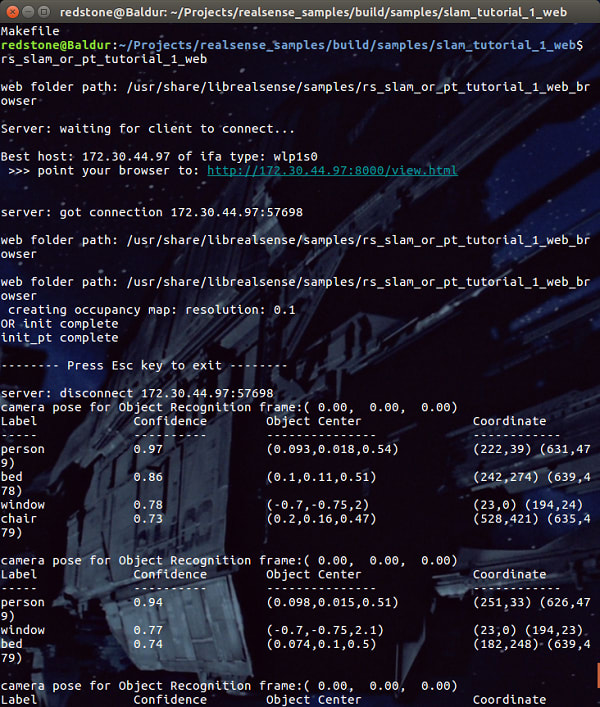
If you put your mouse over the highlighted web address (http://172.30.44.97:8000/view.html in our image above) and right click, you can select ‘open link’, in the menu that comes up, to open this address in your default browser.
Once the server has a client, the example will set about identifying objects and reporting those objects in the terminal. At the same time, the live feeds will go to the web browser and so will the map data from SLAMing the locale in front of the camera (the big map to the top left). The data rates for the sensors are reported in the top right of the browser. The ZR300 will keep feeding data. It can't be bargained with. It can't be reasoned with. It doesn't feel pity, or remorse, or fear. And it absolutely will not stop... ever, until you hit [Esc] or [Ctrl] C in the terminal.
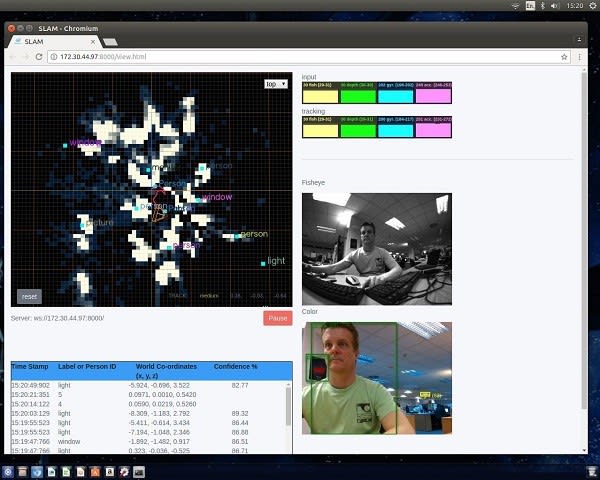
SLAM Map
This is built up as you move the camera around. There is a ‘cone’ that shows the field of view for the camera in real time and in 3D – so as you move the camera in space, the cone will move around too. The map builds up where obstacles are in front of the camera (the grey, blotchy looking areas on the map) and also places where each object that has been identified (from the colour image feed) can be found in space. This is done in 3 dimensions as you can see from the map in the next image:
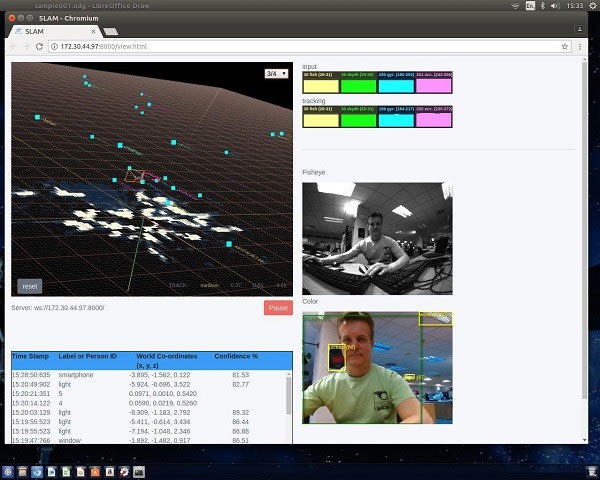
Object Recognition
At the same time as it is making up the SLAM map, the software is matching what it sees in the colour video feed with its object library and determining a percentage confidence that it has accurately identified (and labelled) each object. At the same time, it is determining relative coordinates from itself for where the object is to be found.
The source code from this and the other examples make a great start point for your own object, person and facial recognition applications and/or applications that require the system to gain a knowledge of the surrounding area.
Conclusion
In terms of the technology required for a Terminator to find its way around, the future is already here. Skynet won’t even have to worry about talking to the finance department: for anyone serious about machine vision, the Intel Joule and ZR300 combo are cheap enough that maker clubs with small budgets will be able to afford them – let alone multi-billion dollar evil computer systems.
As if that isn’t enough, there are loads of examples to get Skynet up to speed quickly as well as a support community if ‘netty gets stuck on some particularly pithy problem like identifying a phone book and tearing out the page with all the “S Connor” entries – after all who has an object library for a phone book? No-one has seen one in decades!
Comments