The power-packed Intel® Joule™
Follow article
 Dave from DesignSpark
How do you feel about this article? Help us to provide better content for you.
Dave from DesignSpark
Thank you! Your feedback has been received.
Dave from DesignSpark
There was a problem submitting your feedback, please try again later.
Dave from DesignSpark
What do you think of this article?

Intel is no stranger to the development kit market – the SD card-sized Edison (833-0891) is a prime example – but with the Joule, Intel is aiming squarely at a different crowd of developers. The first major clue is in the price – on most sites the Intel® Joule™ 570X (125-9541) is about 10x the price of everyone’s favourite dev kit benchmark, the Raspberry Pi 3 (896-8660) .
So why would you pay that much more for the Joule? The short answer is compact processing power. The tiny System on a Module (SOM) is only 24mm x 48mm but packs some impressive features, such as 4K video capture and display with support for Intel® RealSense™ technology. This allows the device to capture depth of field (DOF) information, giving an application spatial awareness of its environment and any objects within that environment. It’s easy to imagine how useful that would be for:
- autonomous vehicles, drones and robotics
- driver-assist applications for the automotive industry
- augmented and virtual reality
- industrial IoT
…and pretty much any other application where a 3-dimentional understanding of the local environment would be useful.
Features
So what else do we find in a Joule module? Well, there are actually two variants to choose from and the feature list looks like this:
The Intel® Joule™ 570X module features:
- High-performance, 64-bit, 1.7 GHz quad-core Intel® Atom™ T5700 processor with burst up to 2.4 GHz
- 4GB LPDDR4 RAM and 16GB eMMC memory
- Intel® HD Graphics with 4K video capture and display
- 11ac Wi-Fi with MIMO and Bluetooth 4.1
- USB 3.0, MPI* CSI and DSI interfaces, and multiple GPIO, I2C, UART interfaces
- Linux-based OS tailored for IoT and smart devices
- Enhanced support for the Intel® RealSense cameras and libraries
The less-costly Intel® Joule™ 550X module features:
- High-performance, 64-bit, 1.5 GHz quad-core Intel® Atom™ T5500 processor
- 3GB LPDDR4 RAM and 8GB eMMC memory
- Intel® HD Graphics with 4K video capture and display
- 11ac Wi-Fi with MIMO and Bluetooth 4.1
- USB 3.0, MPI CSI and DSI interfaces, and multiple GPIO, I2C, UART interfaces
- Linux-based OS tailored for IoT and smart devices
- Support for the Intel® RealSense cameras and libraries
So it’s safe to say that the Intel® Joule™ is aimed squarely at the crowd of developers looking to build applications that need more in the way of locally autonomous intelligence, rather than relying on cloud processing for everything.
Intel® Joule™ 570X Developer Kit
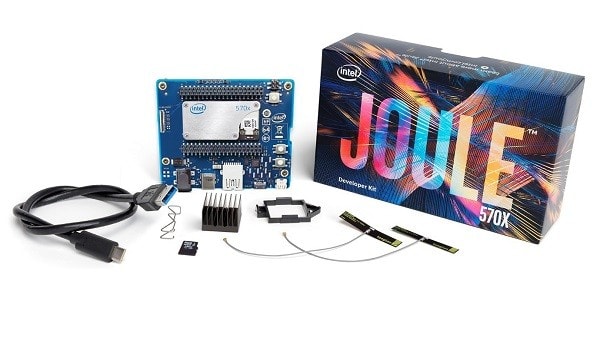
The developer kit delivers a Joule module mounted to an expansion board that gives the user quick access to:
- USB 3.0 (1 Type-A and 1 Type-C port)
- Micro HDMI
- Micro-SD
- 2x 40-pin I/O connectors - 1.8 VDC I/O lines (the expansion board provides open collector level translation up to 3.3V)
- Onboard port for Serial-over-USB debugging
- 2 Wi-Fi antennas
- RTC battery connector
- Fan header
…and is supplied with a heatsink and mounting gear, an antenna for each of the Wi-Fi antennas, a microSD card and a USB type C to type A cable. However, there are a few other items you will need to get hold of before you can run up your new development kit.
What you will need to supply
- LPS or Class 2 output rated 12V, 3A (min) barrel jack power supply
- Male to male, micro HDMI to standard HDMI cable
- Micro USB (type-B) to USB (type-A) cable for serial comms to the board
- Powered USB 3.0 hub for keyboard, mouse and USB sticks as there is only one USB type A connector on the board.
None of these items are included with the development kit, so ordering what you don’t already have at the same time as your Joule dev kit will save some grizzling and griping after your board arrives – so speaks the voice of experience...
Operating system
When you have gathered all your kit together and are ready to run your board up for the first time, you will find that there is a choice of operating systems for your Joule.
- Ubuntu 16.04 LTS Desktop or Core
- Windows 10 IoT Core
- Ostro™ Project Reference Linux for IoT
The Ostro™ Project Reference Linux for IoT, which is built using Yocto Project tools, comes pre-installed on the development board.
In this instance, I had already decided that I wanted to do some direct comparisons with my trusty Raspberry Pi 3, so it seemed reasonable to use Ubuntu Desktop as there is an Ubuntu Mate image for the Pi.
What this meant for my Intel® Joule™ was that I would need to re-flash the BIOS and create a bootable USB stick or microSD card from which to install Ubuntu 16.04. I had some problems with my bootable microSD card which I didn’t take the time to investigate further – the initial boot from this device would fall over half way through – so to get on with the process, I used a bootable USB stick plugged into the powered USB hub. This second set-up ran as it was supposed to, and I was able to install Desktop Ubuntu without problems.
Benchmarking
After a little tweaking to get the desktop how I wanted it, I thought it was time to find out what sort of quantifiable performance gains we get by using a Joule over a Raspberry PI 3. To do this, I fell back on the Linux benchmarking favourite sysbench.
Sysbench is a benchmark suite, originally created by MySQL developers to benchmark database system performance that can also quickly give us an impression of the performance of our own off-the-shelf systems.
To install it on both boards, we can open a terminal and type:
$ sudo apt installsysbench
While there are a number of tests and combinations that we could look at, I decided that we would look at the basics of performance with a CPU performance test and a memory transfer test.
CPU Test
The Sysbench CPU test calculates prime numbers up to a set number (the default is 10 000) by doing a standard division of the number by all numbers between 2 and the square root of the number. Any number that gives a remainder of 0 (i.e. not a prime) causes the calculations to move on to the next number. This will, of course, put stress on a pretty limited set of CPU features but gives an idea of how it handles general number crunching.
As both the Intel and Broadcom processors are quad-core, it seems reasonable to run both tests using first a single thread and then 4 threads to see how the workload spread affects the overall performance of each processor. I also ran the test with a 20 000 maximum number to give the processors a chance to get a bit warm and see what happened.
Test 1
This was pretty much the default setting: single threaded, up to 10 000.
$ sysbench –test=cpu run
Raspberry Pi Result

Intel® Joule™ Result
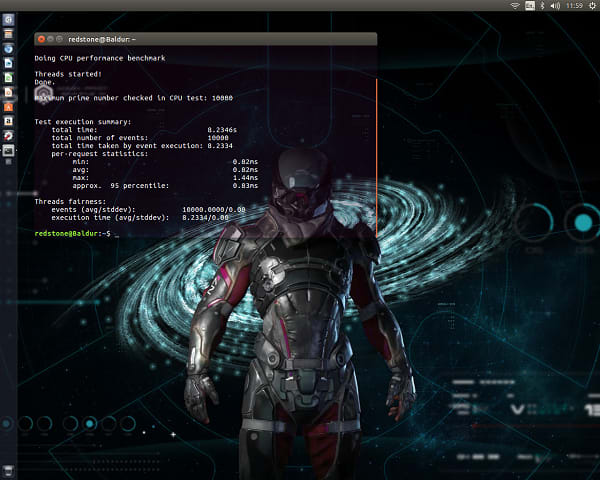
The key figure we are looking at is the ‘total time’ figure under the Test Execution Summary. This looked like a pretty convincing win for the Joule with completion after 8.23 seconds to the Pi’s 158.12 seconds.
Test 2
Here we are going to get all 4 cores involved by using 4 threads to crack the same job.
$ sysbench --test=cpu --num-threads=4 run
Raspberry Pi Result

Intel® Joule™ Result

As we might expect, the performance increases by around 4x for both processors with the Joule coming in at 2.31 seconds and the Pi at 39.50.
Test 3
Here we up the ante further by running prime numbers up to 20 000, giving both processors some extra time to get warm.
Raspberry Pi Result
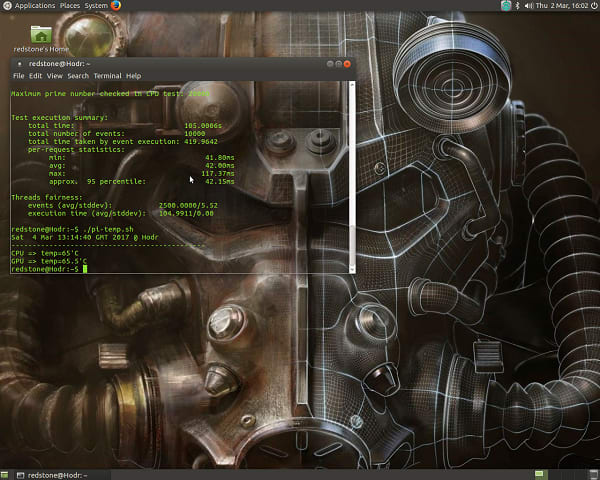
Intel® Joule™ Result

I used a temperature reading script that I knocked together for this experiment to see how warm the Pi was getting. I have included the script at the end of this post, for those who may be interested. In this set of tests, I had a Raspberry Pi heatsink resting on top of the Broadcom processor to try and even out the thermal situation, just a little, for the Pi. Even so, it does seem as though the Pi’s performance against the joule suffers more when the workload is longer and causes the Pi to get warmer: the Pi was 17x slower on the shortest test but was approaching 20x slower on the longer test.
Although these tests are just meant to provide an overall impression of the processors’ respective performance, the disparity is such that it seems reasonable to conclude that on raw number crunching ability, the Joule may well justify its higher price tag.
Memory Test
Of course, it is not just number-crunching ability that affects the overall performance of a processor. The data being processed needs to be moved about in most applications, so memory bandwidth is another limiting factor for performance.
The Sysbench memory test allocates a buffer and then proceeds to read and write each data word location in the buffer until the total buffer size has been read/written. This is then repeated until the total memory size is reached.
To give our candidates the same amount to transfer, we used a 1 Mbyte buffer and ran for a total memory size of 2 Gbytes:
$ sysbench –test=memory –memory-block-size=1M –memory-total-size=2G –num-threads=4 run
Raspberry Pi Result
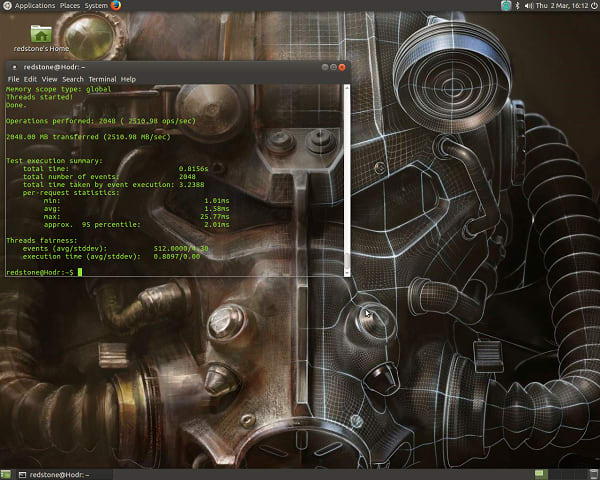
Intel® Joule™ Result

The Raspberry Pi managed a respectable 2.5Gbytes/s transfer rate but was again somewhat outclassed by the Joule at 11Gbytes/s.
There are other tests we could apply, such as file transfer speeds, but I think you get the gist of where this is heading by now. The upshot is really that the Joule is not overpriced compared to the Raspberry Pi – it is a different beast and is competitively priced for the performance bracket it sits within.
So let’s get our Joule to do something useful. I will look at the Joule’s ‘superpower’ – image processing – in an upcoming article where I will break in a RealSense camera. For today, I want to look at how easy it is to do something that is more in the ‘general-purpose computing’ vein because it is nice to know that your dev kit is versatile.
Wireless Relay Station
Next time you want to send emails from that sun-trap at the bottom of your garden, use your Joule as a wireless relay station to extend the range of your home Wi-Fi. You can set this up to run anytime you need it with the flick of a script – after we have set up a few pre-requisites.
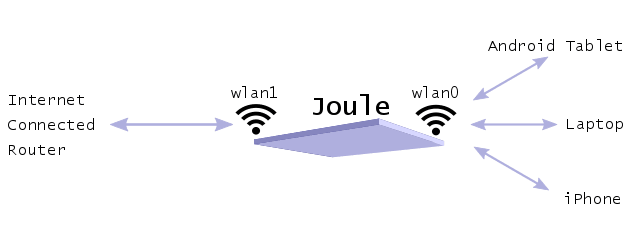
We will be using a couple of standard Linux tools to drive our hardware: hostapd to configure our Wi-Fi adapter as a wireless access point and dnsmasq to run DHCP and DNS services for clients using our access point.
Getting Started
Before we go any further, it’s probably a good idea to make sure that the Joule’s onboard Wi-Fi adapter can actually support the kind of access point operation that we want to use. To find out, we can open our terminal and use:
$ iw list
This will give us a list of the attributes for each wireless interface that iw can find and (near the top of quite a long output) will look like this:

What we want to see under ‘Supported interface modes:’ is AP – and there it is. Looking above that at the ‘Supported Ciphers’ we can see TKIP and CCMP, which means our access point will be able to use WPA2 encryption to stop the neighbours from logging on and stealing our bandwidth.
Drivers
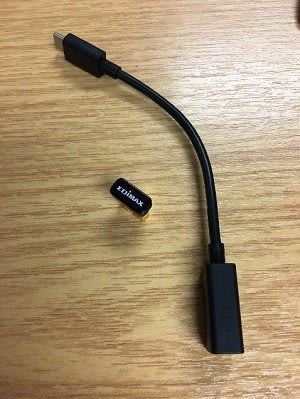
The Edimax USB Wi-Fi adapter is pretty ubiquitous, so it’s not surprising that there is a plug-and-play driver included in most Linux distributions and seems to work reasonably well. However, there is a reported bug which can be fixed using an open source driver (that has the bonus of also being recommended by Edimax) on GitHub. So just to be sure everything runs smoothly let’s install the fixed driver.
First, we will need to install git and dkms as they are not pre-installed in our distro:
$ sudo apt install git dkms
After we have this all installed we can clone the driver from GitHub onto our machine. I tend to put this kind of stuff in a separate directory for the sake of tidiness:
$ mkdir Projects
$ mkdir Projects/wifi
$ cd Projects/wifi
$ git clone https://github.com/pvaret/rtl8192cu-fixes.git
DKMS (Dynamic Kernel Module Support) allows us to install supplementary versions of kernel modules. First, we add the ‘fixes’ as a dkms module:
$ sudo dkms add ./rtl8192cu-fixes
Then we build and install the driver module:
$ sudo dkms install 8192cu/1.10
…and refresh the modules list:
$ sudo depmod –a
Now we blacklist the existing kernel module…
$ sudo cp ./rtl8192cu-fixes/blacklist-native-rtl8192.conf /etc/modprobe.d/
…disable power management:
$ sudo cp ./rtl8192cu-fixes/8192cu-disable-power-management.conf /etc/modprobe.d/
And finally, restart the system to load the new driver:
$ sudo reboot
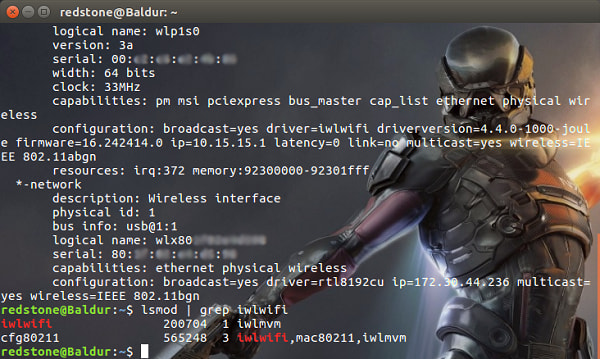
If we then use ifconfig -a, we can see our shiny new network interface is up and running:

Prepping our network interfaces for greatness
While hostapd is easy to set up, there are a couple of limitations that we need to mitigate to keep our setup easy. The first thing to consider is that hostapd needs your interface driver to be built on the mac80211 framework. This allows it to use nl80211 userspace utilities that support wireless modes beyond just station mode – in this case, we want to use AP mode. We can check which drivers we are using with:
$ sudo lshw –c network
We can see that our built-in Wi-Fi interface uses the iwlwifi driver. We can use a driver table to figure out if our iwlwifi driver is mac80211 based, or we can just check our driver dependencies:
$ lsmod | grep iwlwifi
This tells us that we do indeed have drivers based on mac80211:
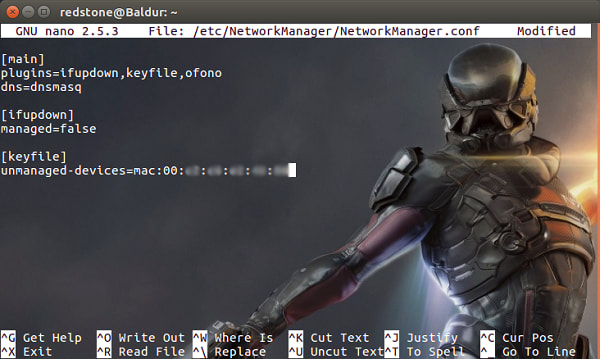
Our other consideration is a bug that prevents hostapd from initialising when the network interface is managed by the Ubuntu network manager. The workaround for this bug is to prevent the network manager from managing the interface we want to use as an AP from the outset. Luckily, this is also pretty simple to arrange. Interfaces declared in the network interfaces file will be ignored by the network manager. We can open the file with:
$ sudo nano /etc/network/interfaces
You will then need to add in something similar to this:

In my case, I have set up the address of the access point (10.15.15.1) to be easily distinguishable from my ISP router’s access point address. We can also explicitly tell the network manager to ignore our access point by declaring its MAC address (which is given by the WHaddr value in the ifconfig –a output) as unmanaged:
$ sudo nano /etc/NetworkManager/NetworkManager.conf
Then add in:
[keyfile]
unmanaged-devices=mac:xx:xx:xx:xx:xx:xx
replacing the x’s with your device’s mac address:
If you now reboot, you should find that your network connection to your router is now made by your USB device rather than the built-in Wi-Fi adapter:

Huzzah! Now our networking configuration is prepared, we can get on and install the software that will do the wireless magic for us.
Install hostapd
To create our access point we can install hostapd with:
$ sudo apt install hostapd
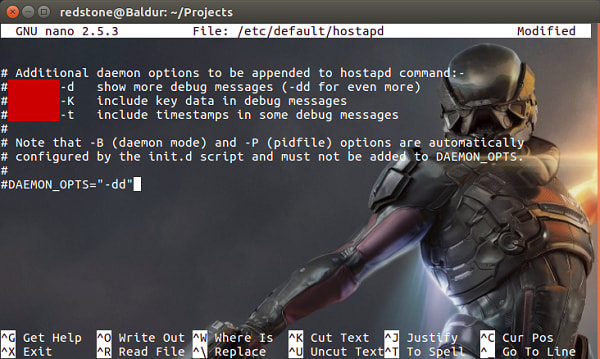
Once installed, we need to configure the access point. First, we will tell hostapd what configuration file we want it to use and where to find it:
$ sudo nano /etc/default/hostapd
Between the speech marks after DAEMON_CONF= we will add the location: /etc/hostapd/hostapd.conf
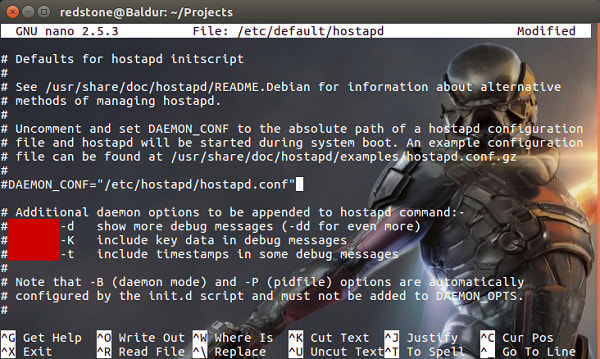
If you need to debug your configuration you can also set the daemon to be more verbose in its output with DAEMON_OPTS further down the config file:
OK, now hostapd knows where to find it, let’s actually create our configuration file:
$ sudo nano /etc/hostapd/hostapd.conf

This is a pretty minimal configuration. You can get quite involved with what is accepted or rejected by the access point and how encryption is set up in the config file. This fully annotated config file shows all of the available options, should you be curious.
You will want to set your ‘ssid’ to whatever you want your access point to be named. I have set the hardware mode to ‘g’ as pretty much everything capable of Wi-Fi can use that configuration. The encryption is set to be WPA2 and only WPA2. You will need to set the ‘passphrase’ to whatever you want your password for the access point to be.
Note that when we run this, hostapd will grizzle about the country code with something like:
..wlp1s0: interface state UNINITIALIZED->COUNTRY_UPDATE
This down to CRDA - the Central Regulatory Domain Agent. It doesn’t affect how our AP operates, so you can do as I do and ignore it.
That’s the access point ready. Now we need to be able to assign IP addresses to whatever devices connect to our AP. For that, we will need DHCP and access to a DNS server.
Set Up dnsmasq
We are using dnsmasq as our DNS and DHCP server. To install it:
$ sudo apt install dnsmasq
Once that has installed, we have another simple config file to set. I usually save the existing file before creating my own as it tends to be much clearer to read:
$ sudo mv /etc/dnsmasq.conf /etc/dnsmasq.conf.orig
And then we create our own configuration:

This is another pretty minimal configuration but it’s enough for our purposes. Again, if you want to explore the other options, look at the notes in the original config file.
In this configuration:
server - lists one (or more) public DNS servers to use for non-local queries. In this case, we have used OpenDNS and Google servers.
no-hosts – stops dnsmasq from using the local /etc/hosts file for DNS lookups.
dhcp-range – is the range of IP addresses our server will serve up to our connecting devices. 8h means that a connected host will have a lease time of 8 hours on the IP address it is given.
dhcp-option 3, - is the gateway address for our new local network of devices.
dhcp-option 6, - is the DNS server address for our local network.
The logs make it easier to check everything is working.
Tying Our Threads Together
Now that we have our software all set up, we just need to route our traffic from the access point to the internet. This is done using the iptables firewall rules. I’m going to script this setup, as I don’t want the Joule to boot up as a wireless repeater, but I do want to be able to turn it on easily whenever I want:
#!/bin/bash
MONITOR_DEVICE=wlp1s0
OUTPUT_DEVICE=wlx80xxxxxxxxxx
# Catch ctrl-c for clean exit
trap ctrl_c INT
function ctrl_c(){
echo Killing AP processes...
killall dnsmasq
killall hostapd
}
echo Bringing up Access Point interface...
ifconfig $MONITOR_DEVICE 10.15.15.1/24 up
# Note that dnsmasq will already be running
echo Setting routing tables
sysctl -w net.ipv4.ip_forward=1
iptables -t nat -A POSTROUTING -o $OUTPUT_DEVICE -j MASQUERADE
iptables -A FORWARD -i $MONITOR_DEVICE -o $OUTPUT_DEVICE -j ACCEPT
echo Starting Access Point...
hostapd /etc/hostapd/hostapd.conf -B
The –B option for running hostapd gets it to run in the background. If you want to see what it is doing while running in your terminal window, leave this option out. You will need to use [Ctrl] [C] to stop the program – and we catch that to kill all the other processes cleanly.
What we are doing here is a form of network address translation (NAT) called IP masquerading -routing all the IP connections on our access point to the built-in Wi-Fi adapter on the Joule, so that this adapter is the only IP address connected to our router and all the data packets to the router appear to come from this single source. This link has a fuller explanation of masquerade: it is an old text but a good exposition of what is happening.
The only things left to do are to make our script (which I have called ap) executable and fire up our repeater:
$ chmod +x ap
$ sudo ./ap
You should now have your very own access point available. If you use a tool like Wi-Fi Commander on a Windows laptop, you should be able to see our access point broadcasting its presence in the spectrum:

I have filtered out the other (92) access points in my vicinity for a little clarity in the picture. We can also test it by connecting our devices, like our iPhone:

Yea! We are now connected and can enjoy some wireless internet access outside of our router’s normal range. When you’re done with it, you can use the ‘rk’ script to shut everything down.
Conclusion
The Intel® Joule™ is fun to play with, like many of the low-cost education/dev kit boards on the market. It can easily be turned to many of the same kind of applications too, but the difference is that Joule also has some serious processing muscle for real-world applications that need a lot of localised processing and where cloud connectivity is either unavailable or undesirable for the application.
I’ve enjoyed getting to grips my Joule and look forward to trying a few other things out with it in the future.
Comments