Learning Mikroe Clicker 2 - Project 3: IoT Weather Station
Follow project
 Dave from DesignSpark
How do you feel about this article? Help us to provide better content for you.
Dave from DesignSpark
Thank you! Your feedback has been received.
Dave from DesignSpark
There was a problem submitting your feedback, please try again later.
Dave from DesignSpark
What do you think of this article?
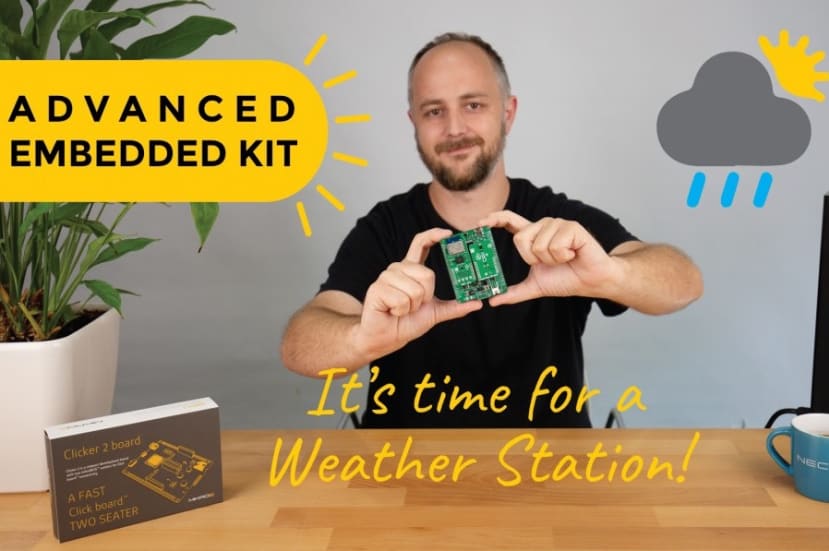 In the third project of our Learning Mikroe Clicker 2 series, learn how to sense temperature, humidity, pressure and ambient light levels and display these in the Click Cloud online dashboard as you learn how to build an IoT weather station.
Parts list
| Qty | Product | Part number | |
|---|---|---|---|
| 1 | MikroElektronika Clicker 2 Add On Board MIKROE-1685 | 8829048 | |
| 1 | MikroElektronika Temp&Hum 8 Click I2C Development Board MIKROE-3263 | 1839646 | |
| 1 | MikroElektronika MIKROE-3444, Ambient 6 Click Light Sensor for VEML7700 | 1885517 | |
| 1 | Development Kit Pressure 4 Click for use with Drones, Indoor Flying Toys Navigation, Variometers, Weather Stations | 1840892 | |
| 1 | MikroElektronika Go to Cloud (G2C) Click GPIO, UART Development Board MIKROE-3291 | 1840143 | |
| 1 | MikroElektronika MIKROE-1154 | 7916485 | |
Welcome to build your own IoT weather station with MikroElektronika Clicker 2 for STM32. This is the third project in our learning with MikroElektronika series - from beginner to advanced - these projects will help you get started with embedded development for the first time, or if you are an experienced engineer, to familiarise yourself with the Mikroe development environment.
You will learn:
- Necto studio development environment
- Writing a microSDK application in Embedded C
- Integrating external libraries into your application
- Extending the capabilities of your Clicker 2 with add-on Click modules
- How to add connectivity to your Clicker 2 project
- Integration with Click Cloud service
In this series:
- Project 1- Getting Started with MikroElektronika Clicker 2
- Project 2 - Automate your home
- Project 3 - Build and connect an IoT weather station to the cloud
Project Index
Part 0: Preparation
Part 1: Building the IoT Weather Station Project
Part 2: Configuring Click Cloud
Part 3: Building Click Cloud Dashboard
This project assumes that you have used NectoStudio and build a project using the MikroE Clicker 2 before. If you haven't, check out our Learning MikroE Clicker 2 - Getting Started project before you start.
Part 0: Preparation
0.1 Download and Install NectoStudio
First, ensure you have downloaded and installed NectoStudio, the MikroElektronika cross-platform IDE. A free 90-day trial is available for evaluation to allow you to get started.
0.2 Hardware
To complete this project you will require a MikroElektronika Clicker 2 for STM32, the mikroBUS shield as well as four MikroE 'Clicks' which are an easy way to add additional functionality to the Clicker 2.
- Clicker 2 for STM32 - MIKROE-1685
- MikroBUS shield -MIKROE-1154
- Temp&Hum 8 Click - MIKROE-3263
- Ambient 6 Click - MIKROE-3444
- Pressure 4 Click - MIKROE-3020
- Go to Cloud Click - MIKROE-3291
0.3 Assembling the Hardware
- First, we need to assemble the IoT Weather Station device, we’ll start by inserting G2C Click to mikroBUS1 and Temp&Hum 8 Click to mikroBUS 2 socket on the Clicker 2 development board.

- On the MikroBUS Shield – >we will insert Ambient 6 Click on mikroBUS 1 and Pressure 4 Click on mikroBUS 2 socket. Then, connect the MikroBUS Shield to the Clicker 2 development board.

Part 1: Building the IOT Weather Station Project
As the G2C library is not yet officially released but will be in the future, we have supplied you with a complete Weather Station project.
With this tutorial we’ll cover the project explanation, configuring the device and working with ClickCloud Ecosystem.
1.1 Download and configure libraries - Temp&Hum 8 Click, Ambient 6 Click, Pressure 4 Click
Before we can build or change anything in the Weather Station project – we need to install the required libraries.
You can browse and install the libraries in the Package Manager, we need to install the libraries for Temp&Hum 8, Ambient 6 and Pressure 4 Click Board.
- Download Libraries - Click on the Packages menu and click on Browse tab – enter the package name, when the library is displayed click on Install. After the library installs – it will be displayed in the Installed tab. From there you can access the various information such as library version, description of the most used functions and example of the code. You need to download and install the following packages.
- Temp&Hum 8 Click
- Ambient 6 Click
- Pressure 4 Click

The compiled source code and header for G2C are integrated into the supplied IoT Weather Station project. In the future, this will be available for you to download from the Package Manager.
1.1 Loading the pre-configured NectoStudio Project
After installing the NectoStudio and registering for your trial license, we need to open NectoStudio and setup the project.
-
Unzip the archive that contains Weather Station project.
-
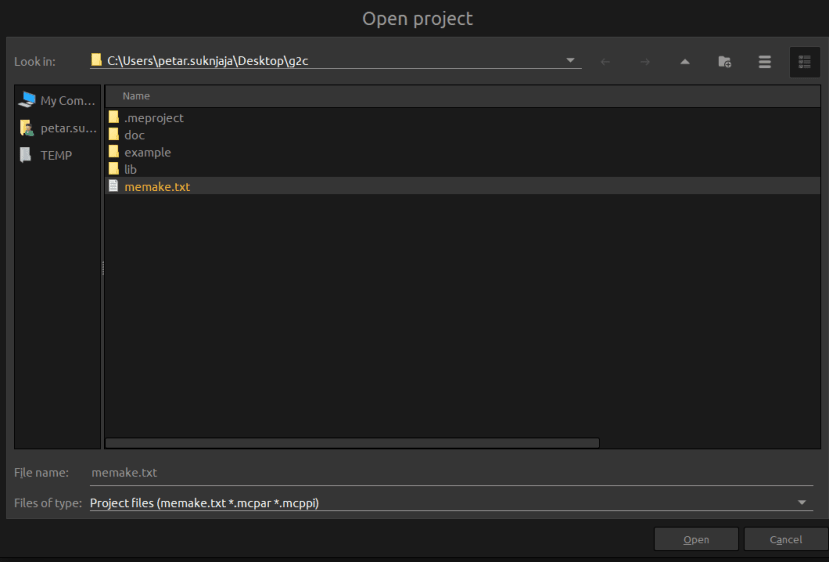
Open NectoStudio and click on Open Project.
-
Navigate to the location of the unzipped project and locate the memake.txt project file
- Select and load the memake.txt project
Having loaded the Weather Station project, we will see application code and project configuration.
1.2 Providing WiFi and Click Cloud Credentials
In order for the IoT weather station to connect to the Click Cloud dashboard, we must provide the credentials for a WiFi network in range of the device as well as a valid key for the Click Cloud service, to allow the device to connect to the service and be associated with your Click Cloud account.
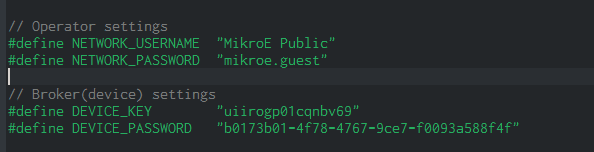
- Within main.c modify NETWORK_NAME and NETWORK_PASSWORD to match the credentials for your home WiFi network. This will enable the G2C to connect to the internet.
- Within main.c modify DEVICE_KEY and DEVICE_PASSWORD to the unique values generated by the Click Cloud dashboard upon device creation. You may leave these as their default values for now and return to this stage later, after you have generated your own device key and password in Click Cloud.
// Operator settings
#define NETWORK_USERNAME  "MikroE Public"
#define NETWORK_PASSWORD  "mikroe.guest"

// Broker(device) settings
#define DEVICE_KEY        "uiirogp01cqnbv69"
#define DEVICE_PASSWORD   "b0173b01-4f78-4767-9ce7-f0093a588f4f"
1.3 Configuring the clock
Next, we must configure the timing source for the STM32 microcontroller on the Clicker 2 - this is often referred to as the clock.
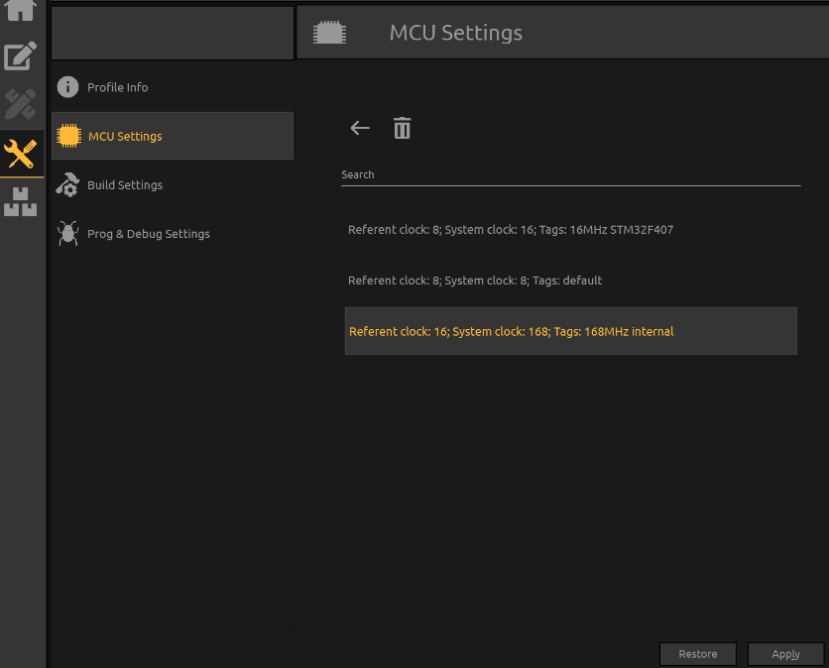
- Navigate to MCU settings - Click on the
icon, choose MCU Settings and click on the Load configuration from scheme template.

- Load the appropriate clock configuration scheme - Select: >Referent Clock : 16; System clock:168; Tags: 168MHz internal and press Apply.
1.4 Building the application
We now need to build the code - i.e turn the code into a binary file which is understood by the STM32 microcontroller.
- Click the Hammer icon in the main menu bar to start building your project.

If the project doesn’t have any errors in code, it will build successfully and upon completing the build it will display the following message:

1.5 Programming Clicker 2
Finally, we will program the application onto the Clicker 2 development board through the bootloader – here’s how I do it.
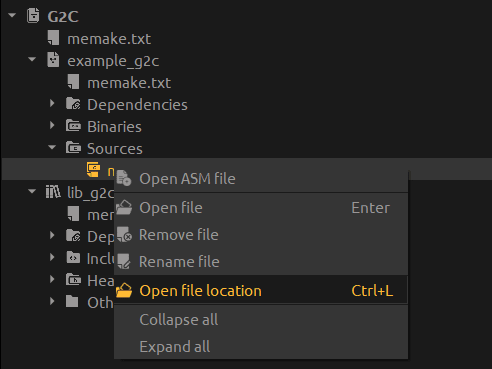
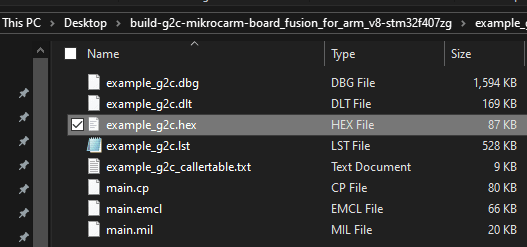
- Right-click on the main.c file in the Project Manager window and choose Open file location.
- Go one folder above and find the build-HomeAutomation folder
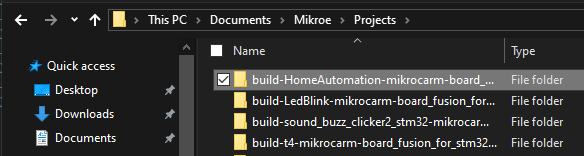
- In the build-HomeAutomationfolder, you’ll find the example_g2c.hex file, which we’ll program
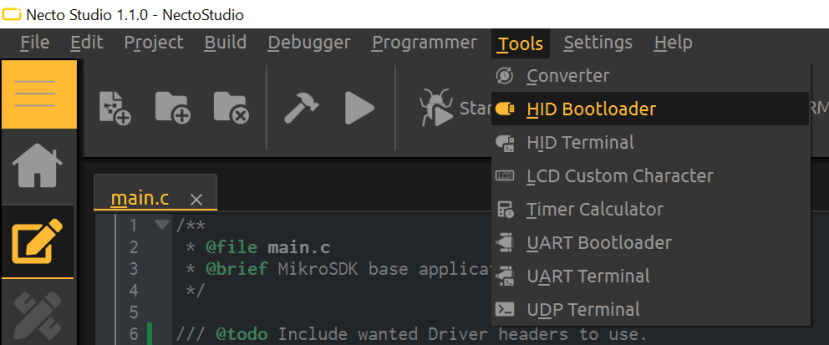
- Now let’s open the HID bootloader from Tools menu
- Connect the USB cable to the development board and turn the Clicker 2 ON.
You’ll see the name of the development board and in the next 5 seconds, it will be connected to the bootloader. Press Reset on the dev board to connect it again, if needed.
- Drag the example_g2c.hex file to the HID Bootloader and you will initialize programming.


After uploading the compiled application to the Clicker 2, the microcontroller will restart and you should see the LEDs blinking on your board.
The G2C Click Cloud will try to connect to the Internet. If both RED and ORANGE LEDs on the G2C Click Board are glowing – that means that G2C is successfully connected to the ClickCloud.
Part 2: Create Device in Click Cloud
To obtain the broker keys for the device we first need to create a new one in the ClickCloud.
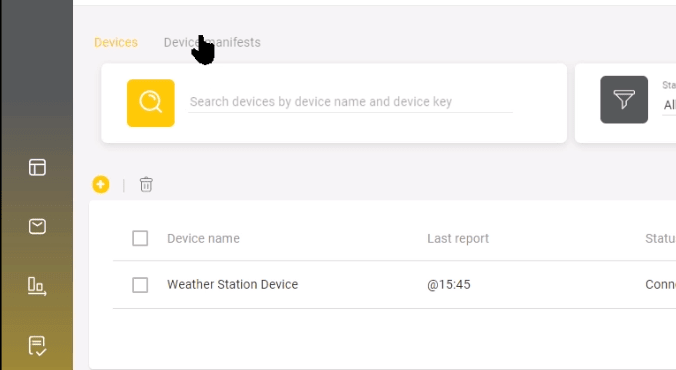
- Go to https://app.clickcloud.io/#/login and create a new account, or log in with your existing account if you have one.
- Click on the Devices icon, then click on the Device Manifest
Then we need to create a new manifest.
Manifest is a device or group of different devices that have one or more different sensor or actuator references. We can use a pre-defined manifest if we want to use only one device – e.g. Ambient 6 Click Board, or we could create our device manifest that will contain a combination of different manifests ( in this case Temp&Hum 8, Ambient 6 and Pressure 4 manifests ).
- We can create the new manifest by clicking on PLUS sign ( Create manifest )

And we can choose to create manifest From Scratch or to Upload an existing one.
- Select the create From Scratch option


We now have an empty manifest which we will populate to include the sensors we are using and some descriptors to help make things easier to read.
- Add a name for the manifest, for example: Clicker 2 Weather Station
- Add a short description for your own reference.
After naming the manifest, we now need to add Sensors that we will use.
- Click on "+" sign to Add Sensor.

- For each sensor in our project we must add the following:
- Sensor name - a descriptive human-readable name for the sensor
- Sensor reference - the reference assigned to the sensor in the code, see below for the references used in our project. The references used in the Click Cloud and in the project code must match in order for the information to be extracted into the dashboard. >The ClickCloud will use this reference to process the data which G2C sends.

Sensor references defined in the Weather Station project
-
- Units - measurement units for the data being displayed
- Data type - NUMERIC for all of our sensors
- Data size - 1 for all of our sensors
- Minimum and maximum - select a suitable value for each sensor and the environment you are using it in
We will repeat this for every sensor that we use. Bear in mind that some sensors can have multiple references, so don’t let that confuse you. Temp&Hum 8 can read Temperature and Humidity values from the sensors; thus we have two different Sensor References to assign different values.

Next, we must create a Device instance using this manifest.
- Click on Create Device from within the manifest view.

- Click on Next Step and name the device.
- Save and a new popout window will appear with the device key and password for your newly created device.

We must now update the project in NectoStudion with the Device Key and Device Password.
The device key and password are unique to you and to this device, they can only be viewed once in Click Cloud so be sure to download, note them down or immediately update your project once they are generated.
- Return to the NectoStudio project and locate the broker settings
- Update the default values in the project to match those provided by Click Cloud
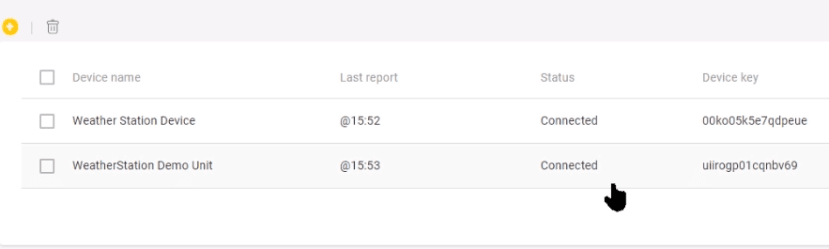
- Click OK and it will display the status of the created device
You will need to rebuild and reprogram your application (using the broker settings you have just generated) onto the Clicker 2 before your newly created device will report as Connected in the Click Cloud dashboard.
Part 3: Building Click Cloud Dashboard
Finally, we will build a graphical dashboard to display our sensor data in an easy to read format.
- Click on the Add new Dashboard and add the new Dashboard name, i.e Weather Station

We can add many different Widgets which display values in the Dashboard.
- Click on the "+" sign to add a widget.
- Select an appropriate widget for the data you wish to display, we will select Gauges for our weather station project.

- Select the item from the manifest for which we want to attach the gauge - here we see the sensors we previously configured in our device manifest.

- Repeat for all of the Sensors used in the Weather Station project.
There are many options in Click Cloud to display your data in different ways. You may assign colour codes, ranges and limits which you can customise to your environment and application.

Once you have added all of the sensors to the dashboard and successfully connected your Weather Station to the Click Cloud your dashboard should look something like this!

The ClickCloud Ecosystem is very flexible with lots of capabilities not covered in this short tutorial – check our the Click Cloud manual to learn more
Congratulations! in this project you have learnt how to sense data from your local environment and report this to a cloud dashboard using the Mikroe Click Cloud eco-system.
What's next? Have a go at customising the project to solve a real-world problem in your area of the world. Share your progress on Designspark to showcase your innovation with the world.
Stuck? If you experienced difficulties with any part of the project comment below for support from the Designspark community and MikroElektronika.