Thinking of buying 3D printer filament? Read this first.
Follow article Dave from DesignSpark
How do you feel about this article? Help us to provide better content for you.
Dave from DesignSpark
Thank you! Your feedback has been received.
Dave from DesignSpark
There was a problem submitting your feedback, please try again later.
Dave from DesignSpark
What do you think of this article?
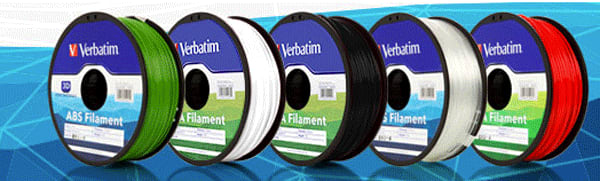
The aim of this article is to give a review of the various Verbatim 3D printer filaments and share the different experimental methods and their results. Verbatim are market leaders within 3D printer filaments.
Overview
This review was conducted to find the strength/maximum load that the material could withstand. There were a total of 4 types of filaments used for the test and review. The materials were Polyactic Acid (PLA), Polypropylene (PP), Primalloy, and Butenediol Vinyl Alcohol Co-polymer (BVOH). A 3D benchmark model printed at different infill percentages for the quality and compression tests.
Material: PLA
Verbatim PLA filament is recommended for use with Ultimaker 2 3D printer as the printed product has a smooth and shiny finishing. Additionally, this filament has a consistent print quality which is able to deliver even when working on a small area. The filament seldom gets choked in the nozzle but the bed temperature is required to be set at 80°C and no lower than that. The printed product using the Verbatim PLA filament had very little residue deposited onto the printed product, which did not require the user to spend extra time removing it. During the printing process, the filament did not emit any noticeable odour. The pictures below show some of the test prints that were done at different settings.
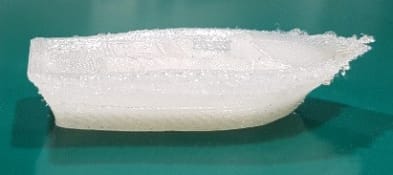
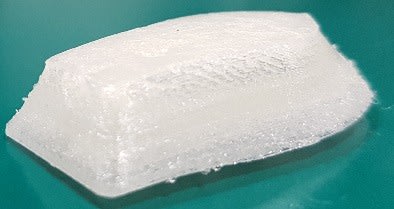
#3DBenchy is a 3D boat model design that is widely used for testing and benchmarking of 3D printers. The model can be found on thingiverse, which I downloaded and used for the quality test.
Print settings:
|
3D Model |
#3DBenchy |
|
Layer Height |
0.15mm |
|
Infill |
10% |
|
Print Speed |
60mm/sec |
|
Nozzle Temperature |
210°C |
|
Bed Temperature |
80°C |
|
Support Structure |
No |
|
Brim Width |
2mm |

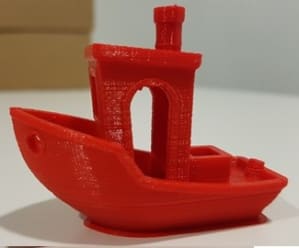
3D model of the benchmark boat test taken at different angles
From the pictures above, the boat is observed to have a very consistent print quality even on small surfaces. It was also observed that it had almost no residue with a nice finish that felt smooth and solid. The detail of the fine print had a good quality which clearly shows all of the details at a high resolution.
The second object that was used for testing is the fidget spinner. A fidget toy is very popular now and lots of people are going crazy over it. It has the most templates on thingiverse and one of the simpler designs was printed out. The following table illustrates the printer settings for the 3D model of the fidget spinner.
|
3D Model |
3 Bearing Fidget Spinner |
|
Layer Height |
0.15mm |
|
Infill |
75% |
|
Print Speed |
60mm/sec |
|
Nozzle Temperature |
210°C |
|
Bed Temperature |
80°C |
|
Support Structure |
No |
|
Brim Width |
2mm |
3D model of a fidget spinner found on thingiverse website
The bed temperature was reduced to 60°C although the recommended temperature was at 80°C. I felt that it was a little too high as the previous PLA material I was working with had their bed temperature set at 60°C. The result of the filament test during 60°C bed temperature is shown in the picture below.

Fidget spinner printed at bed temperature of 60°C
From observations, the printed product turned messy halfway which might be caused by the decreased in bed temperature where the filament is unable to nicely set into the previous printed layer. In conclusion, the PLA material needs to follow the recommended bed temperature of 80°C.
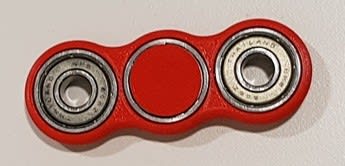
Functional fidget spinner with ball bearings
Video of the fidget spinner in action:
As observed from the picture and video, the printed product is of high quality. It is able to withstand the pressure of inserting and maintaining the ball bearing in place, as well as the weight and force acting on the thin intersection points of the spinner.
Compression Test
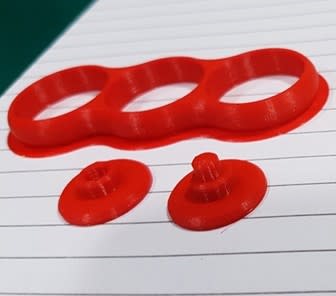
Multiple circular models were printed at different infill levels (of 0, 50 and 100 percent) for a compression test as shown in the picture below. The dimensions of the model is 40mm in diameter and 4mm in height.

The prints were then placed in between the compression plates in the compression machine as the plate’s compresses it. The picture below shows the machine compressing the printed model. The limitation of the machine is that, it only consist of a maximum load of 50kN and anything beyond that cannot be measured.

The results were recorded and tabulated as shown in the graphs below. The different graphs shows the time taken vs the load that the model with different infill percentage is compressed with.
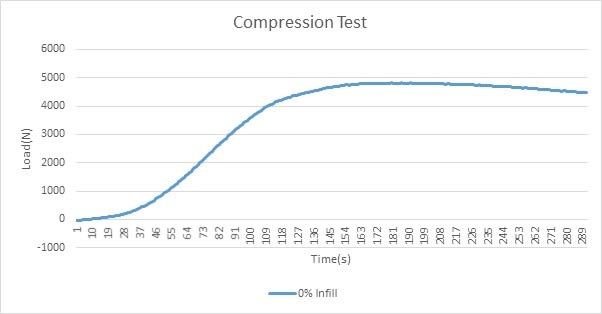

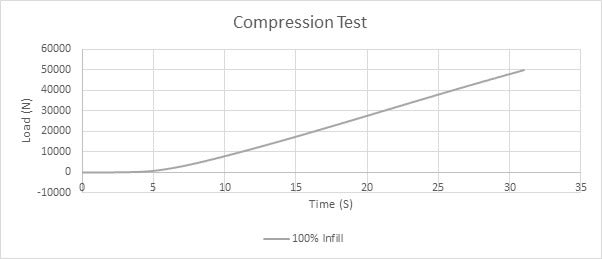
Based on the data collected, 0% infill can withstand a load of up to 4.8kN while both 50% and 100% infill models are able to withstand more than 50kN of load. But, due to the limitations of the compression machine, the maximum load used to compress the test model is only at 50kN. The results obtained from this test is only accurate for objects up to a height of 4mm.
Material: PP
Verbatim PP material was tested with Ultimaker 2 3D printer. As PP filament's nature is slightly elastic, it will face difficulty sticking onto any surface except for its own. It is recommended that a layer of adhesive tape/liquid should be coated onto the printing bed, before using the PP filament for printing. This will help the printed material to stick onto the printer's bed in order to achieve successful prints.
The test was conducted twice. One had a coat of adhesive liquid applied to the printer's bed while the other did not have any adhesive.
The following table illustrates the different print settings that the model was printed with.
Print settings with no adhesive:
|
3D Model |
#3DBenchy |
|
Layer Height |
0.15mm |
|
Infill |
20% |
|
Print Speed |
60mm/sec |
|
Nozzle Temperature |
220°C |
|
Bed Temperature |
100°C |
|
Support Structure |
No |
|
Brim Width |
2mm |
|
Adhesive Coat |
No |


Printed model at upright position
Printed model at capsized position
As seen from the images above, the printer is only able to print the model according to the design for, only 2-3 layers before it starts running out of place and turns messy. This is due to the absence of the adhesive coating on the printer bed to secure the printed model.
2nd print settings with adhesive:
|
3D Model |
#3DBenchy |
|
Layer Height |
0.15mm |
|
Infill |
100% |
|
Print Speed |
60mm/sec |
|
Nozzle Temperature |
220°C |
|
Bed Temperature |
100°C |
|
Support Structure |
No |
|
Brim Width |
2mm |
|
Adhesive |
Yes |
Printed model at upright position
Printed model at capsized position
As seen from the images above, the printer is able to print the model according to the design for much more layers, compared to, the model without adhesive. But, the printed model will still divert from the original design as the printer starts printing the higher layers which causes the model to move slightly. Due to the movement of the print, the front part of the model is seen to be turning messy where the printing was stopped to prevent the model from turning messier. Another observation is, after the printed model was removed from the printer, the base of the model seems to be uneven which might be due to the high bed temperature.
In my opinion, this material can only print models of a certain height, based on the test that I have conducted. Since the printed model was not very secured during printing, the problem might be due to the adhesive applied which might not be strong enough to hold the full model or, the high bed temperature might have reduced the adhesive's effect. There might also be additional settings or precautions that have to be taken into considerations when dealing with PP filament which I might have missed out, causing the print to move.
Material: BVOH
Verbatim BVOH material was tested with Ultimaker 2 3D printer and when the nozzle temperature is at 220°C, the material had problems flowing out of the nozzle while printing. This problem might be caused by the residue that had been left behind from the previous filament. The changing of the printer's nozzle should rectify this issue. Due to the limited resources on hand, I am unable to give a review on this material.
Material: Primalloy
Verbatim Primalloy material was tested with Ultimaker 2 3D printer at the default settings. Initially the filament was too elastic/rubbery for the roller to get a grip to reel it into the printer. Some adjustments were made to configure the printer for use with the Primalloy filament. The pinch roller force was decreased from 25mm/sec down to 5mm/sec, extrusion multiplier was set to 1.15 and printing speed was set to 15mm/sec.
After configuring the print, the filament was able to feed into the printer but, it was unable to extrude from the nozzle at a temperature of 220°C. This problem might be caused by the residue that was left behind from the previous filament which was unable to flush out as the nature of the Primalloy material as it is rather elastic. It might also be due to additional settings that are required for the printer to print successfully which I missed out. Therefore, I am also unable to give a review on this material.
Conclusion
In conclusion, the PLA filament is the best overall material to work with which is also the most popular 3D filament on the market today. On the other hand, the PP filament can be used for other applications that requires heat resistance and slight elasticity. As for the BVOH and Primalloy material, I am unable to give any review for those filaments.