Build your own Vertical Farm - Part 3
Follow article
 Dave from DesignSpark
How do you feel about this article? Help us to provide better content for you.
Dave from DesignSpark
Thank you! Your feedback has been received.
Dave from DesignSpark
There was a problem submitting your feedback, please try again later.
Dave from DesignSpark
What do you think of this article?
In the previous article, we explored the core elements of our miniature vertical farm build, discussing the requirements of each subsystem and how they will contribute respectively to the growth of our prospective plants. As part of this process, we discussed the need for simplicity and energy efficiency to promote vertical farming as a viable technology, with a particular focus on how the use of targeted light spectrums and specialised horticultural LED lights can improve performance.

Having now completed our miniature vertical farm build, the aim of this final article will be to put our theory into practice and measure the performance of our system by observing both the efficacy of our farm as a whole, as well as the relative performance of each type of plant we choose to grow.
Video
Parts list
- Würth Elektronik Lighting Development Kit (210-8068)
- Würth Elektronik Sensor Feather wing (222-0849)
- Würth Elektronik Horticulture Blue LED 3535 SMD (176-6242)
- Würth Elektronik Horticulture Red LED 3535 SMD (176-6244)
- Adafruit Feather M0 Express (124-5520)
- OKdo ROCK CM3 Single board computer (249-3155)
- OKdo ROCK CM3 IO Board (256-4697)
- RS Pro cooling fans (668-8839)
- RS Pro cooling fan covers (737-3976)
- Arduino Uno (715-4081)
- Seeed Studio Relay Shield (174-3234)
- Submersible Water Pump (763-2538)
Environment, Theory and Methodology
The test will be conducted in late April and early May which is the ideal sowing period for many seasonal crops in the UK, just after the frost has passed. This not only gives us the opportunity to take advantage of ambient environmental conditions but also presents us with a decent selection of potential plants to grow. Given the scale of our miniature vertical farm, and the timeframe in which we want to see any results, I decided on a cross-section of reasonably fast-growing leafy green crops known as microgreens, that are popular in the contemporary farming field.
Microgreens are very common in vertical farming and can be grown rapidly in close proximity. A lot of these plants can also be reasonably hardy, a characteristic that lends well to our theme of low-cost simplicity, where we need not rely on an energy-intensive artificial climate. The microgreens I have chosen for this test are:
- Cress, a fast germinating and rapid growing plant that will serve as a good benchmark.
- Salad Lettuce, a very common salad crop that fares well in temperate climates.
- Rocket, another salad staple and a reasonably hardy crop.
- Basil, a fair-weather crop that will test the limits of the ambient climate.
These will be sown as per the packet in four dedicated seed trays, where we will be observing the differences in germination times and overall growth given the exact same environmental conditions and artificial light stimulus.
As part of this test, I will be following the light recipes provided by Würth Elektronik, which will dictate the relative intensity of the targeted light spectrums of our horticultural LEDs at different stages of plant growth. Using these light recipes will allow us to optimise both the efficiency and efficacy of our vertical farm.
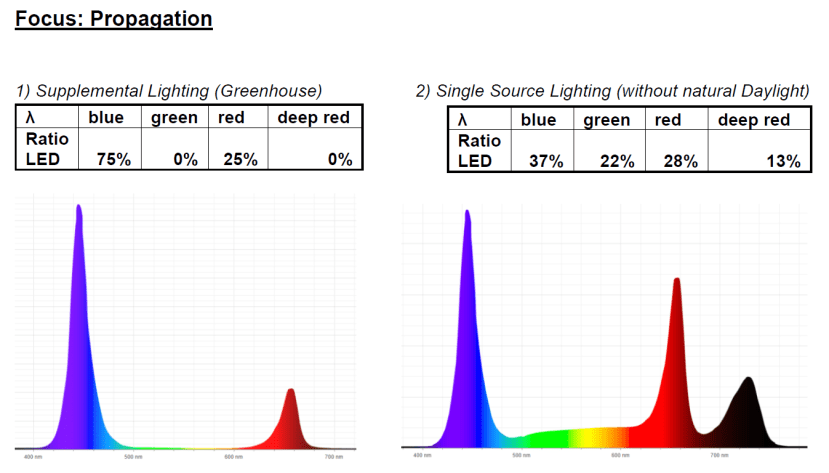
The Würth Elektronik light recipe given for the propagation stage
The first graph shows us how during the early propagation period, there should be more of a focus on the blue spectrum provided by our deep blue LEDs. It is also interesting to note that, while our test will focus on purely artificial lighting conditions, we could also setup our vertical farm to make best use of ambient light and use the LEDs as supplemental lighting for lower energy consumption.

The Würth Elektronik light recipe given for the growth stage
The second graph shows us how during the growth period, the light recipe changes to where red is the predominant spectrum, provided by the hyper-red LEDs. Note how the light recipe now also features a wide band of green and yellow, that will be provided by the white daylight LEDs.
While our light recipes will aim to be as uniform as possible across all our plants, there will be some inherent variation between the different types of plants, that will be interesting to observe during the growing period. Germination times and ambient conditions are likely the biggest factors in determining turnaround time from seed to harvest in different types of plant, where cress is famous for having a turnaround time of just two weeks! In this regard, and with cress as our benchmark, our testing period will be over two weeks, although with optimal growing conditions this may not be needed.

Frame in the shed before testing
The ambient conditions will also determine if our seeds germinate at all, so the location of our farm is also very important. For this test, we will be using a typical garden shed that is sheltered from the elements and adequately ventilated. I will also be using propagator lids to maintain and regulate heat and moisture levels better during the early stages of growth.
Soil moisture is an important constant that needs to be maintained in the test, hence the use of the bottom watering method in the vertical farm. This involves lightly submerging my seed trays in a pool of shallow water for two reasons, firstly, to regulate soil moisture levels automatically, using capillary action to avoid over-watering, and secondly to establish sufficient humidity inside the propagators to encourage a favourable microclimate.

Seeds ready to be sown
I will be using four seed trays with drainage holes, filled with potting compost. The seeds themselves will be placed at different depths as per the instructions on the back of the packet. The seed depths alongside germination times are likely to have the greatest effect on sprouting time and general crop turnaround periods, therefore I am expecting the plants with the best combination of germination time and seeds depth to do best over the testing period.
The measure of success for the test will be primarily to see what kind of germination and growth levels we see, how these compare to our expectations and the back of the seed packet, and ultimately to get an idea of how feasible vertical farming of this or any scale can be.
Actions, Observations and Discussion
Having already tackled the technicalities of building a vertical farm, the testing process was relatively straightforward. I placed the farm structure in the shed, making sure to block any ambient light with plywood sheets so I could have a controlled testing environment.
Having set up the farm, I then loaded four seed trays with potting compost, taking care to moisten the growing medium before sowing the respective seed types in each tray, as per the instructions on the back of the packet. It is worth noting that in the cases of cress and basil, the seeds are planted just below the surface of the soil and hence it is very easy to monitor germination, whereas lettuce and rocket will not be visible until they sprout. To avoid confusion, I labelled each seed tray with a plastic tab.
With the seeds sown, I placed the trays in the propagator and established the initial water level at just above the bottom of the seed trays. I then used the transparent propagator lid to protect my seeds and once they were placed in the farm, I inserted the water hose through the top of the lid and let the pump periodically top up the water level automatically.

Seeds planted and lights on
Lastly, I used the WE Illuminate app on my smartphone to set the light intensity of each LED colour according to the light recipe supplied by Würth Elektronik. The MagI³C LED driver module makes this very straightforward by controlling each of the four LED channels individually over Bluetooth.
Once this was all established, a large part of the test was simply waiting. The most important part of this process initially was making sure I observed germination, and admittedly, I was a bit anxious for the first few days as I waited for something to happen. I really was not sure what to expect from the vertical farm at the start, or even the limit of my own gardening ability, but this was very short lived.
The use of cress in this test scenario was eye-opening, as some of the seeds seemed to germinate on the surface almost immediately, and started growing within a day. The rapid growth cycle of the cress served as a positive hallmark for the rest of the farm, but it wasn’t until I observed it after a few days that I realised how remarkably fast microgreens can grow in artificial light!

Cress before and after the weekend under constant illumination
The use of targeted artificial grow lights resulted in the cress reaching maturity in under a week, that’s twice as fast as what was stated on the packet! Most of this growth was over one weekend where I left it on Friday night and returned on Monday morning to find my seedlings fully grown!

Rocket before and after the weekend under constant illumination
The Rocket while obviously slower than the cress, still managed to fully germinate within a few days, and grow into strong-looking seedlings alongside the fully grown cress. At around the ten-day mark, they were very well established and were already in need of repotting or planting out! Clearly, the conditions were very agreeable for both of these plants.

Basil and Lettuce after two weeks. What has germinated is now growing well.
In contrast, the lettuce and basil did take a lot longer to germinate and the rates of germination were a lot lower. However, given the unseasonably cold weather for this time of year, I actually think that both plants did reasonably well. Basil is definitely a fair-weather plant, and while lettuce prefers slightly cooler soil, the temperature didn’t really rise above ten degrees Celsius while testing, which is unheard of for late April / early May and perhaps something to be said about the challenge of farming under the effects of climate change.

Fantastic results after two weeks
Ultimately, I think the success of the farm hinges on the ability to germinate, as we have already seen that once our seeds are happy, and the climate conditions are favourable, the LED lighting enables terrific levels of growth!
The biggest challenge for the system seems to be establishing a climate that is ideal for germination and the solution to this seems to hinge on what you intend to grow. If you prefer more seasonal crops or hardy annuals then this current system works very well. If we were to be more ambitious, then we would need to establish an artificial microclimate with either a heater, or even a heat pump, but this would obviously increase our energy overhead. Perhaps a more viable solution would be to make use of existing heat sources such as central heating in a domestic setting, recycling heat from industrial processes, or using abundant geothermal energy. Drawing on my own experience, I believe that renewable solar and storage technologies are now so cost-effective that an off-grid solution may also be a viable, sustainable option and something that I would be keen to investigate.
In terms of the performance of the vertical farm as a system, we’ve proven that it can work well and I would go so far as to say that it could be simplified even further. One of the surprising details I noted during the test, was how slowly the water level went down compared to my expectations, which then appeared to increase slightly as the plants became more established. In this regard, I think the use of a closed-loop system consisting of smaller dedicated pumps and water level sensors on each tier may perform better than an open-loop timer in later iterations of the farm.
Lastly, it was very relevant to approach the topic of vertical farming with a fresh pair of eyes, from an ergonomic perspective I found a lot of the process and theory intuitive and easy to understand. As an engineer, and not a skilled gardener, I found vertical farming very accessible, perhaps more so due to my technical background, but it does seem that as long as you follow the instructions and light recipes, it is a useable technology, certainly at this scale, and at any experience level. As a result, it is highly likely that I will continue growing things and developing my farm where I really do see its potential for sustainability and self-sufficiency as an emerging technology.
Comments