3D Printing from Recycled Plastic Bottles, Part 2
Follow article Dave from DesignSpark
How do you feel about this article? Help us to provide better content for you.
Dave from DesignSpark
Thank you! Your feedback has been received.
Dave from DesignSpark
There was a problem submitting your feedback, please try again later.
Dave from DesignSpark
What do you think of this article?
In the first part of this series, we set about exploring and creating tools to cut PET bottles, commonly sold containing carbonated beverages, into long continuous strips of varied thickness. The next stage of recycling this material into 3D printer filament is we need to create a hot-end extruder that receives the cut strips and extrudes something resembling a filament. Aiming to make 1.75mm style filament I set about looking around at how people are achieving this.
One common approach is to use 3D printer parts, or even an entire donor 3D printer, to create the pullstrusion system. Mounting an adapted 3D printer hot end system and modified nozzle as your pullstruder means that you can, if comfortable doing so, use a 3D printer control board and tinker with the firmware to get the system you need. It also means that you can link the same controller to a stepper motor driving the pulling/winding part of the pullstrusion system. It’s a good approach but I felt it might get a little complicated in terms of modifying firmwares and the motor control seems a little overkill as I’d seen simpler, direct drive winding systems with no control systems used.
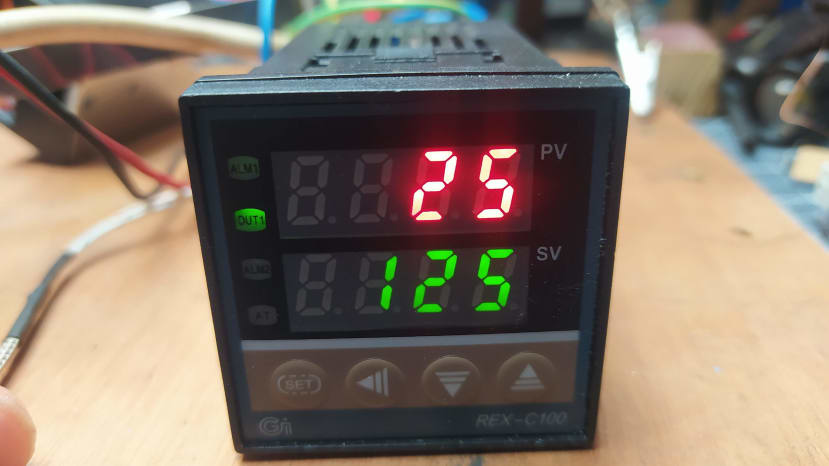
Aside from using 3D printer components another approach that can be found in a few places online is the use of a commercial PID controller with a band heater. Band heaters are, in some ways the correct tool for this job, as they are often used in plastic extrusion systems and also in a wide variety of other applications where heat is needed to be put into a tube or nozzle. I ordered a REX C100 PID controller kit which comes with a thermocouple, a control unit and display and a Solid State Relay (SSR) unit. Also ordered was a 50mm by 35mm Mica band heater which was surprisingly affordable.

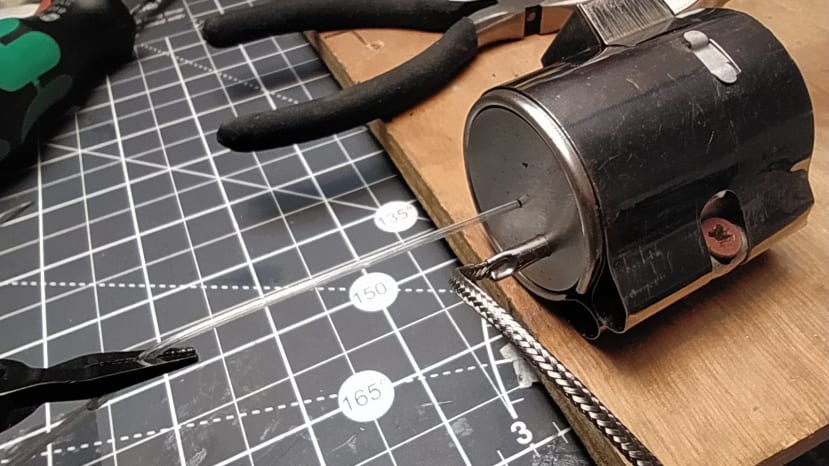
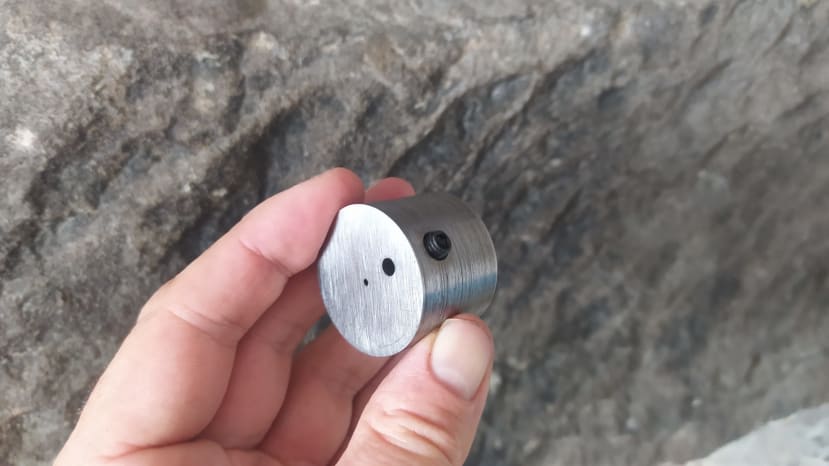
Of course, the band heater needs something to heat. Using a large chunk of EN1A mild steel (simply because this is what was at hand and it is quite easy to machine) I turned a nozzle to fit inside the band heater. The idea is that you want a nozzle which is a little under your target filament size, I drilled the centre through hole to 1.6mm. I then through a combination of drilling and using a boring tool on the lathe, made the back of the nozzle have a large tapered hole which would smoothly guide the bottle strip into the 1.6mm hole. Don’t worry if you don’t have a lathe, this could easily have been made using just a pillar drill and a selection of drill bits. If you have a larger drill bit, say 15mm diameter, the chamfer angle that drill could create would be more than enough ‘run in’ area for the bottle strip.
The Rex C100 PID controller needs feedback from the thermocouple to keep adjusting the temperature and so I wanted to mount the thermocouple directly into the steel nozzle. To do this I drilled a 4mm hole for the thermocouple to slide into. I chose a point where it wouldn’t interfere with the bottle strip entering the device. I then drilled and tapped a 6mm hole at 90 degrees into the thermocouple chamber to allow me to place a grub screw into it to hold the thermocouple gently in place. You could certainly use a smaller grub screw but I was using what I had at hand!
Before we go further, it’s worth stating the usual caveat, if you are at all unsure about or are inexperienced at working with mains AC don’t tackle the wiring required for this system. Ask for help from someone qualified and take every precaution. With that in mind, we performed lots of research and reading into wiring up the REX C100 system. It needs to be noted that we have seen different pin labelling and wire points across these units so you need to check yours carefully and not presume it matches what you see here, or elsewhere online.
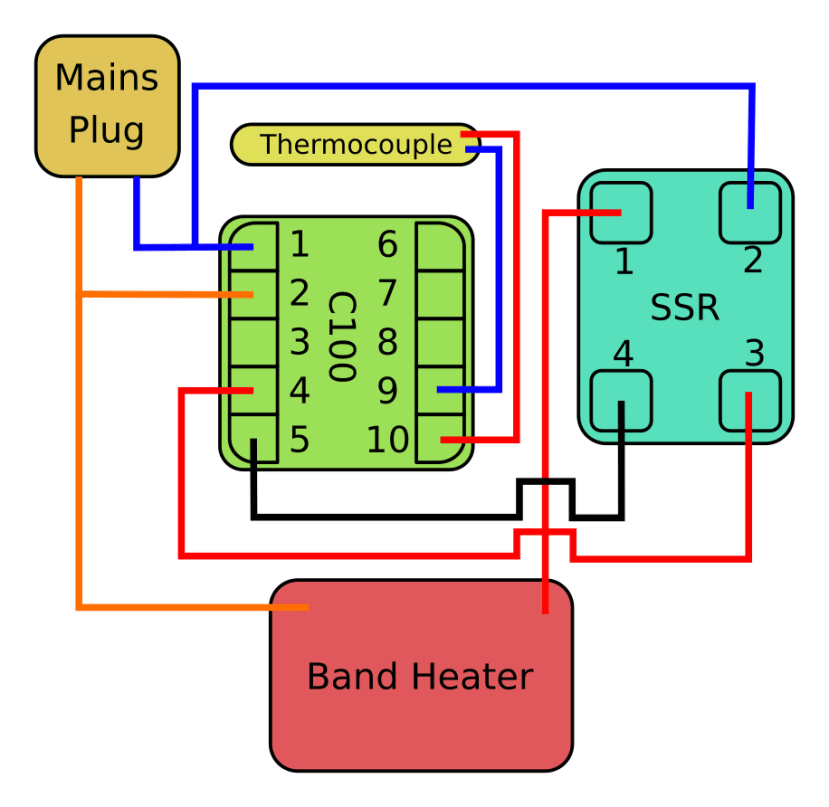
The REX C100 system comes with two components, a PID control unit and a solid-state relay (SSR). The control system can switch the SSR allowing current to flow or not flow to the band heater. Feedback to the controller is via the thermistor and as such it takes a little while to settle onto a target temperature. Once the temperature is stabilised though I’ve found it to be very stable in operation with little fluctuation. As a test set-up, we simply wired the control unit, SSR and the band heater together and fitted the thermistor to the nozzle. Fitting the nozzle into the thermistor we then simply used a screw to temporarily hold the band heater and nozzle arrangement to a scrap of plywood. This isn’t satisfactory but enabled a little bit of testing to take place.
Taking a piece of our stripped bottle I cut one end into a long point so that I could thread this thin section through the nozzle and gently grasp it with a pair of small pliers. Turning on the device I set a target temperature of 190C and waited for the temperature to creep up and settle there. Gently pulling on the point of the strip was encouraging in that I managed to manually pullstrude some of the strip into what looked like a reasonable representation of filament!
There is definitely a lot of experimenting to do with temperature settings and also pullstrusion rate, or the speed at which the filament is pulled from the nozzle. Obviously, an increase in temperature makes the plastic more fluid but in turn, that also means that it is more likely to break. I’d read lots of accounts of different pullstrusion machine builds online and it seems that a rate of around 200mm per minute is a good point to aim for.
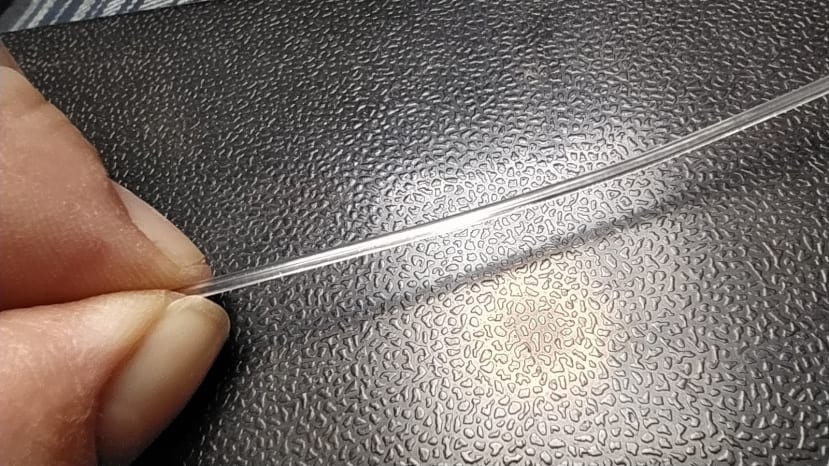
Examining the test filament we’d created by hand it appeared not too bad. It had some variation in diameter but this would probably be more consistent when being wound through the nozzle at a steady rate. It’s also noteworthy that the filament is not a perfectly solid circle in the cross-section. Often you’ll find that pullstruded strip creates a round filament but the filament might have a central void, or even be a “U” shape. Whilst for a commercial filament this would be very off-putting, it’s actually not too big of a problem to mitigate when using this filament for 3D printing. You can simply increase the flow rate so that slightly more filament is used at any given time so that the amount of plastic flowing from the nozzle of the printer is corrected. So long as the created filament is pretty consistent and fits, it should be workable!
In the third part of this series, we’ll look at the creation of the winding mechanism and final assembly of our pullstrusion unit before having a go at using our pullstruded filament for 3D printing.