Audio Processing with Raspberry Pi and Pmods
Follow projectHow do you feel about this article? Help us to provide better content for you.
Thank you! Your feedback has been received.
There was a problem submitting your feedback, please try again later.
What do you think of this article?
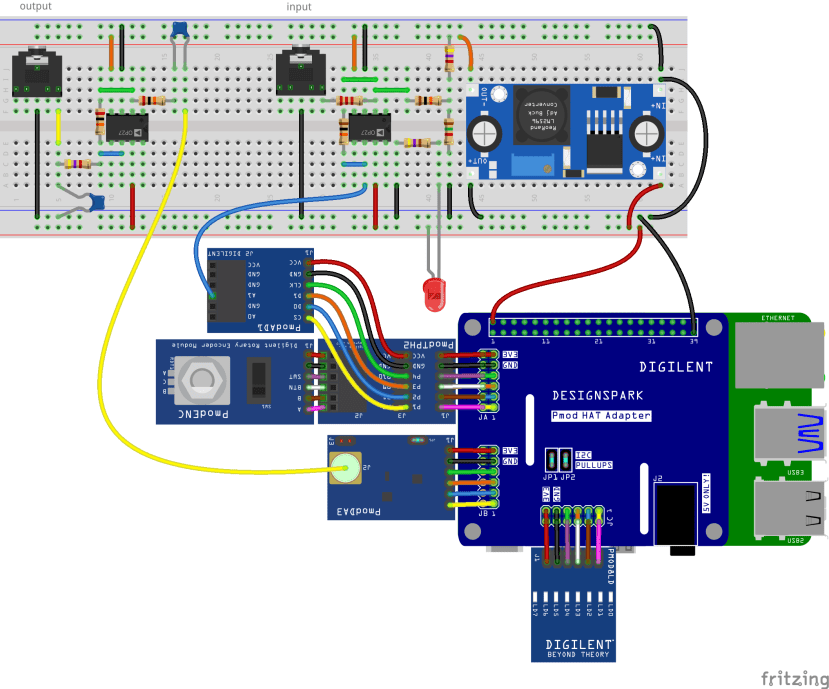 In this project, we will use a Raspberry Pi and Digilent Pmods to apply different audio effects to an input audio signal. The user interface controls the degree and type of the effect.
Parts list
| Qty | Product | Part number | |
|---|---|---|---|
| 1 | Raspberry Pi 4 B 8GB | 182-2098 | |
| 1 | DesignSpark Pmod HAT with 3 Digilent Pmod Sockets for Raspberry Pi | 144-8419 | |
| 1 | Digilent Analog-to-Digital Converter Expansion Module 410-064 | 134-6443 | |
| 1 | Digilent Digital to Analog Converter Expansion Module 410-241 | 134-6456 | |
| 1 | Digilent LED Expansion Module 410-163 | 134-6450 | |
| 1 | Digilent Expansion Module 410-135 | 136-8061 | |
| 1 | Digilent Rotary Encoder Expansion Module 410-117 | 410-117 | |
| 1 | RS PRO 3.5 mm PCB Mount Stereo Jack Socket, 5Pole | 913-1021 | |
| 1 | Digilent Analog Discovery 2 PC Based Oscilloscope, 30MHz, 2 Channels | 134-6480 | |
| 1 | Digilent, 240-000 | 184-0451 | |
Introduction
The main task is to apply audio effects to an input signal. To keep things as simple as possible, the two audio effects chosen for this project as a proof of concept are the echo effect and pitch bend. The nature of these effects will be discussed later in this guide.
The Raspberry Pi has the processing power to alter an input signal in almost real-time. By default, it lacks the necessary peripherals to acquire and playback these signals. However, with the help of the Pmod HAT Adapter, Digilent Pmods, a large variety of Plug'n'Play peripheral modules, can be easily connected to the single-board computer. We capture the sound, alter it, and then play it back. Firstly, the audio signal is fed into an analog to digital converter (ADC). Most ADCs can't handle a raw audio input signal directly, so conditioning the signal might be necessary. After the digital signal is processed, it must be converted back into analog domain, with the help of a digital to analog converter (DAC). Before sending the generated signal to an amplifier or active speaker, conditioning might be again necessary.
To control the audio effect, we create the user interface. For this application, three control elements will be used: a rotary encoder to set the degree of the applied effect, a switch to change the type of effect, and a button, to reset the state of the device. As the user needs feedback about the state of the controls, a LED bar graph consisting of 8 LEDs will be used as a display. A power-on indicator LED is also useful. This can show whether the external circuit is powered or not.
Setting Up the Raspberry Pi
We will use Python 3 for this project, which is preinstalled on the Raspberry Pi OS (version 3.7), but the default Python is Python 2. To make things easier, Python 3 should be set as the default interpreter. Open a terminal on Raspberry Pi, then type:
sudo update-alternatives --install /usr/bin/python python /usr/bin/python3 1Next, the necessary Python packages should be installed or upgraded to the latest version, with the following command:
pip install numpy matplotlib gpiozero RPi.GPIO spidev --upgradeAs we will use peripherals controlled on the SPI interface, this interface should be enabled. Open the configuration settings with:
sudo raspi-configSelect "Interface Options", then "SPI" enable the interface by selecting "Yes".
Input Signal
Pmod AD1
The Raspberry Pi can't sample analog signals directly, thus we use Digilent Pmod AD1, a 12-bit and 1MS/s ADC. Pmod AD1 is powered by Analog Devices AD7476A. It communicates with Raspberry Pi through an SPI interface.
The conversion follows this formula: n=212*Vin/Vref, where n is the outputted number, Vin is the input voltage and Vref is the reference voltage, which is equal to the supply voltage (3.3V). However, the ADC can't handle any voltage less than 0V, or higher than the reference voltage. Although the amplitude of the audio signal on most devices is quite low (approximately 1V), it has a 0V offset. The voltage range is between -1V and 1V. To solve this problem, a conditioning circuit must be built.
Input Signal Conditioning
As the amplitude of the audio signal is much lower than the reference voltage (2*A<Vref), it is enough to add a positive offset to the signal, to shift it above 0V. To do this, a summing amplifier will be used, as shown in the image below.
In this configuration, the desired offset voltage is set by resistors R4 and R5: Voffset=VSS*R4/(R4+R5), where VSS is the negative supply voltage. The output voltage is obtained according to the following formula: Vout=-(Vin*R2/R1+Voffset*R2/R3)=-(Vin*R2/R1+VSS*R4/(R4+R5)), in which case the resistors R4 and R5 set the offset voltage and resistors R1 and R2 set the amplification. Even though the signal is inverted, this won't have any impact on the circuit.
Power Supplies
While the Raspberry Pi has a 5V supply on pin 2 and 4, the conditioning circuit requires a negative supply. To obtain a negative supply voltage, we can use the LTM8067 isolated DC-DC converter. Firstly, we connect the input to the 5V supply and ground. Then, we ground the positive output pin of the converter. As the input and the output are isolated, grounding the positive pin won't short circuit the module. The voltage potential of the negative pin, compared to the ground of the Raspberry Pi, will be below 0V. Do not try this with a non-isolated converter! Use a voltmeter to measure the negative output voltage. Turn the potentiometer with a screwdriver until you get -5V.
Output Signal
Pmod DA3
The Raspberry Pi has only one analog output, the 3.5mm audio jack, which is used for system audio. To have a separate output for the processed audio signal Digilent Pmod DA3 is used. The Pmod DA3 is a 16-bit DAC that is powered by Analog Devices AD5541A. The Pmod DA3 can communicate with Raspberry Pi through an SPI interface.
The conversion follows this formula: Vout=n*Vref/216, Vout is the output voltage, n is the input number and Vref is the reference voltage, which is equal to 2.5V (internal reference). As the DAC can handle only 16-bit, unsigned numbers, so no voltage lower than 0V, or higher than Vref can be obtained in the output. However, an amplifier or an active speaker "awaits" an input signal with 0V offset and usually maximum 1V amplitude, so conditioning the output signal is necessary.
Output Signal Conditioning
The range 0-2.5V allows an output signal of 1V amplitude if it has at least 1V offset. The offset can be removed with a decoupling capacitor followed by a voltage follower. A low-pass filter might be needed in the output as well. The voltage follower's negative supply is taken from the DC-DC converter mentioned previously, which is a switching regulator (flyback converter), so it generates a high frequency switching noise. Due to the speed limitations of the Raspberry Pi, the sample rate is also limited. With a reduced sample rate, the output might present sharp edges, so the harmonics of the output frequencies should also be filtered out.
The vowels in human speech can reach frequencies up to 2KHz, while consonants reach frequencies as high as 6KHz. If a simple low-pass filter is used, designing the cut-off frequency to be between 3KHz and 4KHz seems reasonable, as the majority of sounds is below 3500Hz (source).
If standard resistor and capacitor values are used, the cut-off frequency of the filter becomes fc=1/(2*π*R8*C2)=3.4KHz.
User Interface
Pmod ENC
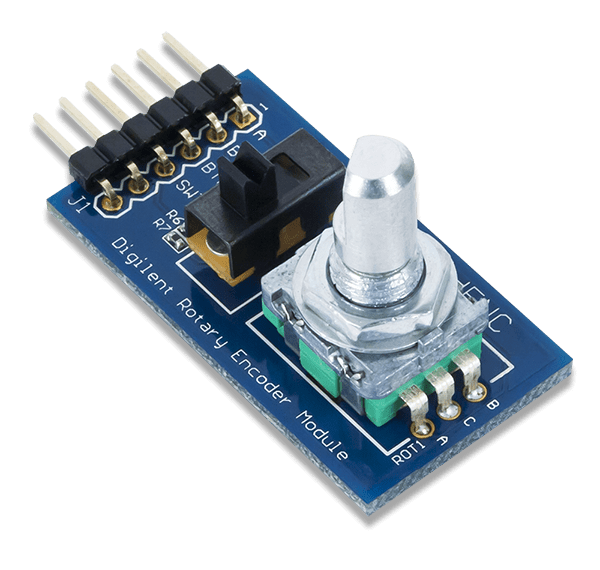
With the Pmod ENC, we can use a switch to turn on the audio processing, a rotary encoder to set the degree of the effect, and a reset button.
Pmod 8LD
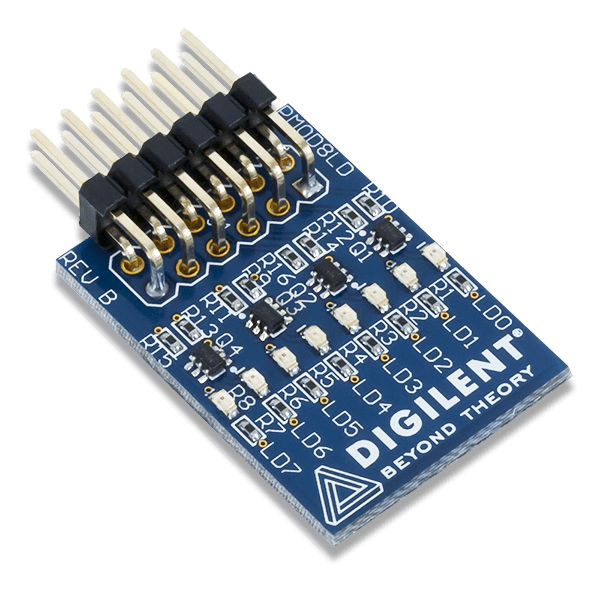
The Pmod 8LD contains 8 high brightness LEDs, controlled by low power logic levels. This can give feedback to the user.
Power Indicator
While the Raspberry Pi has a power-on LED, a second indicator is useful to signal whether the conditioning circuits are powered or not. To build the power indicator, just connect a LED to the 5V supply in series with a current limiting resistor.
The value of the current limiting resistor can be calculated with the following formula: R9=(VCC-VLED)/ILED, where VLED is the forward voltage of the LED (usually around 1.8V for red LEDs) and ILED is the desired current through the LED. The resistor must be chosen to set this current below the maximum. The brightness of a LED is proportional to the current through it. If a dimmer indicator is wanted, a higher value resistor must be chosen.
Interfacing Pmods with the Raspberry Pi
Pmod HAT Adapter
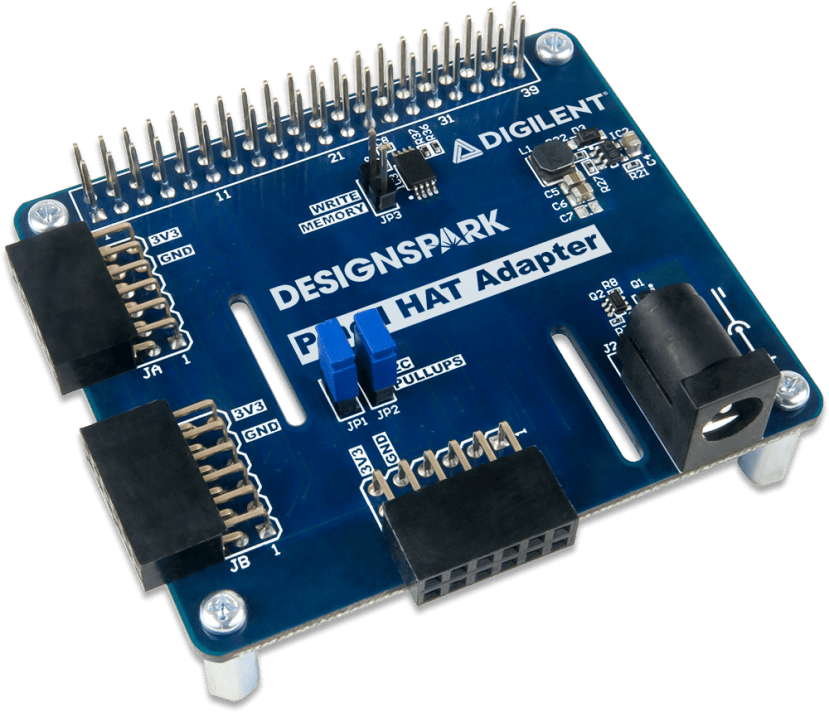
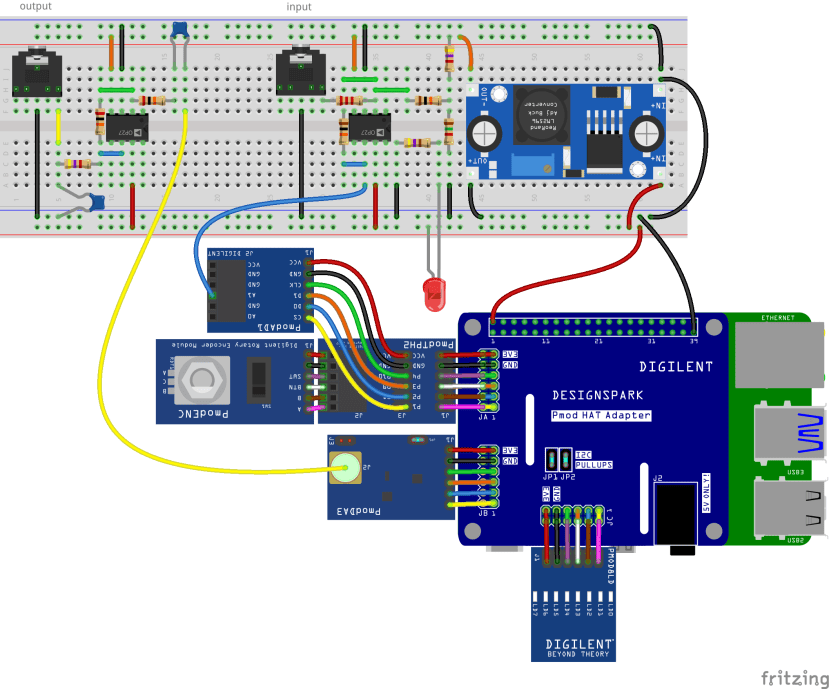
We can connect Digilent Pmods to the Raspberry Pi through Pmod HAT Adapter. The Pmod HAT Adapter breaks out the 40 pin Raspberry Pi GPIO connector to three 2x6 Digilent Pmod connectors (JA, JB, and JC) and each of them can also be used as two separate 1x6 Pmod connectors (for example JA can be separated to JAA and JAB). All the Pmod ports contain a ground and a 3.3V pin to supply power to the connected Pmod. While all ports can be used as GPIO (General Purpose Input/Output), some ports have additional functionality: JAA and JBA can be used to connect Pmods with SPI interface, I2C interface can be used on port JBB and UART on JCA. The adapter can be powered directly from the Raspberry Pi, or from an external 5V power supply via the DC barrel jack (don't use both at the same time!).
The following connections are recommended:
| Pmod HAT Adapter Port | Connected Pmod | Protocol Used |
|---|---|---|
| JAA | Pmod AD1 | SPI |
| JAB | Pmod ENC | GPIO |
| JBA | Pmod DA3 | SPI |
| JC | Pmod 8LD | GPIO |
To connect both Pmod AD1 and Pmod ENC to the JA port of the Pmod HAT Adapter, the Pmod TPH2 12-point test header can be used.
The Full Circuit
After the conditioning circuits, the negative power supply and the power indicator are assembled on a breadboard, connect the 5V rail to pin 2 on the 40 pin Raspberry Pi GPIO connector and the GND rail to pin 39. This way the circuits on the breadboard will be powered. Connect the output of the first conditioning circuit to the A1 channel of the Pmod AD1 and the input of the second conditioning circuit to the SMA connector of the Pmod DA3 (an MTE cable instead of a male SMA connector can also be inserted in the plug).
Software
As discussed previously, the software controlling the audio processor will be written in Python3. The project consists of six modules, which will be presented in a top-down approach.
main.py
The main module contains the most important settings of the project and initializes the other modules. Every important quantity should appear in an accessible place, like the start of the main module, to make tuning easier.
# global variables
spi_clock_speed = int(4e06)   # spi clock frequency in Hz
sample_time = 5e-05  # seconds between samples
buffer_size = 5000  # data points in the buffer
DEBUG = "None"  # "ADC", "DAC", "PROC", "ALL" or "None"
adc_res = 4095  # resolution of the ADC
dac_res = 65535  # resolution of the DAC
The Raspberry Pi has 4 important tasks to do: receive audio input, process audio signals, sent out and communication with the user. If these tasks are done one after the other, there are two major defects
1. A large delay between the input voice and the output voice (the time in which the signal is recorded, processed and played back)
2. Interruptions in the output voice.
To avoid these, tasks must be done in parallel.
The user interface can be realized with the gpiozero Python module which uses asynchronous events (like interrupts on a microcontroller) to communicate with the user. The main module just assigns actions to these events.
# set user interface actions
# increment/decrement a value, when the rotary encoder is rotated
UI.enc.when_rotated = UI.set_value
# reset the value, when the button is pressed
UI.btn.when_pressed = UI.reset_value
# set a flag according to the state of the switch
UI.swt.when_pressed = UI.change_mode
UI.swt.when_released = UI.change_mode
The Raspberry Pi 4 Model B has a quad-core Cortex-A72 processor, which enables us to run tasks on different processor cores via the multiprocessing Python module. The first, main process will only initialize the other child processes. One child process records the input data, the other processes the data and the last one plays it back.
To avoid interruptions in the output, three shared buffers are used: the recorder process fills the three buffers one after the other. If the first buffer is emptied by the player process, the whole process starts again. The data processing waits for the recorder and modifies the content in the buffers.
Shared flags are used to signal the state of each buffer.
# create shared lists
manager = multiprocessing.Manager()
# 3 buffers to use them in rotation
buffer = manager.list([[], [], []])
# flags to signal aquisition state
get_flag = manager.list([False, False, False])
# flags to signal processing state
set_flag = manager.list([False, False, False])
# flags to signal write-out state
ready_flag = manager.list([True, True, True])
The wrapper starts the child processes, then waits for them to finish (the program exits on Ctrl+C).
# main part
if __name__ == "__main__":
    UI.reset_value()   # reset counter

    # initialize processes
    acquisition = multiprocessing.Process(target=DI.acquire_data)
    processing = multiprocessing.Process(target=DP.process_data)
    playing = multiprocessing.Process(target=DO.output_data)

    # start threads
    acquisition.start()
    processing.start()
    playing.start()

    # wait for exit condition
    acquisition.join()
    processing.join()
    playing.join()

    UI.reset_value()   # reset counters

    # terminate processes
    acquisition.terminate()
    processing.terminate()
    playing.terminate()
user_interface.py
The user interface module contains all user interactions functions. These functions
1. Set a variable according to the state of the rotary encoder
2. Light LEDs according to this variable
3. Change the state of the flag on different switch positions (the switch must be pulled up, or down, because otherwise the edges aren't detected)
4. Reset all values and flags when the reset button is pressed.
def set_value():
    # map the counter between 0 and 1 using the rotary encoder
    global param
    param[0] = enc.steps / (2 * enc.max_steps) + 0.5
    set_leds()  # set LED states
    return
def set_leds():
    global param
    # set the leds on/off according to the counter
    if param[1]:
        led.value = param[0]
    else:
        led.value = -param[0]
    return
def change_mode():
    # switch the flag
    global param
    param[1] = bool(swt.value)
    # force software pull-up/-down
    if param[1]:
        GPIO.setup(18, GPIO.IN, pull_up_down=GPIO.PUD_UP)
    else:
        GPIO.setup(18, GPIO.IN, pull_up_down=GPIO.PUD_DOWN)
    set_leds()  # set LED states
    return
def reset_value():
    # reset the counter
    global param
    param[0] = 0
    enc.steps = -enc.max_steps  # reset rotary encoder state
    param[1] = bool(swt.value)  # reset switch state
    set_leds()  # reset LED states
    return
The module makes use of the members of the gpiozero Python package to handle input/output devices more easily.
# initialize devices
# Rotary Encoder
enc = RotaryEncoder(19, 21)
btn = Button(20)
swt = Button(18)

# pull down the switch
GPIO.setwarnings(False)
GPIO.setmode(GPIO.BCM)
GPIO.setup(18, GPIO.IN, pull_up_down=GPIO.PUD_DOWN)

# LEDs
led = LEDBarGraph(16, 14, 15, 17, 4, 12, 5, 6)
The received values and flags are stored in a shared list so that they are available to other processes.
# shared user-interface parameters
manager = multiprocessing.Manager()
param = manager.list([0, False])
data_input.py
The data input module is responsible for initializing SPI communication with the Pmod AD1 using the spidev Python package. This module fills a buffer with the received 12-bit data words, waiting after each acquisition for a predefined time (waiting between samples is necessary, to ensure that the time between two samples is always the same - otherwise pitch shifts may occur), and set the flags when the buffer is filled, to signal its state to the other processes.
# initialize ADC
adc = spidev.SpiDev()
adc.open(SPI_port, CS_pin)
adc.max_speed_hz = main.spi_clock_speed
for _ in range(main.buffer_size):
# measure start time
start_time = time.perf_counter()
# read data bytes
adc_raw = adc.readbytes(2)
# recreate the number from the bytes
adc_number = adc_raw[1] | (adc_raw[0] << 8)
# insert the number in the buffer
buff.append(adc_number)
# check the duration of the operation
duration = time.perf_counter() - start_time
# wait if necessary
if main.sample_time > duration:
time.sleep(main.sample_time - duration)# assign buffer and set flags
if main.ready_flag[0]:
main.buffer[0] = buff
main.get_flag[0] = True
main.ready_flag[0] = False
continue_flag = True
elif main.ready_flag[1]:
main.buffer[1] = buff
main.get_flag[1] = True
main.ready_flag[1] = False
continue_flag = True
elif main.ready_flag[2]:
main.buffer[2] = buff
main.get_flag[2] = True
main.ready_flag[2] = False
continue_flag = Truedata_output.py
The data output module is very similar to the data input module. It controls the DAC via SPI using the spidev Python package. However, the output module checks global flags describing the states of the three buffers before the buffer is processed. After the samples from the buffer are sent to the DAC, the waiting time might not be equal to the waiting time of the ADC. That is because the first element of each buffer contains information about the pitch-shift required (to apply that effect).
# output buffer
if case != None and len(buff) != 0:
  # calculate the duration of a sample
  # (this is needed because of the pitchbend effect)
  sample_duration = main.sample_time - buff[0]
  # discard the first sample
  # (this contains information about the pitch)
  buff.pop(0)

  # output every sample
  for point in buff:
    # measure start time
    start_time = time.perf_counter()

    # get high byte
    highbyte = point >> 8
    # get low byte
    lowbyte = point & 0xFF
    # send both bytes
    dac.writebytes([highbyte, lowbyte])

    # check the duration of the operation
    duration = time.perf_counter() - start_time
    # wait if necessary
    if sample_duration > duration:
      time.sleep(sample_duration - duration)
data_processing.py
The data processing module checks the global flags before processing the buffer. It is necessary for the processes to be in-sync. This module maps the input buffer between -1 and 1 (normalized values), applies one of the effects on the normalized buffer according to the state of the control switch and the rotary encoder, interpolates the normalized buffer according to the resolution of the DAC, and inserts the required timeshift in the first position. The audio effects "echo" and "pitchbend" are created in a separate module.
# normalize values
buff = [interp(element, [0, main.adc_res], [-1, 1]) for element in buff]
# apply audio effect
bend = 0 # store the timeshift if needed
if UI.param[1]:
bend = AE.pitchbend(UI.param[0], main.sample_time)
else:
buff = AE.echo(buff, UI.param[0], main.sample_time)# scale buffer
buff = [round(interp(element, [-1, 1], [0, main.dac_res])) for element in buff]
# insert timeshift
buff.insert(0, bend)audio_effects.py
This module contains some constants which set properties of the audio effects:
1. echo_mag sets the loudness of the echo effect,
2. echo_del sets the maximum delay in milliseconds of the echo (if a larger delay is used, the buffer size must be increased as well, which leads to larger latency, while with a smaller delay, we might get a reverb effect instead of an echo)
3. pitch_bend sets the maximum amount of pitch shift compared to the sampling frequency (if the audio is sampled every 50 microseconds, 0.25 maximum shift results in a delay of 37.5 microseconds between output samples, so the frequency of the output signal will be 1.33 times higher).
echo_mag = 0.8  # echo magnitude between 0 and 1
echo_del = 100  # maximum delay for echo (in ms)
pitch_bend = 0.25   # maximum delay for pitchbend
                    # in % compared to the sample time
The first effect, the pitch_bend, calculates the delay difference between samples by multiplying the original sampling time with the rotary encoder position counter and the maximum amount of pitch shift. This value will be later inserted at the start of the buffer.
def pitchbend(counter, sample_time):
    # calculate sample delay/advance for pitch bending
    bend = sample_time * counter * pitch_bend
    return bend
The echo effect takes the original buffer and creates a delayed version from it, by calculating the sample count for each delay time, then inserting that many 0-s to the start of the buffer. The delayed buffer is attenuated according to the echo_mag constant, then it is added to the original buffer.
def echo(buffer, counter, sample_time):
    # count delay for samples
    counter = round(echo_del * counter / (sample_time * 1000))
    # create dummy buffer
    delay = [0 for _ in range(counter)]
    # shift samples to get the echo
    delayed_buff = delay + buffer
    # add the echo to the original buffer
    result = [buffer[index] + echo_mag * delayed_buff[index]
              for index in range(len(buffer))]
    return result
Debugging
Debugging the Hardware
Analog Discovery 2 can be used, along with the WaveForms software to debug the hardware. Connect the analog input channel 1 negative wire (orange-white wire) of the AD2 to the ground of the Raspberry Pi, then use the positive wire (orange wire), to measure voltages and display analog signals on different points of the circuit. Display the results with the Oscilloscope instrument in WaveForms. Use a fixed frequency and amplitude input signal, to know what output to expect.
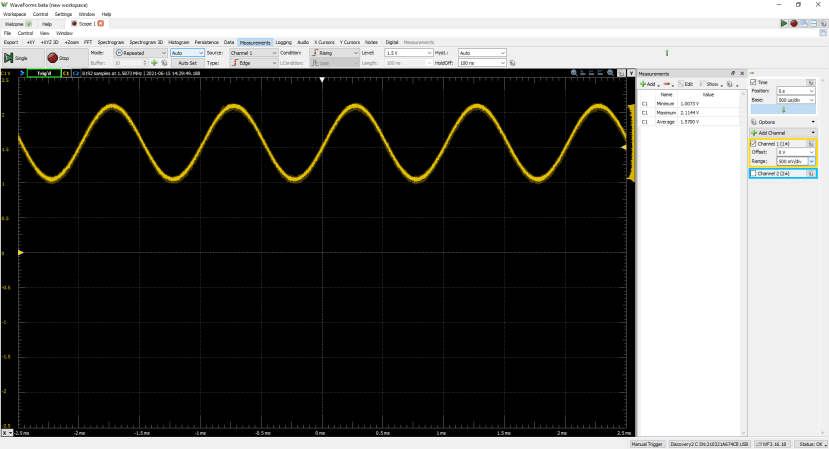
Some voltages and analog signals which are recommended to be visualized are the negative rail of the power supply (should be around -5V), the output of the voltage divider in the input conditioning circuit (it should be around -1.5V), the output of the input conditioning circuit (the input in the image is a 1KHz sine signal with 50% loudness),
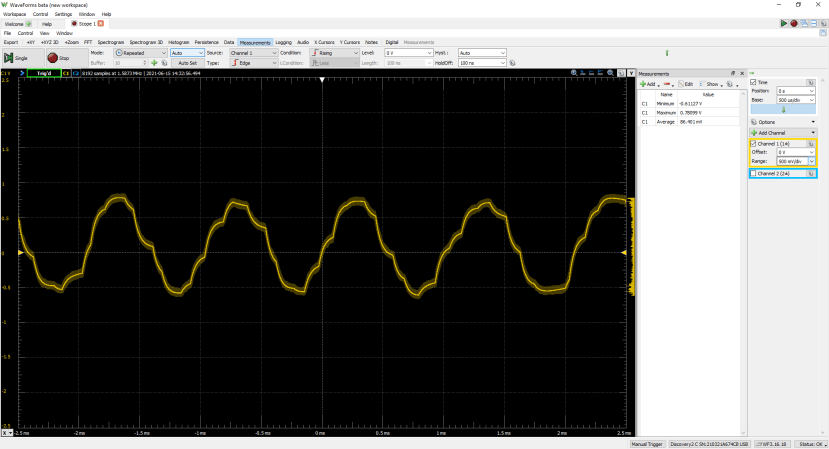
the output of the DAC (the bad quality is because of the low sampling rate),
the output of the output conditioning circuit,
and the output of the whole device, after the low-pass filter.
If one or more signals are not in the expected range, the conversion ratio of the DC-DC converter should be modified using the potentiometer. To change the amplitude of a signal, the respective resistors should be modified.
Use the Pmod TPH2 between the Pmod HAT Adapter and the DAC or ADC, to have testpoints on the SPI signals. Connect the digital I/O pins of the AD2 to the tespoints, then use the Logic Analyzer instrument in WaveForms to visualize the incoming/outgoing data.
Debugging the Software
While the input and output signals can be easily visualized with the Oscilloscope or the Logic Analyzer, there are internal "signals", stages of different buffers, which exist only virtually. To visualize these data points, the matplotlib.pyplot Python module can be used. To abbreviate the name of the module and to show its function, it can be imported into the project as "debug".
# display the buffer if needed
if main.DEBUG == "ADC" or main.DEBUG == "ALL":
  debug.plot(buff)
  debug.show()
Tuning
The performance of the application depends on some key parameters. Two of the most important values in the whole project are the sampling time and the buffer size. Reducing the sampling time increases the quality of the output and the bandwidth (before the low-pass filter), but the time needed for each buffer to be filled is increased as well. If the buffer is filled too slow, interruptions in the output appear. This can be corrected if the buffer size is reduced, but with a reduced buffer size, the echo effect can't be applied, and problems with the pitchbend timing also appear. With a very short sampling time, pitch shift in the output audio might appear randomly. The solution is to find a balance between good audio quality and uninterrupted operation.
Results
Some results with 50 micro second sampling time and a buffer of 5000 samples:








Comments