Trying out Python on the Pi
Follow article
 Dave from DesignSpark
How do you feel about this article? Help us to provide better content for you.
Dave from DesignSpark
Thank you! Your feedback has been received.
Dave from DesignSpark
There was a problem submitting your feedback, please try again later.
Dave from DesignSpark
What do you think of this article?
Learning Python and GPIO basics with the Raspberry Pi 2.
Looking at my previous blog posts it will be apparent that most of my programming experience has been on Arduino. So I thought it was about time I had a proper look at Raspberry Pi and what seems to be the most popular programming language to use with it – Python.
Setting up the Raspberry Pi
The very first thing which needs doing is preparing an SD card. I loaded the most up to date version of Raspbian, which can be found in the downloads section of the Raspberry Pi website.
When the download was complete the zip file needed to be extracted. To do this on my laptop which is running Ubuntu, I opened a terminal window and entered the following.
$ cd Downloads
$ unzip 2015-09-24-raspbian-jessie.zip
*Please note that if downloading a later version of Raspbian the file name may be different.
This uncompressed image can then be used to format the SD card. In the terminal to do this I used the dd command. This command should be used with great care as it is very easy to erase your hard drive if misused.
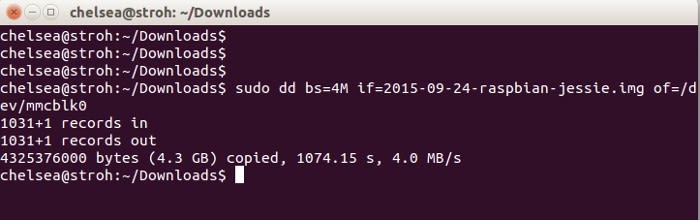
$ sudo dd bs=4M if=2015-09-24-raspbian-jessie.img of=/dev/mmcblk0
*Above is the command used to format the SD cards.
Once the SD card had been imaged this was inserted into the Raspberry Pi and then next I connected the Pi to a monitor, keyboard, mouse, Ethernet and power supply.
I opened the terminal and executed ifconfig -a. I did this before and after the Pi was connected to the network to see what address had been allocated to the board.
At this point I could remotely connect to the Pi from my laptop, using the command:
$ ssh -Y pi@10.0.10.119
So what does that mean?
ssh – This is the command which connects to the remote computer with IP address which follows.
-Y – This enabled X11 forwarding, which means that any graphical programs which are run on the Pi are forwarded to the computer which is remotely logged into it.
pi – The user name to log in as.
10.0.10.119 – The IP address for the Pi on the network.
Now the Pi is set up and connected to the network I can begin using Python to try out some examples.
Python Basics
To run Python from the terminal window you can use this as a command line by entering the following:
$ python
From here you can then start entering in Python code.
Or you can put your Python code in a file which then gets run.
$ nano example.py
Nano is a text editor which can be used to create and edit files. When starting nano you need to specify the file name.
You can also use Idle as the Python shell by entering this command:
$ idle
This will open a window in which you can edit and execute your code.
*Both of these commands should be run when you are remotely connected to the RPi.
Next we will look at the challenges set in the example section of the Raspberry Pi website. I decided to use Idle as Python shell, since this seemed preferable for a novice who was first getting to grips with the language, also this is what was used to run through the examples.
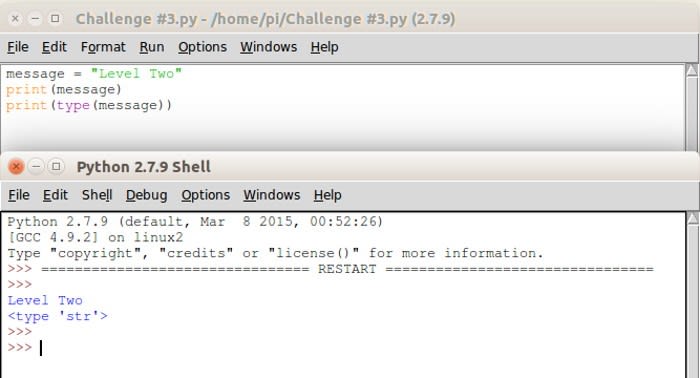
Printing With Python
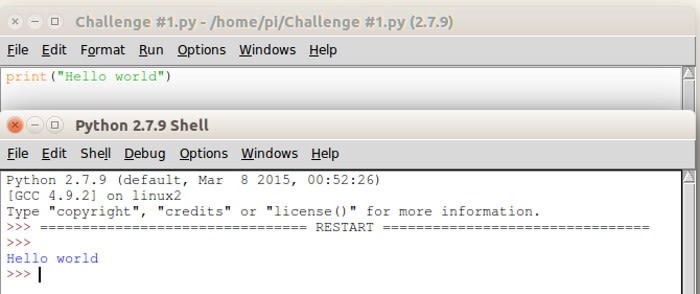
The first challenge is the hello world example. This uses the print function to display text to the output. The text is wrapped by quotation marks and passed as a parameter to the function. e.g. $ print(“hello world!”).
Printing Variables
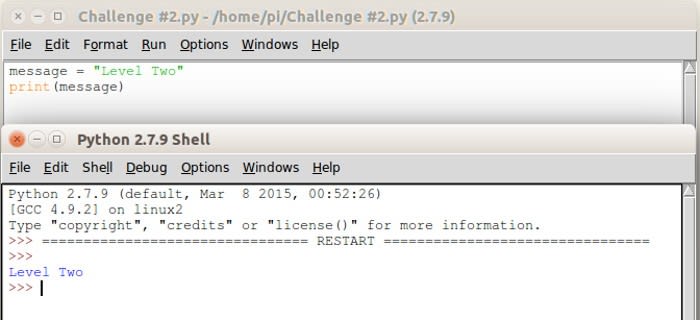
Another example using the print function, however, this time printing a variable out.
Determining Variables
This challenge uses a function to ask Python what type a variable is and prints it out.
Arithmetical Printing
Challenges four, five and six all use the print function combined with numerical variables to perform calculations. These challenges demonstrate how you can perform one or more calculations in a program.
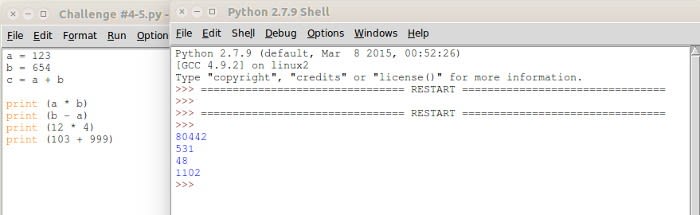
Challenge 6 also shows what happens when the value of variables change.
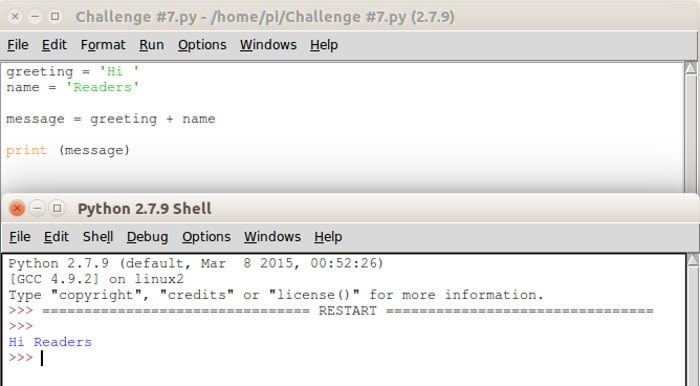
Combining Strings
This example shows how you can combine multiple strings together. Once multiple variables have been defined these are combined into a final variable.
GPIO
GPIO stands for general purpose input/output and these are generally digital, however, analogue is sometimes available. Which types of GPIO is available is dependant on the chip in question. GPIO pins allow development boards such as Arduino and the Raspberry Pi to connect to the outside world. the RPi only has digital GPIO pins.
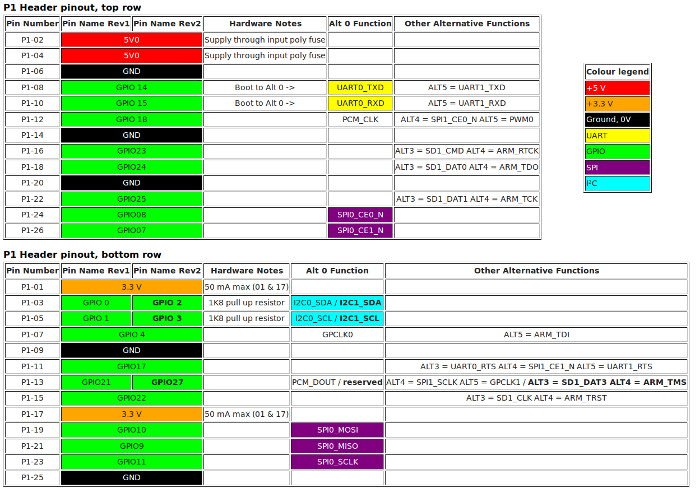
*The tables above were taken from elinux.org
Some examples of general purpose inputs include:
- Gathering readings from a temperature sensor.
- Detecting when a switch is actuated.
- Taking measurements from an LDR.
Examples of general purpose outputs consist of:
- Blinking an LED.
- Sounding a buzzer.
- Controlling the power supply to other external devices.
Illuminating an LED
The most basic thing you can do on the RPi is pretty much just illuminating an led and using the Pi as a power source for this. Most people will be familiar how an LED works; there is an anode (long leg) and a cathode (shorter leg). The anode is connected to VCC (ideally through a suitably sized resistor) and the cathode is connected to GND. This provides power to the LED, therefore making it illuminate.
So for a very basic first step I did just that. Because for this example the LED wasn’t going to be illuminated for long I didn’t bother using a resistor. I connected the anode to pin 1 (3.3V) on the RPi and the cathode to pin 6 (GND), there are other options for these connections, refer to the pin mapping of the RPi for this information. After the LED was connected I then powered the Pi through the micro USB and this illuminated the LED.
Blinking an LED
Again I remotely connect to the RPi using the ssh command.
To use GPIO on the RPi you need to include the RPi.GPIO library. This module is installed by default with Raspbian, however, to make sure the most up to date version is installed run the following commands when connected to the Pi.
$ sudo apt-get update
$ sudo apt-get install python-rpi.gpio python3-rpi.gpio
Getting started with GPIO
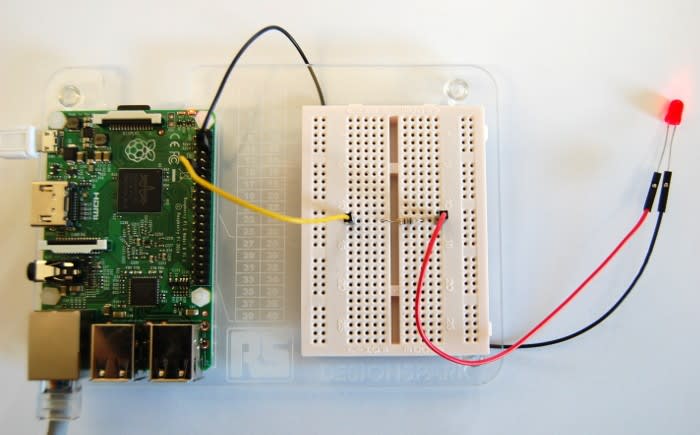
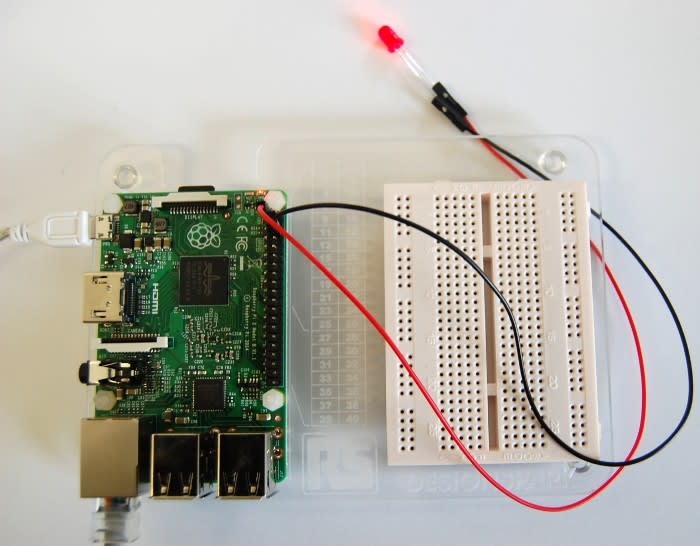
Once this has been done I was ready to start using GPIO on my Raspberry Pi. The first thing I wanted to do with GPIO was a simple example which would make an LED blink. Since the LED will be connected for much longer this time I used a 68 ohm resistor.
To find out what resistor size is required you can use an online calculator. Take LED the specifications from the manufacturer data sheet.

So this time instead of connecting the anode of the LED directly to 3.3V it was connected via a resistor to a GPIO pin – I used GPIO17, which is pin 11 on the RPi. The cathode of the LED should still be connected to GND, which is pin 6 on the Pi.
Once the LED is connected to the Pi the next thing to do was to start looking at writing a blink program in Python. This time I decided I wasn’t going to use Idle and wanted to try using the nano text editor instead.
There are lots of basic GPIO examples available online, the one i followed can be found here.
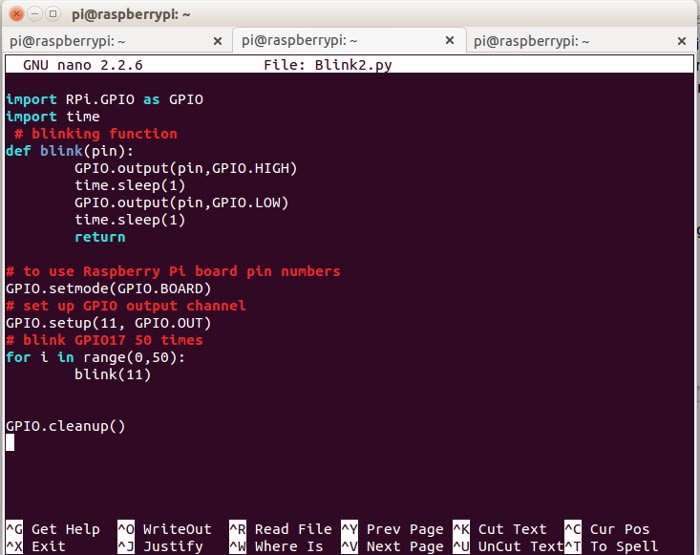
Once I had entered the code I could then run this by executing python Blink2.py in the terminal to see if it works!

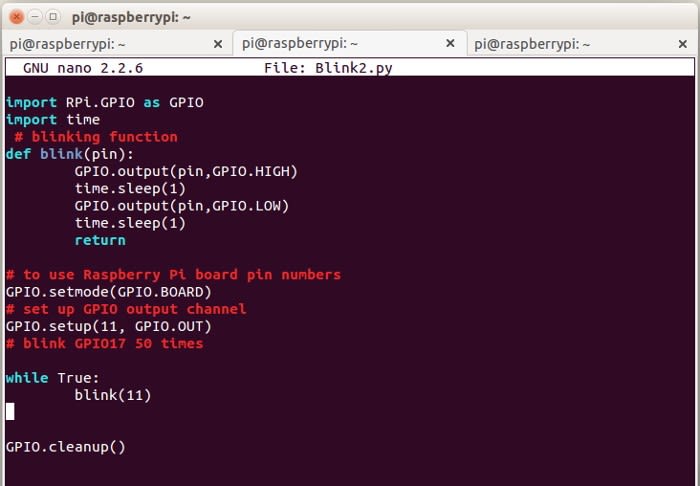
Here we have a working blink program using Python! The way the program is written the LED will blink 50 times before ending. To repeat this you can enter python Blink2.py in the terminal again to run it once more, or if you wish it to blink for longer you could edit the range in the nano text editor.
I wanted to make the LED blink forever, so I did this by removing the for loop and replacing this with while true().
If you would like to learn Python more in depth there is a very useful website which goes into further detail here.
Python or Arduino?
For a first time using Python I thought it was relatively straightforward. For anyone writing code in a programming language that is new to them will obviously be a bit different and take longer, than if they were to do this in a language they were already familiar with.
I like the fact that Python has many thousands of libraries available to use on multiple platforms. I plan to learn more about Python in the near future and look at what peripherals I can interface with using it on the Raspberry Pi.
In comparison to Arduino I would have to say at the minute I have no preference; I am fairly familiar with Arduino basics, so when working with this I can complete tasks faster and understand more of the language. However, as I’m no so familiar with Python, at the moment it is difficult to give a proper comparison of the two.
I still have a lot to learn with Python, such as the different data types, using variables and conditional statements. As my experience with this and Arduino develops I may then develop a preference.
Comments