Building a Portable 12V Sound System
Follow project
 Dave from DesignSpark
How do you feel about this article? Help us to provide better content for you.
Dave from DesignSpark
Thank you! Your feedback has been received.
Dave from DesignSpark
There was a problem submitting your feedback, please try again later.
Dave from DesignSpark
What do you think of this article?
 In a series of Designspark articles, I have outlined my creation of a stylish, great sounding, portable 12 Volt sound system. In this Project post, I give a more detailed break down of how the system was put together.
Parts list
| Qty | Product | Part number | |
|---|---|---|---|
| 1 | Speaker Cabinet Kit including Drivers from Wilmslow Audio | ||
| 1 | Tuff Cab Speaker Cabinet Paint | ||
| 1 | 5mm Black Acrylic Sheet | ||
| 2 | U1. Line Input Transformer 10kΩ : 10kΩ | 123-7201 | |
| 2 | XLR1.1 and XLR1.2. Neutrik 6 Way Panel Mount XLR Connector, Female to Female, Gold over Nickel Plated Contacts, 50 V | 448-7243 | |
| 2 | S3. Off-On Push Button Switch, IP67, Panel Mount Red LED | 022-6047 | |
| 2 | Binder 720 Series, 3 Pole Panel Mount Miniature Connector Socket, Male Contacts, IP67 | 734-5571 | |
| 2 | Binder 720 Series, 3 Pole Cable Mount Miniature Connector Socket, Female Contacts, IP67 | 734-5492 | |
| 1 | 09-1034, Single-Sided Stripboard FR-2 160 x 100 x 1.6mm FR1 | 100-4328 | |
| 1 | Power Supply, Desk-Top, SMPSU,12V,5A,60W | 018-8769 | |
| 2 | R1. Vishay P9A1R100FISX1103ML 1 Gang Rotary Conductive Plastic Potentiometer with a 6 mm Dia. Shaft | 504-2661 | |
| 4 | S1 and S2. RS Pro Single Pole Double Throw (SPDT) Toggle Switch, Latching, IP67, PCB | 734-6968 | |
| 2 | JP2. 8 Way Preci-Dip Straight Through Hole 2.54mm SIL Socket, Solder, 3A 100 V ac, 150 V dc | 702-2789 | |
| 2 | J1 and JP1. 10 Way Preci-Dip Straight Through Hole 2.54mm SIL Socket, Solder, 3A 100 V ac, 150 V dc | 702-2805 | |
| 2 | Phoenix Contact COMBICON MPT Series 2.54mm Pitch Straight, PCB Terminal Block, Through Hole, 2 Way | 220-4260 | |
| 2 | U3. LDO Regulator 3.3V 1.3A TO220 | 686-9767 | |
| 2 | U4. Click Board MAX9744 Audio 2x20w | 165-1405 | |
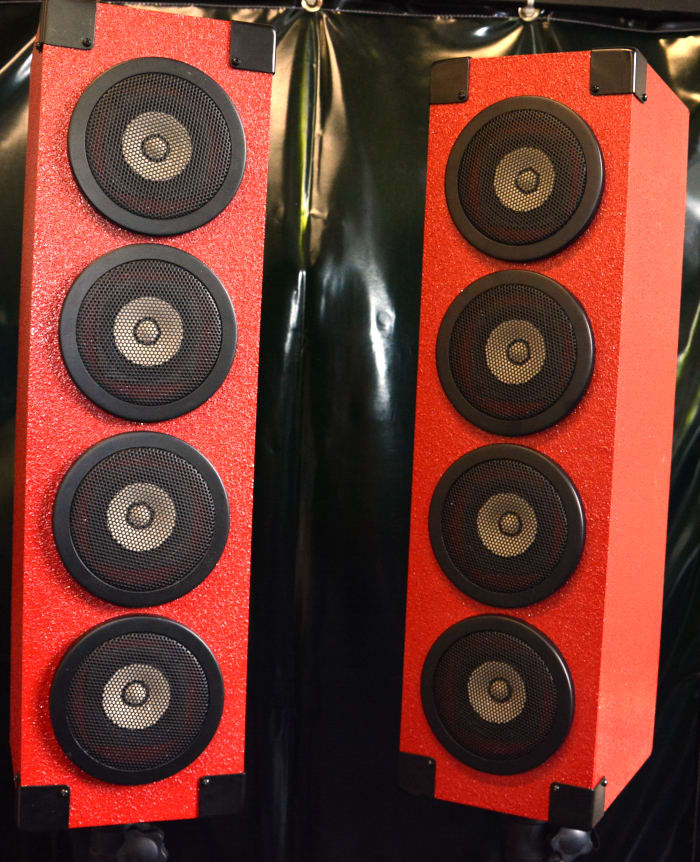
I sourced the speaker cabinets and drivers as a kit from Wilmslow Audio. Alternatively, if you wanted to build something similar yourself, there are other places that supply similar kits, or you could start from scratch referencing the multitude of plans and instructions to be found on the Internet.
The paint that produced the striking red textured finish is called Tuff Cab and can be sourced from various online vendors.
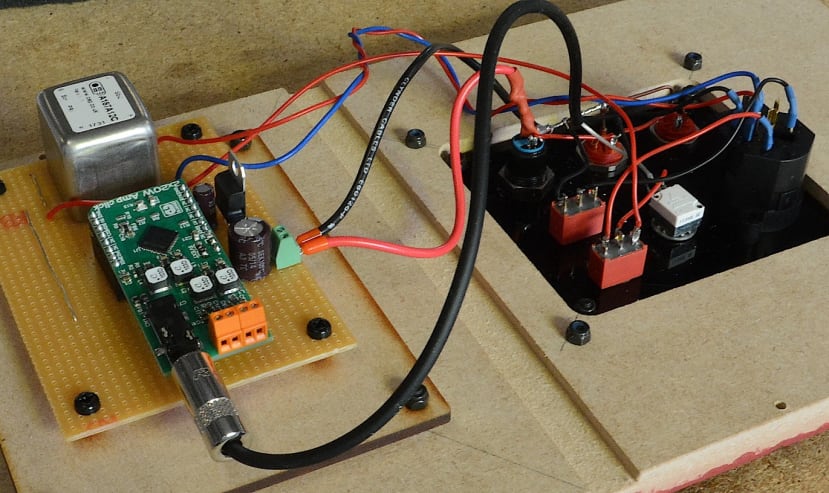
I decided on 2 Class-D Amplifiers to drive the speakers, opting for the Mikroelectronica ClickBoard 2x20, with a stereo channel powering two of the Fostex full range drivers installed in the cabinets. Since the drivers are 8 ohms and wired in parallel, this presents a 4-ohm load to each amplifier channel and means that we can get close to the peak output from these.
I wanted a choice of balanced and unbalanced audio inputs. The sound card I use for DJ’ing has balanced outputs and an alternative unbalanced input would be a sensible addition so that I could plug a smartphone or MP3 player without problems. This meant I needed to plan a circuit that would route the balanced in through a transformer, which also gave the opportunity to provide an optional ground lift to help defeat any hum if needed.
This is how the speakers came together:
- MDF Cabinets glued, clamped and the adhesive left to set
- Cabinets painted with 2 coats of the Tuff Cab paint and then left to cure
- Speaker drivers mounted in the cabinets and wired in parallel pairs. Speaker grills fitted to the front
- Components for the amplification mounted on the laser cut back panel or the stripboard as appropriate and soldered
- Amplification units mounted on the back panels of the speaker cabinets and these panels fitted to the cabinets
- Protective metal corners fitted to the cabinets and screwed in place
- New plug fitted to a 12V power supply and a connecting cable to run power from one speaker to the other made
Comments