Making Faces To Air Quality Part 2: How-To
Follow articleHow do you feel about this article? Help us to provide better content for you.
Thank you! Your feedback has been received.
There was a problem submitting your feedback, please try again later.
What do you think of this article?
This article is a follow-up from Part 1 - Making faces to air quality, where we discussed the process.
Parts needed:
- High-Density 8x8 Matrix https://www.adafruit.com/product/3444
- Raspberry Pi 4 (or 3 if using a better power supply and power the led separately )
- Electronic cables - we used some AWXX black and 4 cores one optional but neater.
- 3d printer
- Fibre optic (Optional, produces sharper light dots)
- Screws for screen M2 x 10mm
- Screws for enclosure M2.5 x 12mm
- Tray (Optional)
- Spring fastener to adjust the strap
- Anything to add a super-nose to it!
How to:
- Install Raspberry Pi 4 (4 is recommended for the power).
- See getting started with Raspberry Pi tutorial
- Install the necessary libraries:
- CircuitPython. See adafruit tutorial
- Adafruit_dotstar (LED Matrix), see adafruit dotstar raspberry tutorial
- PIL (image treatment library), see how to install PIL
- Plantower PMS 5003 (Sensor), part of the app folder from Github, but the source is here.
- Copy the python MakingFaces app onto the board Github link
- Edit the code if you want to change the GIF, the text and the threshold.
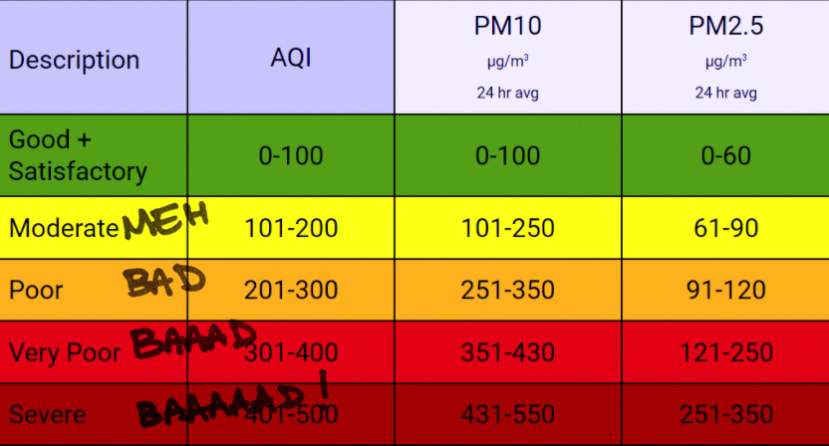
The current settings are detecting PM2.5 (Combustion) and PM10 (dust, pollen), and display highly precise alert levels as: BAD, BAAAD, BAAAAAAD, TERRIBLE and the GIF
- Make the MakingFaces Python App to Autostart at startup, so you don't need the keyboard, screen, mouse anymore.
- 3D Printing files:
- Nose (preferably SLS print)
- Insert
- LED surround cover
- Legs
- Enclosure
- Fit the optical fibres into the mount. You can use a 2mm drill bit to clear up. Trim the optical fibres flush.
- Put the matrix in place and the LED surround to prevent light leaks. Add the legs on each side and fasten everything with the screws.
- Pass the 2 cables through the holes of each side s of the nose, make a knot to relieve tensions and solder them to the matrix (Power, Ground, Din, Cin)
- Mount the Pi onto the enclosure. Connect the sensor to the Pi and stick it with double-sided tape.
- Connect the nose's long cable to the Pi (5v, Ground, SCK, MOSI)
- Connect the Pi4 USB-C to power the Pi, and close the enclosure with the screws.
- Use double-sided tape to mount the enclosure under your upside-down tray.
- You can now attach the nose to your favourite bust, teddy bear or flower pot!
FDDS Project team
Florian Dussopt
Navpreet Singh
Nouman Mahmood
Mitsutaka Shirasu


