Customising the Air Quality Application
Follow articleHow do you feel about this article? Help us to provide better content for you.
Thank you! Your feedback has been received.
There was a problem submitting your feedback, please try again later.
What do you think of this article?
A how-to guide on customisation of the AQ app to support a new non-ecosystem sensor.
Introduction
The Air Quality application is the first written to take advantage of the Environmental Sensing Development Kit hardware. This application takes readings from all the ESDK sensors (and additional ones) and records them to DesignSpark Cloud for later viewing via an online dashboard. Additionally, the ESDK hardware also features a screen that the AQ application utilises to show sensor metrics locally.
In this article, we’ll be looking at what DesignSpark.ESDK provides that enables application expansion, the latest features in the AQ application, and how to expand the application to support a new sensor that is both presented via the local display and published to DesignSpark Cloud.
Expansion Capabilities
Hardware
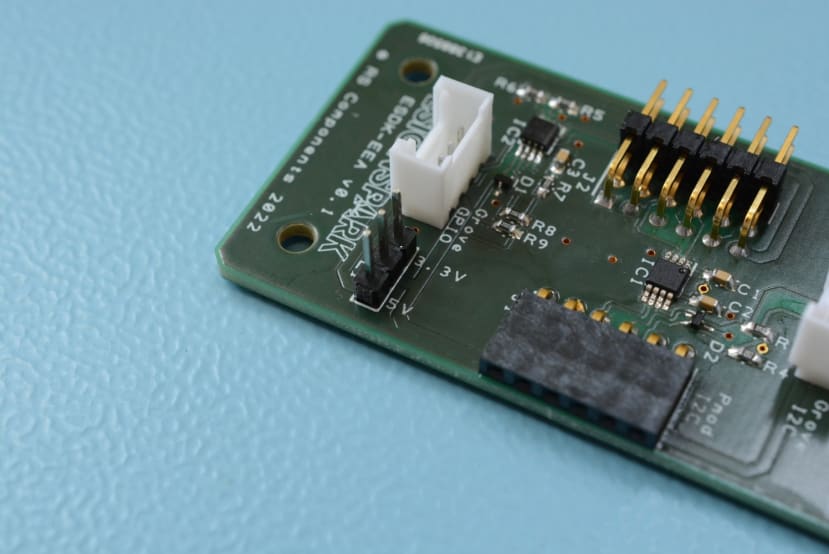
In a previous article, we covered the ESDK-EEA (Ecosystem Expansion Adaptor) board that allows for sensors not included with the kit to be easily connected.
The EEA board exposes a number of connectors, including a Seeedstudio Grove GPIO, Grove I2C, a Sparkfun Qwiic, and a Digilent Pmod utilising the I2C pinout.
Additionally, the Grove connectors have a selectable 3.3/5V Vcc voltage which also translates the GPIO pin voltage to match the supply rail. An NXP I2C bus repeater is included on the board that buffers and provides some limited ESD protection, as well as supporting sensor hot swapping. An additional TVS diode sits on the GPIO lines to offer some protection from ESD events.
Software
A basic plugin system has been implemented in the DesignSpark.ESDK library to accompany the EEA board, which allows users to easily add support for new sensors. Creating a plugin is as easy as writing a Python class that implements at minimum a function called readSensors() which returns a dictionary containing the sensor reading and some additional metadata.
To load plugins in an application utilising the DesignSpark.ESDK library is as simple as calling the function loadPlugins() on an ModMAIN instance. Any plugins are then polled, just as an ESDK sensor would be with a call to readAllModules().
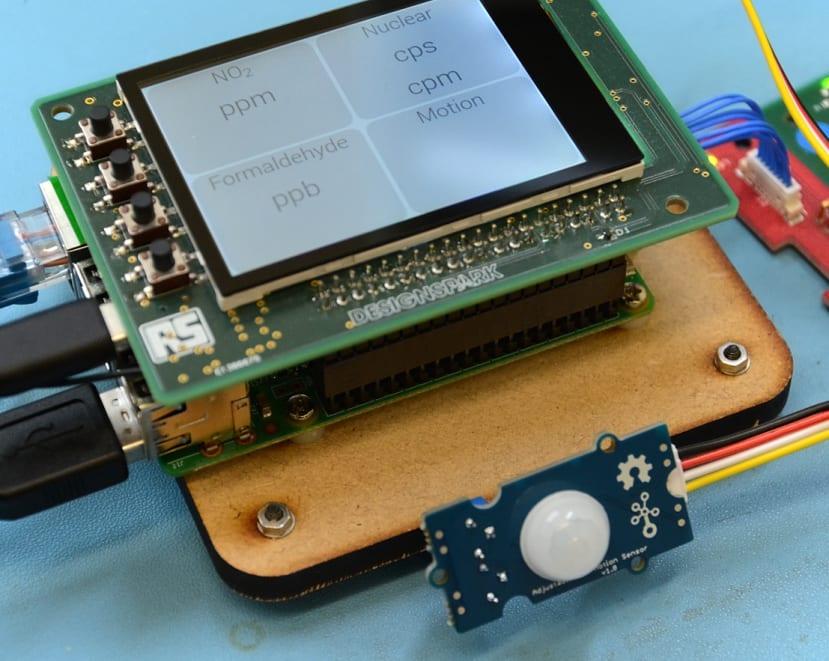
A plugin example was documented in our previous article, which reads the state of a Seeedstudio Grove PIR sensor connected to the ESDK-EEA board.
New AQ Application Features
The soon-to-be-released latest version of the AQ application features a number of exciting new features which improve the usability of the ESDK hardware. For in-depth coverage of the new features, refer to our previous article here.
New User Interface
A long-standing improvement that we wanted to implement was a full-blown UI that renders correctly on both mobile and desktop devices. Due to challenges working with the limited resolution 320x240px ESDK display, the on-device UI required the use of fixed element sizes which when rendered on a desktop display did not scale correctly.
We opted to create a new UI that was responsive to ensure compatibility with smaller screen mobile devices all the way up to large tablet and desktop screens. Charts of the past hour of sensor readings are immediately visible on the home page, and the debugging page features all the configuration items presented by the AQ application.
Updated Device UI
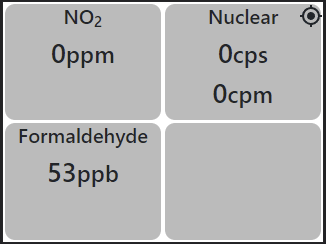
The on-device UI also has some other new features that scratch itches that we have had for a while, most notably the lack of at-a-glance GPS and CSV file logging status.
Adding both GPS and CSV logging status to the on-device UI was an easy affair as the Websocket connection already exposed the state as part of the debug data object. A small dash of Javascript and a couple of div elements containing icons from Material Design Icons was all that was necessary to add indicators.
As new sensors had been developed for the ESDK ecosystem (formaldehyde, NO2 and nuclear radiation) metric tiles for these sensors were also added, along with accompanying history charts.
Built-In Web Server
With the creation of a full “desktop” UI, some way to serve this page to other clients was necessary. At present, the on-device UI is loaded by Chromium opening the file locally rather than accessing a web server.
To resolve this, a simple HTTP server utilising the Python Twisted library was created that serves content on port 8080 — port 80 could not be used as the AQ application would need to be run with root privileges. The HTTP server currently returns a directory listing if the root URL is browsed to (ie “airquality:8080”), but the full dashboard is accessible by browsing to the correct page URL (ie “airquality:8080/dash_full.html”).
Hardware Button Support
The original design specification for the ESDK included four hardware buttons, one of which is currently utilised to perform a safe shutdown of the Raspberry Pi.
With three other buttons ripe for usage, and with a second page of metrics to be viewed, we opted to configure the centre two buttons to act as left and right keys — these keypress events are monitored in the dashboard Javascript and then used to switch the metrics pages back and forth.
The remaining button was utilised within the AQ application itself to toggle on-the-fly CSV recording, which does require the configuration file option to be set to true. Minor technical difficulties arose during the implementation of this feature due to the fact that Python does not support restarting a stopped thread, and creating a new thread instance proved too complicated.
Updating to the Latest Version
Next, we’ll take a look at how you can update to the very latest software versions for the purposes of custom development. However, please note that a new Micro SD card image will also be provided in the coming weeks for those who prefer a turnkey solution.
A prerequisite of running the latest AQ application is having the latest version of DesignSpark.ESDK available, which is currently 22.7.0.
To install this, the AQ application first needs to be stopped by running sudo systemctl stop aq.service. The latest library version can then be installed by executing the command pip install DesignSpark.ESDK. By default, pip retrieves the latest package version so no version needs to be specified.
With the latest library installed, swapping to the latest version of the AQ application is easily done. The first step is to move into the aq-device folder with cd ~/aq-device/, then check which is the current branch by running git branch. This should return a list of available branches with main highlighted in green.
To switch the branch to development run the commands git checkout development and git pull which should pull in any changes. If the pull fails due to local changes these can be discarded with git checkout -- . or alternatively stashed and reapplied as detailed here.
{{ systemctl status output }}
With the latest version of DesignSpark.ESDK and the AQ application installed the service can be restarted with sudo systemctl start aq.service. To check the application is running correctly and view application output the command systemctl status aq.service can be run.
Customising the AQ Application
As the AQ application is written in Python it is easily modified and only requires basic programming experience. Extending the UI also requires only working knowledge of HTML and Javascript, as most of the functionality is copy-paste to create multiple elements such as the metric tiles.
Adding a Plugin
To demonstrate a simple plugin we’ll build upon our previous PIR example, where the code can be found in this article.
The first step is to create a new folder within the aq-device/firmware folder called plugins, and then move into that folder. Using an editor of choice (my preferred editor is ‘nano’) create a file called “PIR.py” with the contents of the example plugin that reads from a GPIO pin. Note: as the “PrometheusWriter” module only supports integer values, the statement str(pirState) needs to be changed to int(pirState).
As the AQ application at present does not use any plugins this needs to be modified to call the appropriate DesignSpark.ESDK function. Looking at the application source code a line above line 102 (mainboard.createModules()) needs to be added consisting of mainboard.loadPlugins().
Adding this line instructs the library to search for plugins in the default folder, however the path to search for plugins can be specified by modifying line 72
mainboard = MAIN.ModMAIN(debug=debugEnabled, config=configData, \
    loggingLevel=loggingConfig)
to have a parameter of pluginDir='/path/to/plugins/folder' appended after the loggingLevel parameter.
To ensure that CSV logging works properly with a new plugin type the “CsvWriter” module needs to be updated. Line 24 contains a list of metrics that are logged to a file, and we need to append the metric name returned by the plugin — in this case “motion”.
With the code modified, plugin folder created and the example plugin file created we can test to ensure correct functionality. Manually launch the AQ application with python3 aq.py from within the firmware folder, wait for the sensorsUpdateThread task to output sensor data and the PIR sensor output should be visible.
Extending The UI
With the plugin working, we can move on to extending the UI. This example will only cover the on-device UI, with extending the desktop UI left as an exercise for the reader (the code is largely the same and with only the layout elements changing).
As there is an empty metric tile available we’ll use this to display data from our PIR plugin. The first step is to give the <div> element a name by adding an id attribute, in this example id="motionMetric" — it will prove helpful to make this name descriptive.
Within the metric div create a <h5> element that contains a name for the metric, in this case it could be something like “Motion” or “Movement”. A <h1> element should then be created that will hold the metric value, and then a <span> with an appropriate element ID nested inside.
The completed metric tile code should look like the following:
<div class="metric" id=”motionMetric”>

  <h5>Motion</h5>

  <h1><span id=”motionText”></span>

</div>
We now need to extend the Javascript to process the new metric that is published via the websocket. Following the layout of the existing element update statements the following code is added at line 194:
if(dataObj.hasOwnProperty('pir')) {

  if(dataObj[‘pir’][‘motion’] == 1) {

    $('#motionText').html(“Motion detected”);

  } else {

    $('#motionText').html(“No motion detected”);

  }

} else {

  $('#motionText').html("--");

}
This code checks for a property called pir being present in the received data (which is returned by our plugin) and then checks for either a ‘1’ or not ‘1’ to set the appropriate text value. If the “pir” property is unavailable then the sensor value is populated with two dashes to indicate the unavailable status.
With all the modifications performed, reboot the Raspberry Pi and ensure that the new metric value appears on screen. Sensor readings are automatically pushed up to DesignSpark Cloud and the dashboards will need to be modified to display other readings, but again this is left as an exercise to the reader to implement.
The modified files that are necessary to create the example PIR plugin are located on a separate GitHub branch within the “aq-device” repository. This example can be used as a basis for integrating further sensors by utilising the ESDK-EEA board.
To Finish
In this article, we’ve taken a look back over what the ESDK-EEA board provides for hardware expansion and the accompanying software support in DesignSpark.ESDK, touched upon the latest features of the Air Quality application itself and how to run the latest version from GitHub.
We’ve also taken a look at a worked example demonstrating extending the AQ application to support a plugin that reads the state of a PIR sensor and how to modify the necessary application files, and also adding support to a new metric on the on-device UI.


Comments