Connecting XinaBox IoT with Zerynth to Cloud Part 2: Uploading Data to OKdo Cloud and Visualising Data
Follow project Dave from DesignSpark
How do you feel about this article? Help us to provide better content for you.
Dave from DesignSpark
Thank you! Your feedback has been received.
Dave from DesignSpark
There was a problem submitting your feedback, please try again later.
Dave from DesignSpark
What do you think of this article?
 Zerynth, XinaBox and OKdo Cloud are the user-friendly tools for IoT prototyping. This part teaches you how to program your Xinabox to collect data and helps you get your XinaBox to OKdo Cloud.
Parts list
| Qty | Product | Part number | |
|---|---|---|---|
| 1 | XinaBox SW03, Weather Sensor Module for MPL3115A2 | 174-3746 | |
| 1 | XinaBox xCHIP Wi-Fi & Bluetooth Core Module CW02 | 174-3702 | |
| 1 | XinaBox, USB Programming Interface Module for FT232R - IP01 | 174-3703 | |
| 1 | Zerynth Studio | ||
| 1 | OKdo Cloud | ||
In Part 1: Introduction and Simple Example, it teaches you how to connect and program your XinaBox in Zerynth Studio. In this part, this guide teaches you how XinaBox sends data to OKdo Cloud, collects data from SW03 sensor, and how to build a dashboard in OKdo Cloud.
Other things you need
- Your WiFi access credentials (SSID and Password, I use my mobile as Wi-Fi hotspot)
- OKdo Cloud Account
What is OKdo Cloud?
OKdo is a new global tech business focusing on IoT. The OKdo Cloud is one of their services. OKdo Cloud provides you an IoT cloud platform to connect your things and interact with them. The GUI of OKdo Cloud is simple and easy to use. You can build your own dashboard (called "Pinboard" in OKdo Cloud) to display all received data. With the help of APIs in OKdo Cloud, you can connect your things, capture your data and visualise your results in just few steps. Most importantly, it is free.
More information about OKdo Cloud can be found at https://www.okdo.com/do-iot/.
Creating an account in OKdo Cloud
Sign up at https://okdo.allthingstalk.com/ with your email address and a chosen username and password.
You can see a page similar to the below after login.

According to a project in okdo.com, “The OKdo Cloud organizes members and devices into “Grounds”, a better way to manage things and data access. OKdo Cloud automatically creates a first Ground, called ‘Playground’ after signing up”.
Connecting your device and Setting up the OKdo Cloud
You may create your own Ground or use the default one.
To Create a new Ground, click “+ NEW GROUND”. Type in the name you want and click “CREATE”. After this, you can see the following.

Click “+ CONNECT A DEVICE”. Select “Your own device” and type in the Device name as what you want. Click “CONNECT” afterwards.

Next, new “Device Assets” should be created to enable the OKdo Cloud to receive what your devices sent. Fill in the Name “random” and Type “Number” in Profile as following. Click “CREATE ASSET”.

After this, we are a few steps away to receive data from XinaBox.
Connecting your XinaBox
If you have any difficulties in this part, you may go to Part 1: Introduction and Simple Example to take a look.
Connect the modules of XinaBox as the image below:
- Connect CW02 to USB programming interface module IP01.
- Connect SW03 weather sensor to CW02.

- Connect the XinaBox to your computer over USB.
Programing the XinaBox
If you have any difficulties in this part, you may go to Part 1: Introduction and Simple Example to take a look.
Launch the Zerynth Studio and find the example project of OKdo Cloud → Mqtt, or you may create your own project and copy the code below.
################################################################################
# MQTT at OKDO Cloud IoT
#
# Created at 2019-05-06 08:40:34.990336
#
################################################################################
import streams
from wireless import wifi
# choose a wifi chip (esp32)
from espressif.esp32net import esp32wifi as wifi_driver
# let's import the OKDO cloud modules; first the IoT module...
from okdo.iot import iot
# ...then the mqtt client
from okdo.iot import mqtt_client
# Let's define a global variable to store the publishing rate (in ms)
rate = 3000
# Customize the following variables
ssid = "SSID"         # this is the SSID of the WiFi network
wifipwd = "Password"          # this is the Password for WiFi
device_id = "device_id"    # this is the device identifier. Can be obtained from the OKDO cloud dashboard
device_token = "device_token" # this is the device token. Can be obtained from the OKDO cloud dashboard
# Remember to add a device to your okdo cloud and define some assets:
# - a "rate" actuator, with type integer
# - a "random" sensor of type integer
def rate_cb(asset,value, previous_value):
  global rate
  value = int(value)
  if value<1000:
    value=1000
  rate=value
  print("Rate changed to",rate,"ms")
streams.serial()
try:
  # Let's initialize the WiFi
  wifi_driver.auto_init()
  for _ in range(0,5):
    # put your SSID and password here
    try:
      wifi.link(ssid,wifi.WIFI_WPA2,wifipwd)
      break
    except:
      print("Trying to connect...")
      sleep(2000)
  else:
    print("oops, can't attach to wifi!")
    raise IOError
  print("Connecting to OKDO IoT Cloud...")
  # let's create a device passing the id, the token and the type of client
  device = iot.Device(device_id,device_token,mqtt_client.MqttClient)
  device.connect()
  print("Device is connected")
  # define the callbacks to call when an asset command is received
  device.watch_command("rate",rate_cb)
  # start the device
  device.run()
  print("Device is up and running")
  while True:
    # sleep as indicated by rate
    sleep(rate)
    x = random(0,100)
    msg = device.publish_asset("random",x)
    print("Published asset",msg)
    # alternatively, you can publish more than one asset state at a time
    # by providing them as a dictionary to the following function (uncomment to test)
    # msg = device.publish_state({"random":x})
    # print("Published state",msg)
except Exception as e:
  print(e)
Take a look into the code. This python function "device.publish_asset("random",x)" sends a MQTT packet contains a payload ("random": {value}) to OKdo Cloud. It is the function to send data to OKdo Cloud. We must recognise this function later on.
msg = device.publish_asset("random",x)Also, there are 4 contents you must need to change, SSID, Password, device_id and device_token. The SSID and Password are under your setting of Wi-Fi network. I use my mobile phone as a Wi-Fi hotspot, and of course, my mobile phone is connected to the internet (through a 4G cellular network). About the device_id and device_token, they are the unique information for authentication of devices in the cloud. So, they are unique per device. You can get the unique Device ID and Device Token in OKdo Cloud.
Go back to your browser. Inside the Ground you created (mine is “A Ground”), find out the “DEVICE” tab on the left and click on the device you created before. You may find this page as shown below.

Click “SETTINGS” on the top right corner and click “Authentication” to view your device ID and tokens. They are a unique string that contains numbers, symbols or characters in lowercase and uppercase, just depends what OKdo assigns to you. You may find a similar page as below.

After finding out these 4 contents, I filled the variables shown below.
# Customize the following variables
ssid = "Rxxxxxxxs"         # this is the SSID of the WiFi network
wifipwd = "axxxx"          # this is the Password for WiFi
device_id = "MxxxxxxxxxxxxQ"    # this is the device identifier. Can be obtained from the OKDO cloud dashboard
device_token = "maker:4QRxxxxxJo0" # this is the device token. Can be obtained from the OKDO cloud dashboard
Verify and Uplink your code in Zerynth Studio. Open the console and you may find the following result. Please see part 1: Introduction and Simple Example if you find any difficulties.

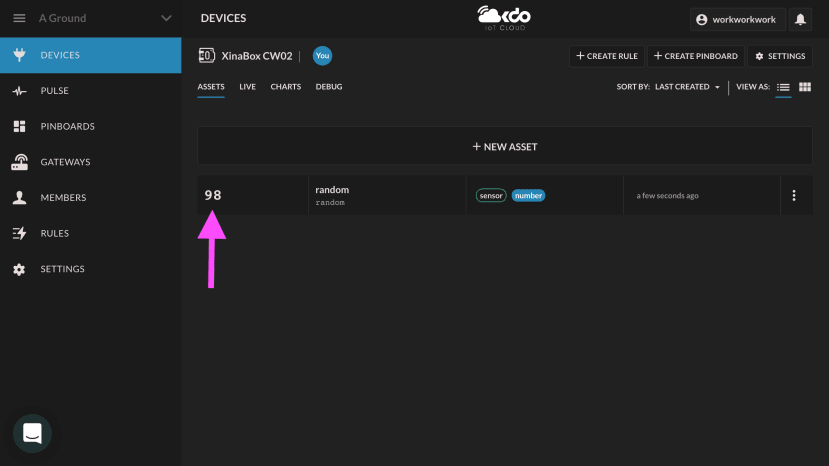
Going back to OKdo Cloud. There is a number showing up on the left-hand side of the “random”. You can click “LIVE” or “CHARTS” and see what is showing up (wait a moment, reload the page in the browser or unplug & plug the XinaBox to PC USB if you cannot see any data in “LIVE” or “CHARTS”).

In “CHARTS”, you may not see any data plotted like the following. You can turn on the data storage function so that you can store the data in OKdo Cloud.

To turn on the data storage, navigate to “SETTINGS” on the top right corner → “Data storage” under “Data” categoria → click “Store Device Data”. A green notification shows up at the bottom to tell storage function is enabled.

After that, you may view all your data, including the past data, in OKdo Cloud. (Wait a moment, reload your page in the browser or unplug & plug the XinaBox to PC USB if you cannot see any data plotted.)

Creating an online dashboard
In OKdo Cloud, the dashboard is called pinboard. It is a place that you can decide what data you want to display and can design how data is visualised.
Look at the video and see how to build a simple dashboard.
Collecting data from the SW03 weather sensor
Collecting data from SW03 is simple because the program code already exists. In Zerynth Studio, you just need to Navigate to "Examples" and search "SW03". Clone the project "environment data" and upload this program into XinaBox. The result can be viewed at the console.
The code:
##############################################
#  This is an example for SW03 ambient
#  temperature, altitude and pressure
#  sensor.
#
#  Ambient temperature, altitude and pressure
#  is measured and printed out on the console.
##############################################
import streams
from xinabox.sw03 import sw03
streams.serial()
# SW03 instance
SW03 = sw03.SW03(I2C0)
# configure SW03
SW03.init()
while True:
  temp = SW03.getTempC()   # return temp in degree celcius
  alt = SW03.getAltitude()  # return alitude in meters
  pres = SW03.getPressure()  # return pressure in pascals
  print('Temperature: ', temp, ' C')
  print('Altitude  : ', alt, ' m')
  print('Pressure  : ', pres, ' Pa')
  sleep(1000)
Result in the console:

Forwarding collected SW03 sensor data to OKdo Cloud
As the code of sending data to OKdo Cloud and the code of collecting SW03 sensor data are separated, we need to merge them together. So that the sensor data can display in the OKdo Cloud pinboard.
Here's the code after merged:
You must change theSSID, Password, device_id and device_token variables.
# xinabox_zerynth_okdo_mqtt
# Created at 2019-08-14 08:36:17.078318
#################### SETTING 1 <BEGIN> ####################
## Uploading data to OKDO Cloud
## Example: MQTT at OKDO Cloud IoT
import streams
from wireless import wifi
# choose a wifi chip (esp32)
from espressif.esp32net import esp32wifi as wifi_driver
# let's import the OKDO cloud modules; first the IoT module...
from okdo.iot import iot
# ...then the mqtt client
from okdo.iot import mqtt_client
# Let's define a global variable to store the publishing rate (in ms)
rate = 3000
# Customize the following variables
ssid = "Rxxxxxxxxxs"         # this is the SSID of the WiFi network
wifipwd = "axxxxx4"          # this is the Password for WiFi
device_id = "Qxxxxxxxxxxxxxx3"    # this is the device identifier. Can be obtained from the OKDO cloud dashboard
device_token = "maker:4xxxxxxxxxxxP" # this is the device token. Can be obtained from the OKDO cloud dashboard
# Remember to add a device to your okdo cloud and define some assets:
# - a "rate" actuator, with type integer
# - a "random" sensor of type integer
def rate_cb(asset,value, previous_value):
  global rate
  value = int(value)
  if value<1000:
    value=1000
  rate=value
  print("Rate changed to",rate,"ms")
streams.serial()
#################### SETTING 1 <END> ####################
#################### SETTING 2 <BEGIN> ####################
## Collecting ambient temperature, altitude and pressure sensor.
## Example: environmental_data, for SW03 weather sensor
#import streams
from xinabox.sw03 import sw03
#streams.serial()
# SW03 instance
SW03 = sw03.SW03(I2C0)
# configure SW03
SW03.init()
#################### SETTING 2 <END> ####################
# As a counter
a=0
try:
  # Let's initialize the WiFi
  wifi_driver.auto_init()
  for _ in range(0,5):
    try:
      wifi.link(ssid,wifi.WIFI_WPA2,wifipwd)
      break
    except:
      print("Trying to connect...")
      sleep(2000)
  else:
    print("oops, can't attach to wifi!")
    raise IOError
  print("Connecting to OKDO IoT Cloud...")
  # let's create a device passing the id, the token and the type of client
  device = iot.Device(device_id,device_token,mqtt_client.MqttClient)
  device.connect()
  print("Device is connected")
  # define the callbacks to call when an asset command is received
  device.watch_command("rate",rate_cb)
  # start the device
  device.run()
  print("Device is up and running")
  while True:
    # sleep as indicated by rate
    sleep(rate)
  ############ Modified code <BEGIN> ############
    ###### SW03 weather sensor <BEGIN> ######
    temp = SW03.getTempC()   # return temp in degree celcius
    alt = SW03.getAltitude()  # return alitude in meters
    pres = SW03.getPressure()  # return pressure in pascals
    ###### SW03 weather sensor <END> ######
    a=a+1
    print("#", a)
    msg = device.publish_asset("temperature",temp)
    print("Published asset: Temperature",msg)
    msg = device.publish_asset("altitude",alt)
    print("Published asset: Altitude",msg)
    msg = device.publish_asset("pressure",pres)
    print("Published asset: Pressure",msg)
    print(".")
    print(".")
    # alternatively, you can publish more than one asset state at a time
    # by providing them as a dictionary to the following function (uncomment to test)
    # msg = device.publish_state({"random":x})
    # print("Published state",msg)
  ############ Modified code <END> ############
except Exception as e:
  print(e)
The result is shown on console:

A new dashboard is created in OKdo Cloud. Last but not least, a video shows the result of the dashboard.
My articles
1. Building a Hill Fire Detection IoT with LoRa
2. Connecting XinaBox IoT with Zerynth to Cloud
Part 1: Introduction and Simple Example
Part 2: Uploading Data to OKdo Cloud and Visualising Data
3. XinaBox Weather Station with ubidots Cloud
Comments