CNC Build #3 Electrical Build of Gantry and Control Panel
Follow article
 Dave from DesignSpark
How do you feel about this article? Help us to provide better content for you.
Dave from DesignSpark
Thank you! Your feedback has been received.
Dave from DesignSpark
There was a problem submitting your feedback, please try again later.
Dave from DesignSpark
What do you think of this article?
This involves high power and high voltages so beware, it can kill you or cause serious damage to things, if you are not experienced working with mains then seek help and make sure you use safe practices.
OK, so now the mechanical is done and we are ready for the electronics and electrical to be added to our CNC.
Here are a few links to the RS-Components products used on the build, simply select your region. Since I started this project, I have also noticed the prices for these components have significantly lowered which is great for anyone wanting to follow along.
- Nema 23 Stepper Motors (535-0445)
- Geckodrive 7 A Stepper Motor Stepper Drive (793-4127)
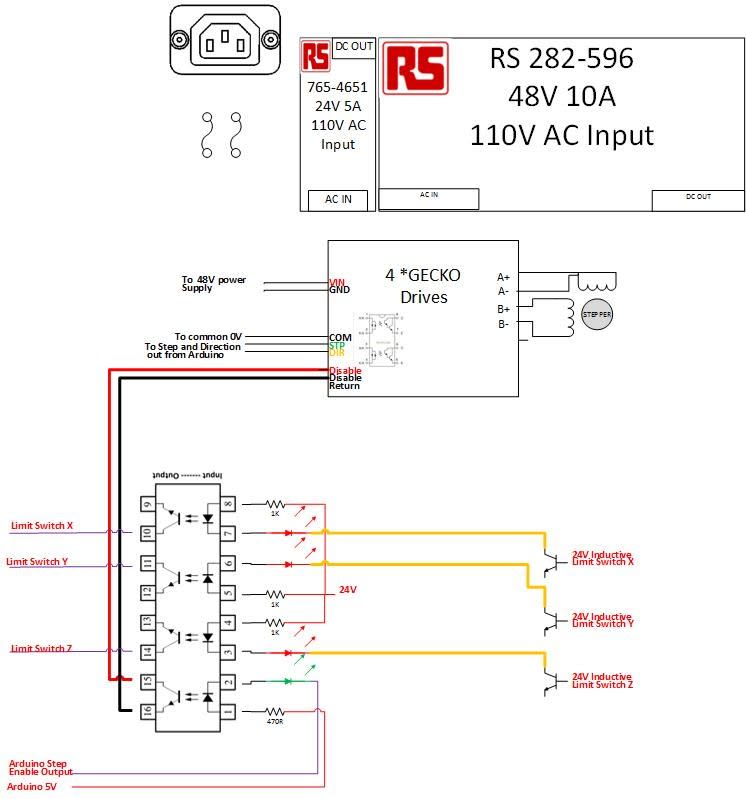
- 480W 1 Output Switch Mode DIN Rail Panel Mount Power Supply, 48V dc, 10A (028-2596)
- 120W 1 Output Switch Mode DIN Rail Panel Mount Power Supply, 24V, 5A (765-4651)
- DIN Rail Top Hat, TS35 Slotted, 1m x 35mm x 7.5mm (648-5738)
- Cable Chain Trunking (486-8686)
- Grey PVC Open slot Cable Trunking (878-1148)
- DIN Rail Power Distribution Block (383-1582)
- Inductive Sensors for Limit Switches (701-8250)
Wire was sourced locally
Extrusions are from SNB Solutions who now have additional plates and extrusions for building bigger and better CNC Machines to meet pretty much any ones needs along with numerous other parts including electronics in support of your project, ask for SAM or in Europe google for OpenBuilds
Biggest tip on the wiring, consider the possibility of having to replace or upgrade things at a later date, how easy is it to replace a gantry plate for instance. I changed my wiring in part, to anticipate changing an end plate by not using the holes in the plate for the wires.
I split the videos into two parts, The Gantry and the Control Panel. Here is the Gantry
and the Control Panel, you can see clearly the use of an Arduino (Well its under the OPTO Isolator board) to function as a GCode interpreter, GCode is the natural language of industrial CNC machines and is what is required to control our CNC. I could have purchased a parallel port for the computer and then additionally MACH3 software but this in my opinion is a step backwards and an un-necessary expense at this point of the game. Using the UNO and GRBL Control Software keeps cost to a minimum while experimenting and the software still functions very well, oh and anything with a USB port can send the code to the controller, no need for a legacy parallel port. Again I will go into the setting up of this in seperate posts.
Now you may choose to use different controllers than the Gecko ones in my build and if you use smaller Nema 23 or Nema 17 steppers it may not be cost effective to use these ones. You can get numerious control boards from SNB Solutions or OpenBuilds or other places of your choosing, just ensure they are compatable and meet your needs, Oh and you have plenty of power to drive them.
While I am going to produce a seperate video regarding stepper motors and how to control them, I want to provide a few links to the GeckoDrive site that has some excelent information on choosing the Right Stepper for the job and some basic theory of operation.
Manual for the GeckoDrive G201X

Stepper Motor Basics Guide
Next up will be configuring the GRBL Control Software for the Arduino and then to check the calibration / accuracy of the CNC, this will involve a trip to DS Mechanical first to create the Model and GCode.
Proposed test piece

Words of wisdom or my CNC build and an Oops with my Uno
So, no hiding it, yes I missed a cross connection on a sensor and promptly killed an ATMEGA328, the damage is obvious and can happen in a heartbeat to anyone so I guess ill share my Oops, I also follow on with a few tips and ideas from the build so far. Enjoy