Mains Power Monitor
Follow project Dave from DesignSpark
How do you feel about this article? Help us to provide better content for you.
Dave from DesignSpark
Thank you! Your feedback has been received.
Dave from DesignSpark
There was a problem submitting your feedback, please try again later.
Dave from DesignSpark
What do you think of this article?
 Wi-Fi Mains Power Monitor - ESP32
A friend of mine wanted to keep a log of his power
Wi-Fi Mains Power Monitor - ESP32
A friend of mine wanted to keep a log of his power
Parts list
| Qty | Product | Part number | |
|---|---|---|---|
| 1 | PZEM-004T | PZEM-004T | |
Wi-Fi Mains Power Monitor - ESP32
A friend of mine wanted to keep a log of his power consumption.
He also wanted to make sure the wattage of appliances is what they state they are.
As he has not got a smart meter (even if he did, there would not be a log every second), he asked if I could come up with a solution.
He would prefer it to be Wi-Fi, so the PC does not have to be moved next to the power monitor.
So, the Mains Power Monitor was developed.
It uses an ESP32 module with integrated Wi-Fi.
I am using a Wroom version, but the Lolin will work just as well.
The power monitor hardware is a PZEM-004T.
Hardware:
ESP32 Wroom-32 Module. (Other ESP32 modules can be used)
Solderless Breadboard
Micro USB LEAD
4x Male / Female Dupont Jumper Wires
Mains rated twin-core cable protected with a maximum 3 amp fuse.
Power monitor PZEM-004T.
The version I bought has a plastic enclosure (Vital to prevent mains shock) and a 100A Split transformer:
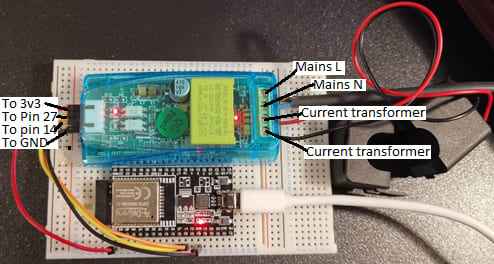
| Pin | PZEM-004T connections (Isolated 3V3 side) | Esp32 Wi-Fi board | PZEM-004T connections (Mains side, on the right, from top to bottom) |
|---|---|---|---|
| 1 |
5V |
3V3 | Live |
| 2 | RX | 27 | Neutral |
| 3 | TX | 14 | Current Transformer (Any Connection) |
| 4 | GND | GND | Current Transformer (Any Connection) |
PZEM-004T connections (Mains side, on the right, from top to bottom)
Live
Neutral
Current Transformer (Any connection)
Current Transformer (Any connection)
IMPORTANT HEALTH WARNING: Mains can kill. Only attempt this project if you are competent at mains wiring!
I would recommend the mains of PZEM-004T to be wired to a 3 amp fused mains plug.
Only purchase the PZEM-004T that has a plastic casing.
Note:
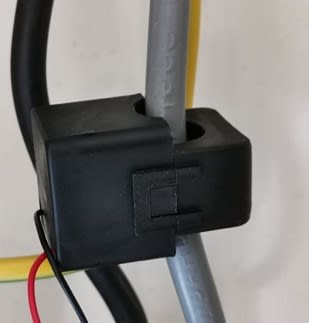
The split current transformer only clips onto a single wire of the consumer unit:
You will notice that 5V of PZEM-004T connects to 3V3 of ESP32.
This is not a typo!
It is the Wi-Fi board that supplies the power to the PZEM-004T, not the other way around.
Since the ESP32 pins are only 3V3 tolerant, and the PZEM-004T works just as well at 3V3.
As there is less hardware involved, you will not need to level shift.
As I am not an expert in C or MODBUS, I need to find a nice simple solution to get the ESP32 programmed.
So not only does the hardware work, but it can also send the data via Wi-Fi to a PC.
The PC can save logfiles of power consumption and display all the data in an eye-pleasing format.
I decided Flowcode would suit this application perfectly!
With Flowcode, you just create the flowcharts of what you want to do, and it does all the rest for you.
You can get a free 30 day fully unlocked version from this website.
If you already had the free trial for the 30 days, then to get this project working will cost a one-off cost of £25.
This is because you will need to purchase comms pack C for the Modbus communication.
If you look here, you will see what other communication protocols comms pack C will cover.
I will not be going into the basics of Flowcode for a few reasons.
- There are great beginners guides on how to use Flowcode.
- Both flowcharts (Firmware and App developer) for the Mains Power Monitor have already been created for you.
- I do not want to give you too much to read before you can start using the Mains Power Monitor
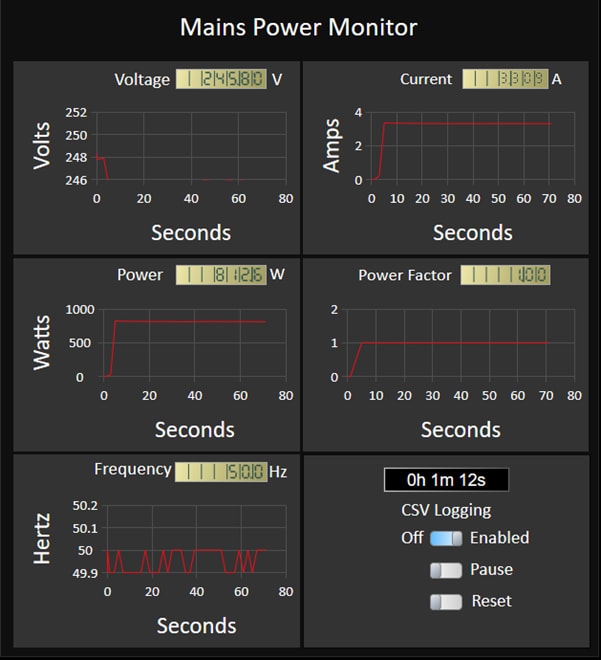
This is the end result using Flowcode App Developer:
This is a small sample of what the logs look like that is saved on the PC:
Example from the generated CSV logs:
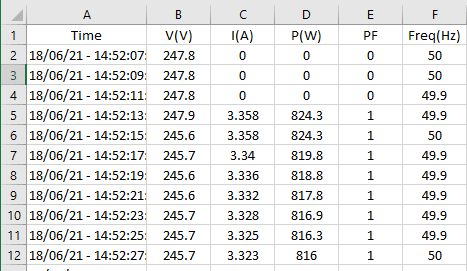
From Row 5, only the toaster is connected.
From Row 46 is when I switched my kettle on.
There is also a Console view (View Tab, Console):
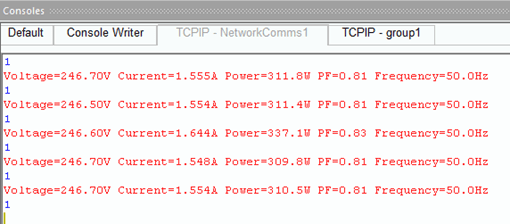
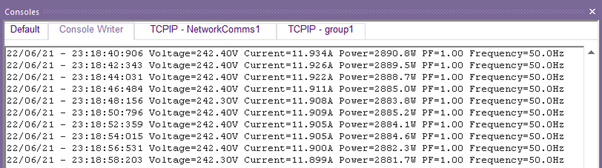
Also Console Writer View:
Steps to program ESP32 module.
- You will need to download the ESP32 firmware flowchart from here
Scroll down to the Mains Power monitor App, then click on the Firmware link.
Save the Firmware - ESP32Wroom Wifi.zip to your P.C., then open the zip file & extract the firmware file (at the time of writing, its name is Mains PMon v1.0-ESP32 Wroom Firmware.fcfx) to a folder of your choice that does not require elevated accesses permission.
You will need the firmware for step 8.
- Register for a Flowcode account.
- After receiving a confirmation email, download the ESP32 toolchain and Flowcode.
- Install the ESP32 tool by carefully following these instructions.
- Download and install the correct drivers for the ESP32 board you have.
Depending on which ESP module you have, either the CP210x Universal Windows Driver or CH340 Driver will require installing first.
I’m using ESP32-Wroom-32, which uses CP210x.
I would recommend restarting your P.C. after drivers are installed.
6. Make sure you have the ESP32 board connected to your P.C., then look in the Device Manager (Right select window icon and select Device Manager).
Expand Ports (COM & LPT) and note which port the ESP32 board is connected to.
In my case, It is COM4:

7. Run Flowcode and select the 30-day trial, then Enter Username and password.
8. Restart Flowcode, select File, Open Project & Browse.
Browse to where you saved Mains Mains PMon v1.0-ESP32 Wroom Firmware.fcfx, Then select open.
9. Select View, Component Properties:
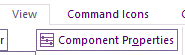
Or you can select View, 2D panel and right-click on a blank area, choose Properties
replace SSID and Password with the ones for your router:

10. Select Build Ribbon, Project Options, select the correct Programmer Port:
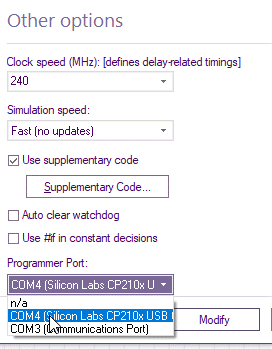
Select Modify.
The board we are using is ESP32-Wroom 32, if that is the board you have, then skip to 13.
If you have a different board, e.g. Lolin Light, then while you are within Project Options you will see ESP32-Wroom 32 highlighted.
Right-click and select search & enter a keyword, e.g lite or loli etc.
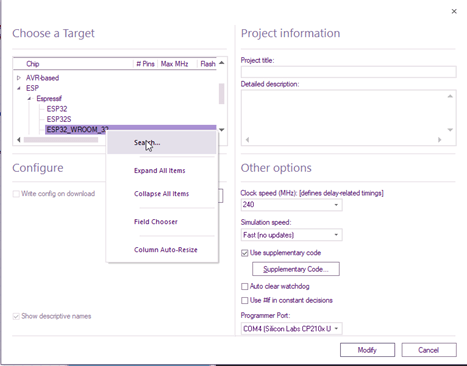
Select Find Next, and the new board/Microcontroller will be highlighted.
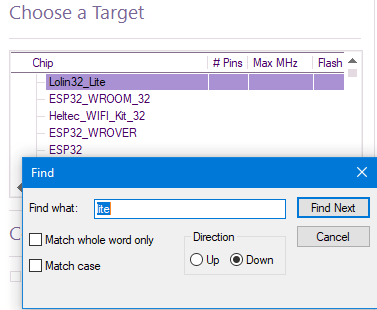
Select X or Cancel Then Modify.
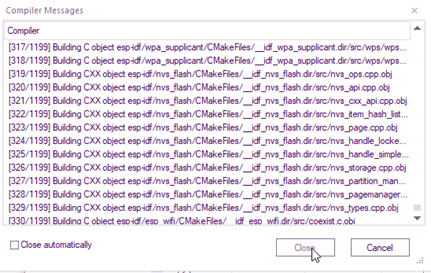
11. Staying within the Build ribbon, Select Compile to Target.
If, when compiling to target, you see error messages about not a recognised command, try restarting your PC
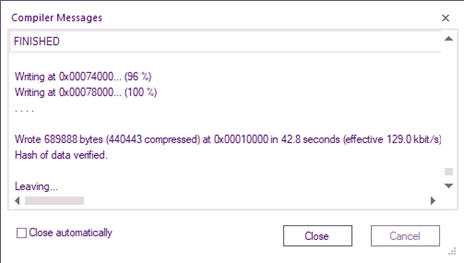
As This will be the first time of compiling, the time taken to compile may take up to a couple of minutes:
All being well, the Esp32 board should be programmed:
With the ESP32 running, it will connect to your Wi-Fi network.
You can confirm this by using a free small utility called Wireless Network Watcher.
The assigned I.P. address will be automatic so that it will be different on each setup.
Here is what it looks like for me:
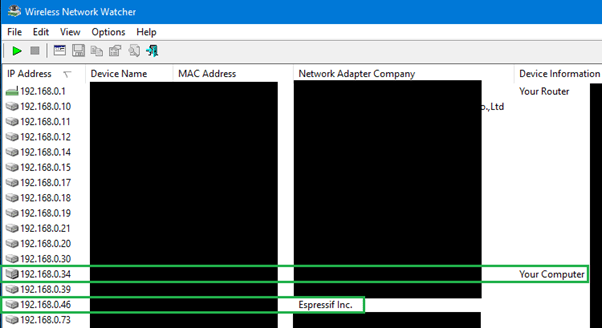
I have blanked most information and outlined the two I.P addresses we will need to know.
12. Download the App developer zip, and extract all the files to a suitable folder on your PC Run: Open Mains Power Monitor v1.0.bat file.
I Have outlined the two I.P addresses we will need to know.
After extracting The App Developer files, run: Open Mains Power Monitor v1.1.bat file.
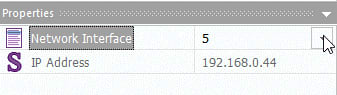
Select the drop-down arrow and keep selecting different network interface numbers until you see your PC’s IP Address:
I have found this only works on PC’s that are connected via Wi-Fi.
My main PC is only Ethernet.
I have tried with Ethernet connections and can only see 0.0.0.0 for the IP Address.
What I did was order a cheap USB Wi-Fi adapter, and that worked perfectly!
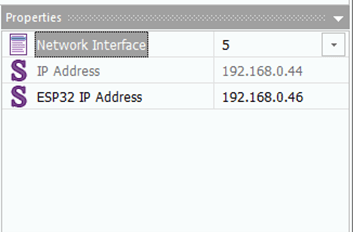
When you see the correct IP address of your PC, enter the IP details from The Wireless Network Watcher:
Now you can run the App developer.
When you enable CSV logging, the XY charts will also start logging.
So the CSV file does not get too large and unmanageable, a new CSV file with an incremented number will be automatically generated after every 86400 rows.
When you click on the Reset switch, the number will reset back to 1.
So make sure you have all the CSV files backed up first.
If you have any technical issues, questions or App suggestions, then post a question on the Flowcode forums.
Troubleshooting.
PZEM-004T, none, one LED flashing or both constantly rapidly flashing.
There are a few different causing for this.
No LED’s are flashing, then check:
- 3V3 & GND supply is correct and going to 5V & GND of PZEM-004T.
- Pin Connections within MODBUS properties and hardware match.
- ESP32 is correctly programmed with the correct firmware.
Only LED nearest +ve supply connection is flashing:
- MODBUS is at the wrong frequency.
Check those MODBUS properties are set for 9600 Baud.
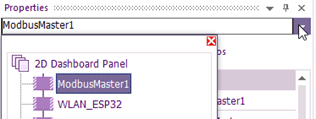
Within properties, select ModbusMaster1 from the drop-down arrow
You can check the frequency of ESP32 is correct by doing a one second Flash test.
2. Mains live/neutral not connected.
When the mains is connected, there is an LED that lights between the mains terminal block and X type capacitor.
App Developer not picking up the ESP32 Wi-Fi
Use the previously mentioned Wireless Network Watcher.
If Espressif Inc is not on the list, then ESP32 is not connected to the Wi-Fi
- Make sure that the correct router SSID and password are correctly entered within the properties:
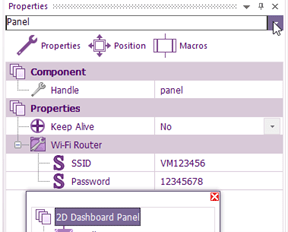
Select the drop-down arrow then 2D Dashboard Panel on the popup window to enter SSID and Password.
- ESP32 has not been programmed with the correct firmware.
- ESP32 board out of range or Wi-Fi signal is being blocked.
This can be eliminated by placing the ESP32 near the router to see if communications have been established.
- You could be selecting the wrong Espressive Inc.
For example, you could have more than one ESP32 board or have smart Light bulbs or sockets that use ESP32.
If multiple Espressive Inc is displayed, then unplug the board without refreshing Wireless Network Watcher.
You may need to wait a minute, but the Wi-Fi board you unplugged will show as a red X: