How to Build an Electric Folding Bike | Bike Assembly | DesignSpark
Follow article
 Dave from DesignSpark
How do you feel about this article? Help us to provide better content for you.
Dave from DesignSpark
Thank you! Your feedback has been received.
Dave from DesignSpark
There was a problem submitting your feedback, please try again later.
Dave from DesignSpark
What do you think of this article?
As much as I have explored the role of engineering and technology in the development of the circular economy, addressing the issues of sustainability and climate change is not a simple task. However, with the rapid progression of electric transport and storage technologies in the mainstream, these solutions are finally starting to become more accessible. Having already built an electric skateboard, my aim for this article was to explore sustainable transport further by building an electric folding bike.
Electric Bike Components
My Raleigh Evo-2 folding bike was used as a base for this project and all of the other parts required for the conversion can be supplied from Yose Power.
- 36V 250W 20" Front Motor Kit - Black
- 36V 10Ah Lithium Rear Mounted Battery
- Raleigh Evo-2 Folding Bike
- Lithium Grease
- PLA Filament
- Cable Ties
The conversion kit used in this article contains a range of components that can look daunting initially. However, it is straightforward to assemble and will take around a day of time at a casual pace.
Components included in the kit are:
- Electric bike front wheel assembly
- Weatherproof speed controller box
- LCD handlebar interface
- Brake handle microswitch assemblies
- Throttle assembly
- Front light assembly
- Hall-effect pedal sensor assembly
- Preassembled wiring looms
Installing the Hub Motor
The wheel hub is the most important component in the kit and should be installed first to ensure it fits correctly. Removing the original wheel was as easy as loosening the nuts and pulling it off. I could then check to make sure the new wheel hub would fit between the forks and slotted comfortably into the 10mm mounting grooves. Having confirmed that the kit would fit I then removed the tire, inner-tube and rubber lining from the original wheel and transferred them to the new wheel hub assembly.
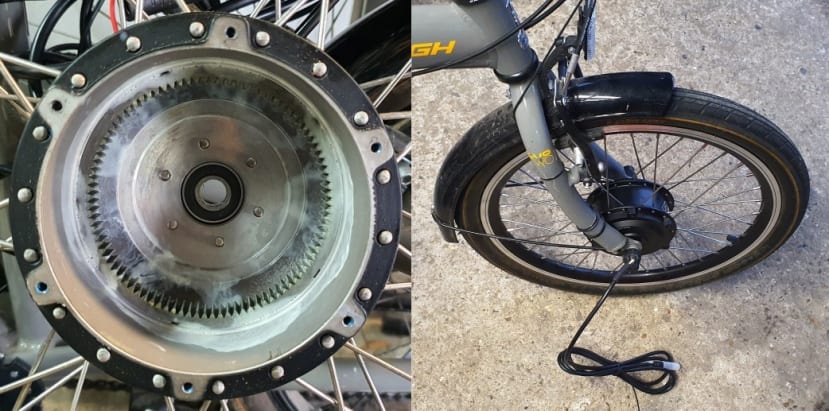
Grease the hub stator then attach new wheel hub assembly to the forks.
With the new wheel assembly ready to fit I removed the rotor from the hub assembly and lubricated the inside of the stator with lithium grease which will ensure a more efficient operation over its working lifetime. With the hub reassembled I could finally mount the new wheel to the forks and continue with the conversion.
Handlebar Assembly
All of the electric bike operating functions are controlled through the handlebars. The LCD screen controls the level of motor assistance in addition to displaying speed and other telemetry options. The brake levers are also updated with microswitches to cut power under braking. Assembling the components on the handlebars was a simple task once I decided on my preferred layout. The hardest part was removing the rubber handles, which I managed with the help of some white spirit. Once complete, all of the components could be attached easily, including the throttle and headlight, ready to be wired up to the rest of the bike.
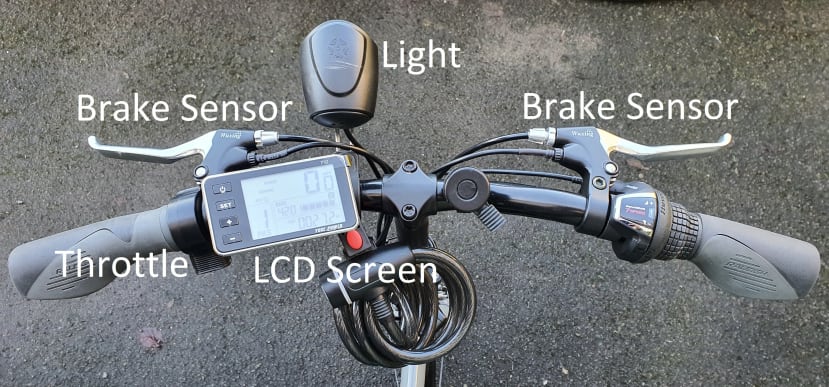
Completed handlebar assembly.
Pedal Sensor
As a legal requirement, electric bikes are designed to operate only while the user is pedalling. A lot of conversion kits come with a thumb throttle which should not be used on public roads. The pedal sensor that comes with this kit is a simple hall effect device that responds to a magnetic ring attached around the pedal shaft.
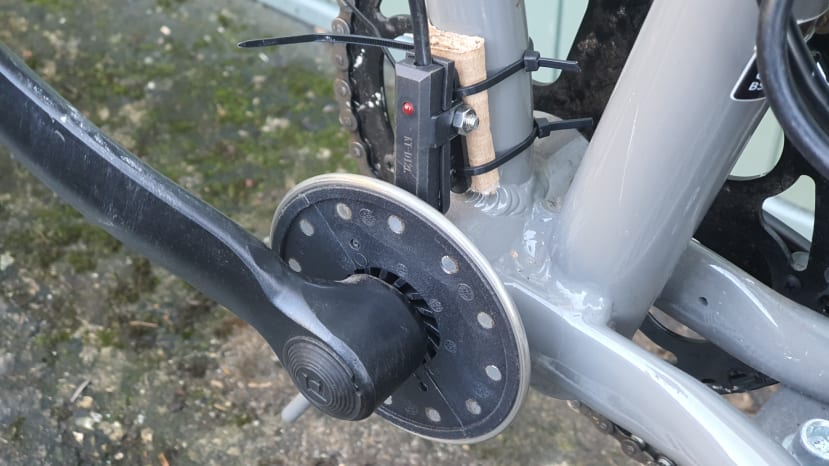
Pedal sensor assembly with magnetic ring and hall-effect.
Installation is as simple as securing the two halves of the magnetic ring around the pedal shaft. Once this is complete the sensor can be attached with two cable ties to the frame nearest the pedal shaft and ensuring the sensor is within 5mm of the ring. In this case, I used a piece of cardboard as a temporary spacer until I could 3D print a replacement bracket for the sensor.
Battery and Pannier
Mounting the battery to the pannier rack was the most complex part of the conversion process overall. There were no standard fixing methods to use with the pannier so a bespoke bracket design was required. Luckily, I was able to make good use of DesignSpark Mechanical and my 3D printer to fabricate a custom design. I could then use this bracket to firmly clamp the battery to the pannier rack. Once this was done, I used cable ties to secure the motor speed controller to the underside of the pannier and attach it to the bike.
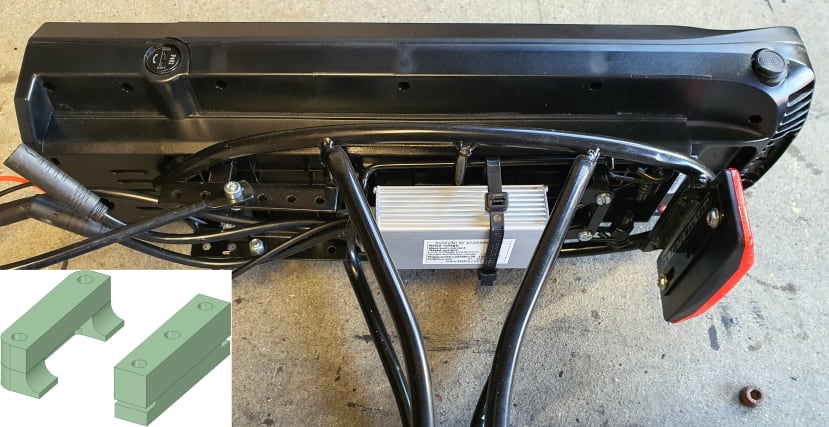
Pannier assembly uses 3D printed brackets to secure the battery.
Using the preassembled wiring loom I could connect the individual components of the conversion kit together in anticipation for initial testing. I was then able to tidy the wiring loom and use cables ties to secure them against the bike frame neatly.
The Result
Testing an electric bike for the first time is an awesome experience. There is a visceral sense of technological progress as you pedal effortlessly up steep inclines and over long distances. The simple knowledge that you built it yourself adds to this experience so much more and underlines its importance as a viable sustainable transport solution.


The result, an intrepid folding bike capable of travelling a long distance, up-hill and off-road.
After testing a range of electric bikes I have found the front hub motor performs the best overall. Having two independently driven wheels maximises the control and grip available to the user, with the added weight and power distribution helping to reduce stress on a lot of the original components. Lastly, while the legal power limit of 250w may sound low, I can confidently say that it is more than enough to surprise you.
Comments