Build your own Microcontroller Board
Follow articleHow do you feel about this article? Help us to provide better content for you.
Thank you! Your feedback has been received.
There was a problem submitting your feedback, please try again later.
What do you think of this article?
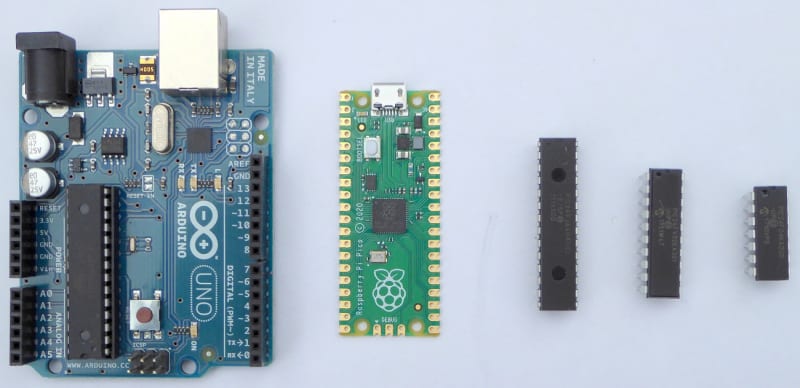
Boards and Chips. Left to right: an original Arduino Uno (pre-Rev3) with an 8-bit ATmega328 DIP chip, Raspberry Pi Pico with a 32-bit dual-core RP2040 MCU on a hand-solderable module, and three 16-bit Microchip PIC24 chips in different-sized DIP-packages.
Any ‘embedded’ project will benefit from using as few components as possible, so why not design your own custom development board? At the very least there’s the satisfaction gained by controlling the design at a deeper level. The downside is having to connect many individual components together to form complex circuits either by plugging them into a solderless ‘breadboard’ or by soldering them onto ‘stripboard’. There is another solderless technique called ‘wirewrap’, but it seems to be little used nowadays. If you’re used to just plugging modules together, like I did to create a wireless, battery-powered robot remote-controller, then the prospect of soldering tiny electronic components together can appear to be quite a daunting task!
Stripboard: with MCU chips or modules?
I’ve chosen to use SRBP stripboard (or Veroboard as we used to call it) (206-5841) for two recent projects: the paper tape reader interface and currently, a vintage teleprinter interface. Soldered stripboard is an ideal compromise between a custom printed circuit board (PCB) and plug-in breadboard. It allows you to make a robust one-off prototype without the hassle and cost of a PCB. The breadboard does offer the advantage of easy correction of mistakes but is hardly robust and you wouldn’t build it into a case as part of a finished product. A well-designed stripboard on the other hand, can be used for low-volume production of specialist equipment, especially if the fibre-glass version (518-5932) is used. However, good component layout and high-quality soldering are the keys to a reliable design, whatever material is used. Take a look at Figure 1 as an example.
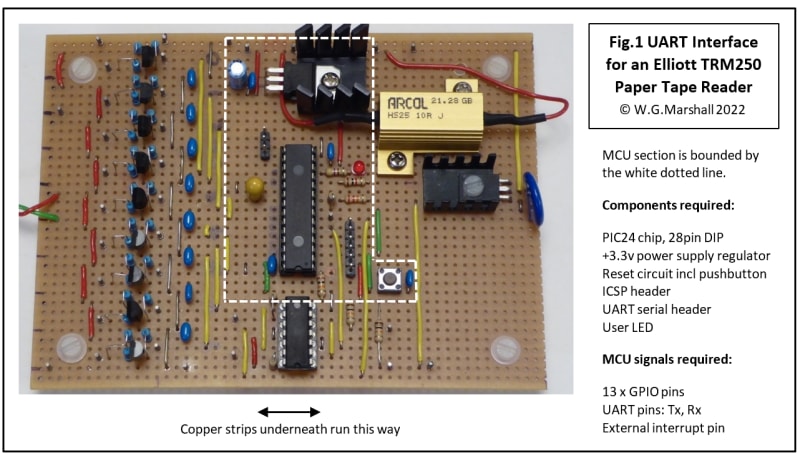
Figure 1. UART Interface for Elliott TRM250 Paper Tape Reader
This is an example of an ‘embedded’ microcontroller performing a single task; in this case, converting the parallel output of an old paper tape reader to a standard serial format. It enables tapes to be read via a COM-port terminal emulator running on a PC. Having decided to use an MCU for controlling the interface, the question becomes, which one? The programmed task is pretty simple and doesn’t need to run at a very high speed, so just about anything would do. The deciding factors in this case are:
- The number of GPIO lines required (13).
- The presence of an on-chip UART.
- The need for an External Interrupt pin.
Basing it on an Arduino-format board might seem to be a good idea: besides the ‘basic’ Arduino with its 8-bit ATmega328 chip, there are a whole host of others from other manufacturers featuring much more powerful devices. A possibility is to mount all the other components in the picture on a prototyping expansion board or Shield, which would then just plug into the MCU board. For this project, there are just too many other circuit elements to fit on one Shield. Boards like this can be stacked, but with all the external connections required, I felt the result was going to be too messy and difficult to debug.
Nowadays, there are many ‘nano’ or ‘pico’ format processor modules around designed to be soldered onto a piece of stripboard alongside all those peripheral components. There is in fact an Arduino Nano (696-1667) available which would fit on my board in place of the PIC24 and its support components, bounded by the dotted white line in Figure 1. I used the chip instead because (a) I had one to hand, and (b) I’m familiar with dsPIC/PIC24 programming using a PICkit debug tool (171-7762) and Microchip IDE MPLAB. The heading picture shows an example of a recent-introduced, vastly more powerful ‘nano’ board based on a dual ARM Cortex-M0+ core processor: the Raspberry Pi Pico (212-2162) . Rather over-the-top for this application though.
Chip selection
Having settled on a PIC24, which of the hundreds of variants should I use? Obviously, the package format is the most important criterion: only DIP parts (through-hole) can be used with stripboard and that seriously limits the choice. The number of GPIO pins needed for the PTR interface dictated a 28-pin device and I chose the PIC24HJ128GP502-I/SP, mainly because I happened to have one in the spares box….. It may seem a bit strange to select MCU chips on the basis of GPIO pins, but other criteria such as Flash memory capacity or clock speed are seldom critical for small embedded control applications. Unless of course, you see the inclusion of Artificial Intelligence as being crucial for successful operation.
The teleprinter interface is serial on both sides so requires far fewer connections than the PTR. On the face of it, two UARTs are needed, but there’s a problem. The old machine uses a 5-bit (Baudot) code rather than the later 7-bit (ASCII) equivalent, but modern UART circuits cannot be set up to handle 5-bit serial data. That means I’ll need to code up a ‘software UART’ based on a couple of GPIO pins for the teleprinter side. So, it looks like I only need four I/O pins for this interface and can get away with a correspondingly smaller device. The 14-pin PIC24F04KA200-I/P (687-8339) should fit the bill. It’s only got 4Kbytes of Flash program memory, but as I’ll be coding in assembler, it should be enough.
Chip support
An examination of say, a Raspberry Pi Pico module will reveal the presence of components other than the MCU chip itself. As a minimum there will be power rail decoupling capacitors, perhaps an external clock crystal, probably a +3.3v voltage regulator, and certainly Reset components including a manual pushbutton. Most of these will need to be included in your own board design. The chip datasheet should contain a diagram showing all the essentials. A means to program the Flash memory must be included too, hence the ICSP header on the board in Figure 1 which takes the PICkit programmer tool.
Stripboard: Layout
Still looking at Figure 1, the copper tracks underneath run horizontally along the ‘X-axis’. Components on the topside, where possible, are mounted along the ‘Y-axis’, linking tracks together. First, to be laid out were the nine data inputs from the PTR coming in on the left side of the board, soldered to tracks that run straight under the level-changing buffers. Pairs of power and ground rails run next to each other between the buffer transistors and are easily decoupled with 0.1in pitch 100nF capacitors soldered between them. That’s the line of eight tiny blue components across the board.
Next to be determined is the position of the MCU chip. There are nine tracks from the buffers which need to be linked with eight GPIO and one interrupt input on the MCU chip. The latter is oriented so those inputs are on the same side as the buffer outputs. But of course, the tracks don’t line up, so wire links on top of the board at right-angles to the tracks must be soldered in to complete the connection. Those are the yellow insulated wires between the line of capacitors and the MCU. The latter is placed so as to leave room for these wire links. Where a link changes direction like this, the track must be cut to avoid a possible short-circuit with other components further to the right. To cut tracks neatly, a special tool like a drill-bit is available (054-3535) which when inserted into a hole on the copper side of the board and rotated a couple of times, leaves a nice clean break.
The robustness of soldered joints and the ease of cutting tracks make design errors rather more difficult to fix than with plug-in breadboard, so laying out the components on the board and thinking about the signal routes before cutting and soldering will save an awful lot of annoying re-work. For the occasions when joints have to be undone, a solder sucker (479-4197) is an invaluable tool.
I decided to go with a stacked two-board arrangement for the teleprinter interface, partly because of space constraints within the case, and partly to separate the +80v power supply and magnet driver from the low-voltage MCU.
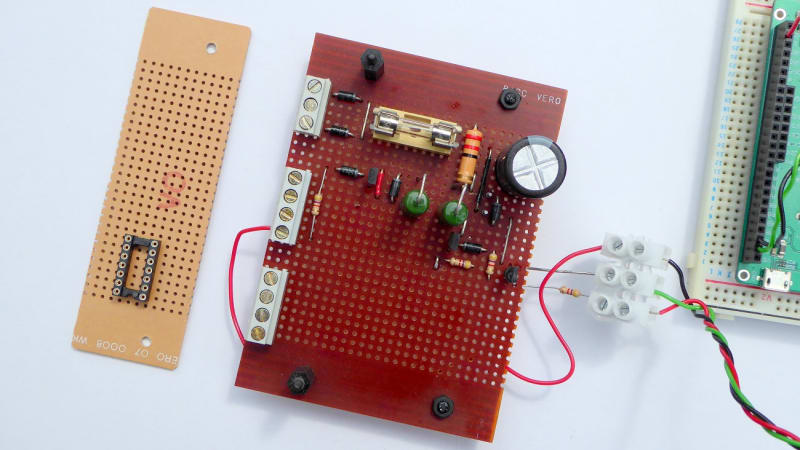
Unpopulated MCU board on the left, partly-populated high-voltage board in the middle and host Clicker 2 board on the right. The copper tracks run left to right underneath both stripboards. You can see that with thoughtful design, components can be grouped quite closely. The +12v supply has yet to be constructed in the remaining space on the HV board. Note the use of screw-down connectors – they make dismantling for hardware changes so much easier. Save the soldered wires for the debugged production version.
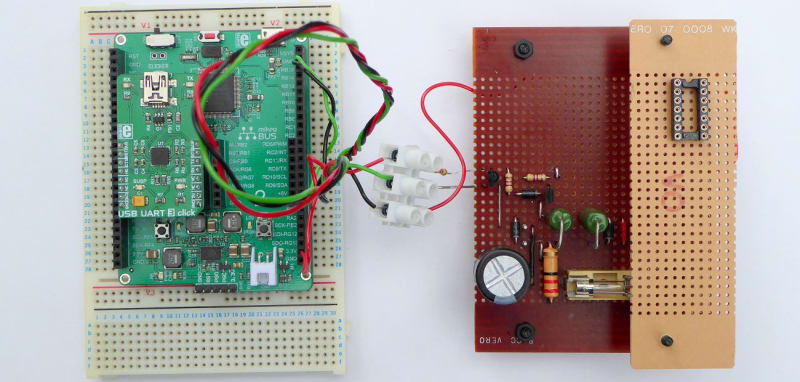
Bare MCU board shown in its stacked location on two plastic mounting pillars. The board is narrow in order to avoid covering the two vertically-mounted green 3W resistors. They get pretty hot. Incidentally, mounting resistors vertically – even ¼ watt types – is a great way of saving space on stripboard. Luckily, there are only two major components on the processor board: the MCU itself and a +3.3v regulator on a heatsink. There isn’t much more on the average nano board, and this custom version is optimised to suit the application, may cost less, and offers a whole lot more satisfaction for the constructor. The Clicker 2 is plugged into a solderless breadboard just to stop its pins from tearing up the surface of my workbench!
Finally
Building complete embedded projects on stripboard is really only a practical proposition if one of the relatively low-spec DIP-format MCUs available is up to the task. That doesn’t make prototyping on copper stripboard a thing of the past. On the contrary, the availability of modules like the Pico with its powerful processor and 0.1in pitch DIP format will guarantee the survival of the soldering iron for some time yet. However, to paraphrase Occam’s razor:
“Avoid using the latest powerful, but unfamiliar processor chip when a less-sophisticated, fully-understood device will do”.
If you're stuck for something to do, follow my posts on Twitter. I link to interesting articles on new electronics and related technologies, retweeting posts I spot about robots, space exploration and other issues. To see my back catalogue of recent DesignSpark blog posts type “billsblog” into the Search box above.


Comments