Basics of Atmega328
Follow article
 Dave from DesignSpark
How do you feel about this article? Help us to provide better content for you.
Dave from DesignSpark
Thank you! Your feedback has been received.
Dave from DesignSpark
There was a problem submitting your feedback, please try again later.
Dave from DesignSpark
What do you think of this article?
Hello everyone, I hope you all are doing great. It's my first article on this platform and I will try my best to provide good material to the readers. If you have any problem then you can ask in comments and I will try my best to resolve them.
In today's tutorial, I am going to give an Introduction to Atmega328. Atmega328 is an Atmel microcontroller, which is used in Arduino UNO board. Here's its image:
Here are few of its features:
- Atmega328 has 28 pins in total.
- It has 3 Ports in total which are named as Port B, Port C and Port D.
- Port C is an analogue Port and it has six pins in total. So, in simple words, ATmega328 has 6 analogue pins.
- Port B and Port D are digital ports and have 7 pins each.
- So, in total ATmega328 has 14 digital pins.
- It also supports Serial Communications, we can perform serial communication via Pin # 2 (RX) and Pin # 3 (TX).
- It also supports SPI Protocol.
- It needs a crystal oscillator for generating the frequency. You can use crystal oscillator ranging from 4MHz to 40 MHz.
- Arduino UNO board uses 16MHz crystal oscillator.
Here's an image showing its internal configuration:
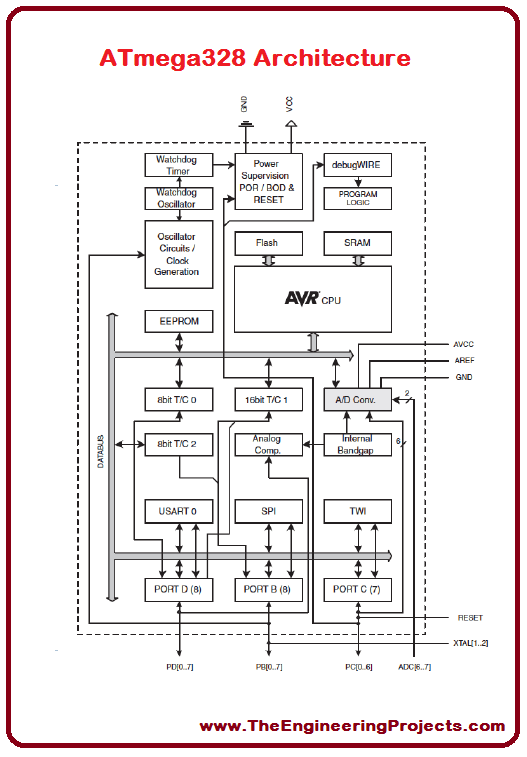
Image Source: Introduction to Atmega328
So, that was all about Atmega328. I hope you will like my first effort and I will keep on posting more articles on Arduino and Atmega328. Thanks for reading. Have fun !!! :)
Comments