What is Arduino UNO? | Arduino Uno Pinout & Program | DesignSpark
Follow article
 Dave from DesignSpark
How do you feel about this article? Help us to provide better content for you.
Dave from DesignSpark
Thank you! Your feedback has been received.
Dave from DesignSpark
There was a problem submitting your feedback, please try again later.
Dave from DesignSpark
What do you think of this article?
In this post today, I’ll walk you through the Arduino UNO in detail as I’ll cover each and everything related to Arduino UNO including what is Arduino UNO, its features, pinout, programming, and applications.
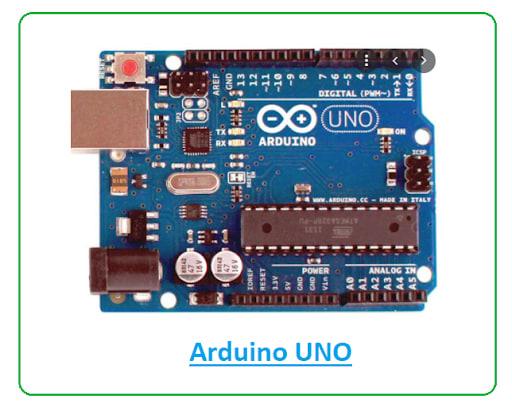
What is Arduino UNO?
Arduino UNO is a low-cost, flexible, and easy-to-use programmable open-source microcontroller board that can be integrated into a variety of electronic projects. This board can be interfaced with other Arduino boards, Arduino shields, Raspberry Pi boards and can control relays, LEDs, servos, and motors as an output.
Arduino UNO features AVR microcontroller Atmega328, 6 analogue input pins, and 14 digital I/O pins out of which 6 are used as PWM output.
This board contains a USB interface i.e. USB cable is used to connect the board with the computer and Arduino IDE (Integrated Development Environment) software is used to program the board.
The unit comes with 32KB flash memory that is used to store the number of instructions while the SRAM is 2KB and EEPROM is 1KB.
The operating voltage of the unit is 5V which projects the microcontroller on the board and its associated circuitry operates at 5V while the input voltage ranges between 6V to 20V and the recommended input voltage ranges from 7V to 12V.
Do you like what you read? Visit your profile and preference center to opt in to our DS newsletter and never miss great tech articles again!
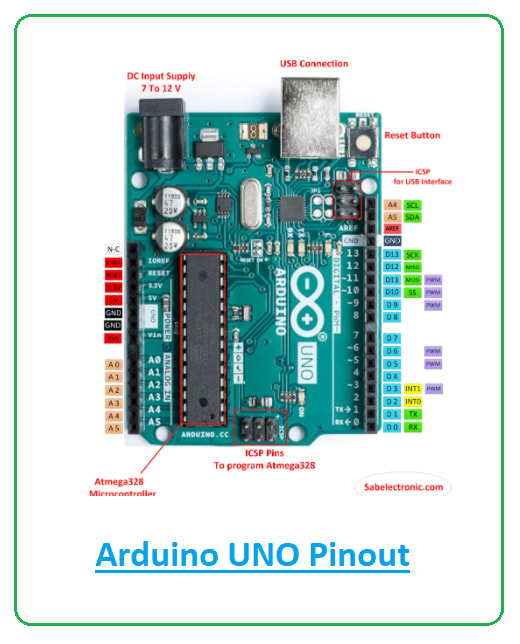
Arduino UNO Components
The Arduino UNO board contains the following components and specifications:
ATmega328: This is the brain of the board in which the program is stored.
Ground Pin: there are several ground pins incorporated on the board.
PWM: the board contains 6 PWM pins. PWM stands for Pulse Width Modulation, using this process we can control the speed of the servo motor, DC motor, and brightness of the LED.
Digital I/O Pins: there are 14 digital (0-13) I/O pins available on the board that can be connected with external electronic components.
Analogue Pins: there are 6 analogue pins integrated on the board. These pins can read the analogue sensor and can convert it into a digital signal.
AREF: It is an Analog Reference Pin used to set an external reference voltage.
Reset Button: This button will reset the code loaded into the board. This button is useful when the board hangs up, pressing this button will take the entire board into an initial state.
USB Interface: This interface is used to connect the board with the computer and to upload the Arduino sketches (Arduino Program is called a Sketch)
DC Power Jack: This is used to power up the board with a power supply.
Power LED: This is a power LED that lights up when the board is connected with the power source.
Micro SD Card: The UNO board supports a micro SD card that allows the board to store more information.
3.3V: This pin is used to supply 3.3V power to your projects.
5V: This pin is used to supply 5V power to your projects.
VIN: It is the input voltage applied to the UNO board.
Voltage Regulator: The voltage regulator controls the voltage that goes into the board.
SPI: The SPI stands for Serial Peripheral Interface. Four Pins 10(SS), 11(MOSI), 12(MISO), 13(SCK) are used for this communication.
TX/RX: Pins TX and RX are used for serial communication. The TX is a transmit pin used to transmit the serial data while RX is a receive pin used to receive serial data.
Arduino UNO Pinout
There is a range of Arduino boards available in the market but the Arduino UNO is the most common board used in the electronic industry. The following figure shows the Arduino UNO Pinout for better understanding:
How to Program Arduino UNO
Arduino UNO is easy to program and a person with little or no technical knowledge can get hands-on experience with this board. The Arduino UNO board is programmed using Arduino IDE software which is an official software introduced by Arduino.cc to program the board. The Arduino program is called a sketch which you need to unload into the board. The sketch is nothing but a set of instructions that allow the board to perform certain functions as per your requirements.
Each Arduino sketch comes with two main parts:
void setup() – this sets up the things that need to be done once and they don’t happen again in the running program.
void loop() – this part comes with the instructions that get repeated again and again until the board is turned off.
Difference between Arduino Board and Microcontroller:
Arduino boards can perform some functions that a single microcontroller is capable of doing. But hobbyists and experts still prefer the Arduino board over the microcontroller. Why? Because Arduino boards are easy to use and you don’t require a lot of expertise to run these units. Simply plug the board into the computer and start playing with it.
Moreover, while using Arduino boards, you don’t require extra peripherals and components to run the boards. Arduino is the complete board that comes with GPIO pins, analogue pins, and a microcontroller as the heart of the board. A microcontroller, on the other hand, is a chip where all the necessary parts like microprocessor, ram, and flash memory are incorporated into a single chip.
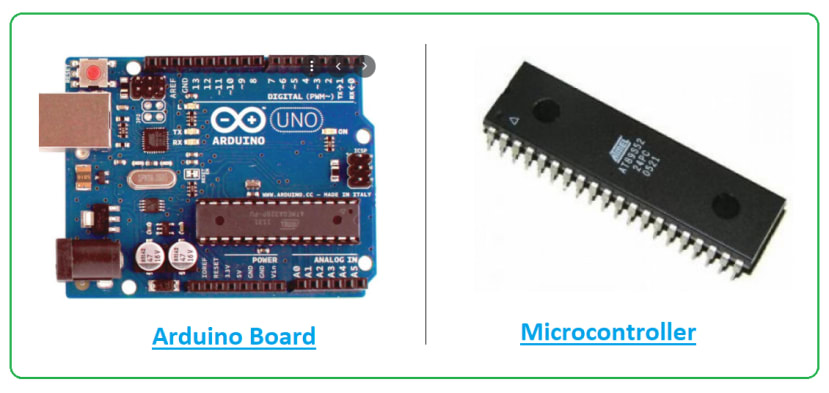
So we can say every Arduino board is a microcontroller but not every microcontroller is an Arduino board.
Plus, Arduino is an open-source hardware and software platform which means it is free to use and anyone can modify the boards as per their requirements.
Arduino UNO Applications
The Arduino boards can work as a stand-alone project and can be interfaced with other Arduino boards or Raspberry Pi boards. Arduino UNO board is used in the following applications.
- Weighing Machines
- Traffic Light Count Down Timer
- Parking Lot Counter
- Embedded systems
- Home Automation
- Industrial Automation
- Medical Instrument
- Emergency Light for Railways
Hope you’ve found this read helpful. If you’re unsure or have any questions, you can approach me in the section below and leave your comment. I’ll try my best to help you out. Thank you for reading this article.
Comments