Sony Spresense Packs Advanced IoT Capabilities into Tiny Board
Follow article
 Dave from DesignSpark
How do you feel about this article? Help us to provide better content for you.
Dave from DesignSpark
Thank you! Your feedback has been received.
Dave from DesignSpark
There was a problem submitting your feedback, please try again later.
Dave from DesignSpark
What do you think of this article?
Diminutive powerhouse integrates camera, GNSS, plentiful GPIO and Arduino support.
The saying goes that you can have fast, cheap or good — pick two. However, the Sony Spresense combines a high performance, low energy multi-core processor with 8MB flash, camera interface, GNSS and no shortage of I/O, for a little more than you might pay for a GNSS dev board alone. Not only this, but with full support for using the Arduino IDE or, alternatively, an SDK that is built on top of a GNU toolchain and featuring a developer framework based on the NuttX RTOS.
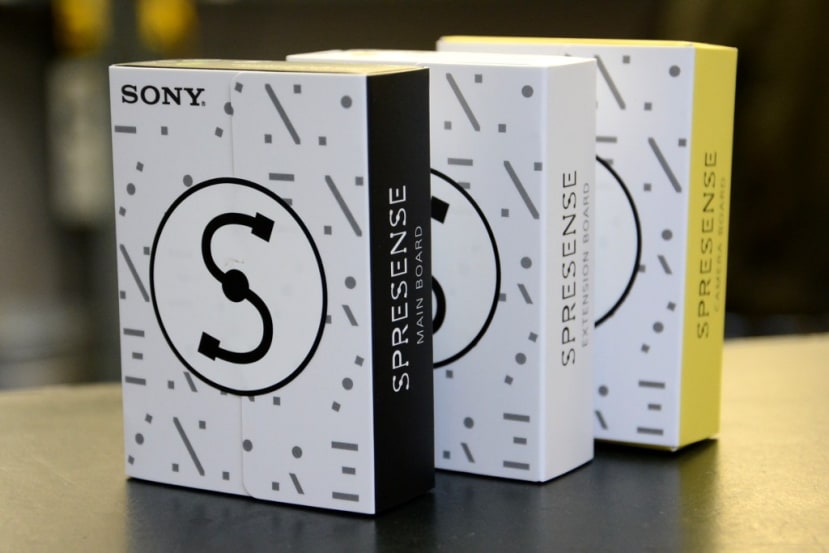
In this post, we take a look at the Spresense Main, Extension and Camera boards, before moving on to running some of the provided examples.
Sony CXD5602 at its Heart
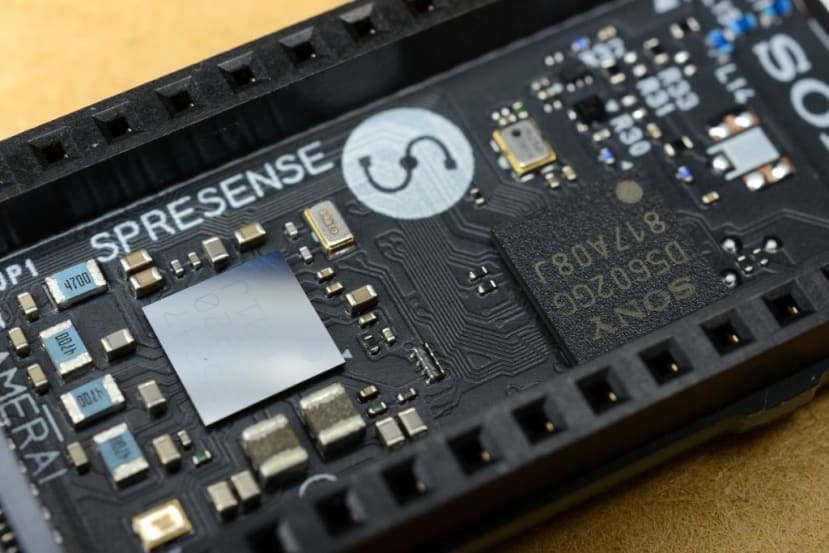
The Spresense Main Board (178-3376) is built around Sony’s CXD5602 microcontroller, which manages to fit a ton of functionality into an IC package only 6.5 x 6.5 mm in size.
Implemented in low power FD-SOI technology, with a selection of sleep modes and partitioned into multiple power domains, the MCU is squarely targeted at deeply embedded IoT applications with low power requirements.
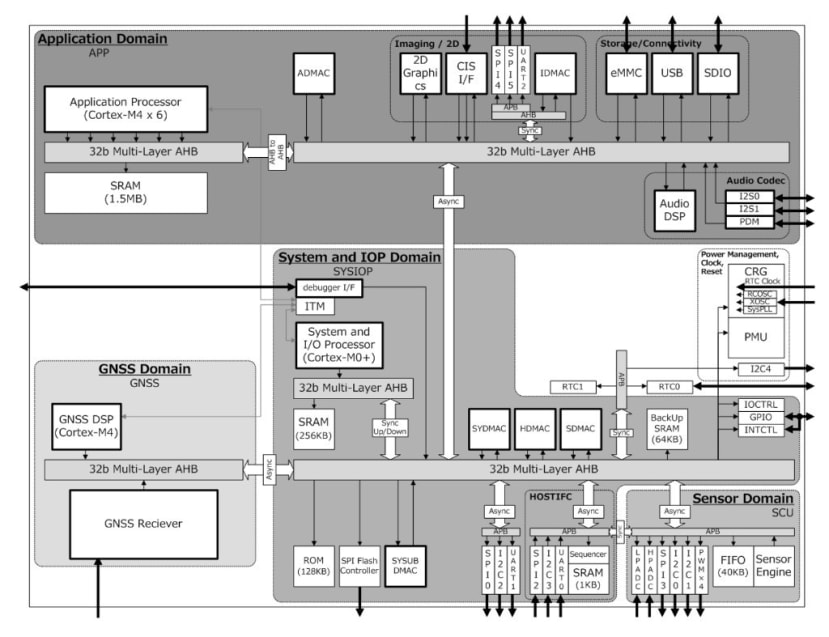
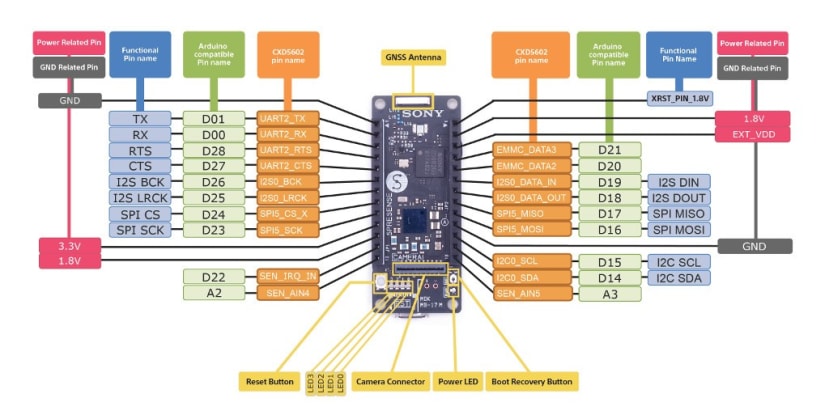
The CXD5602 application domain is powered by six Arm Cortex-M4 processors with 1.5MB SRAM, with a seventh taking care of the GNSS receiver DSP. The eighth and final core being a Cortex-M0 that is configured as a system and I/O processor. Other key features include:
- Image processing domain with support for various formats and capture control
- Sensor domain with decimation and digital filtering, plus DMA controllers and interfacing that includes:
- I2C
- SPI
- ADC
- PWM
- Storage/connectivity including eMMC and USB
- Real-time clock (RTC)
The Spresense Main Board adds to this 8MB flash, GNSS antenna, Micro USB and camera connectors, LEDs and buttons, plus a high density connector for interfacing with the Extension Board or a custom board.
In addition to the above, the Main Board also integrates a Sony CXD5247GF featuring power management and an audio block. The latter provides a 4x channel analogue microphone amplifier with programmable gain and ADC, plus a Class-D audio output amplifier for use with 8 ohm loads.
Arduino Form Factor
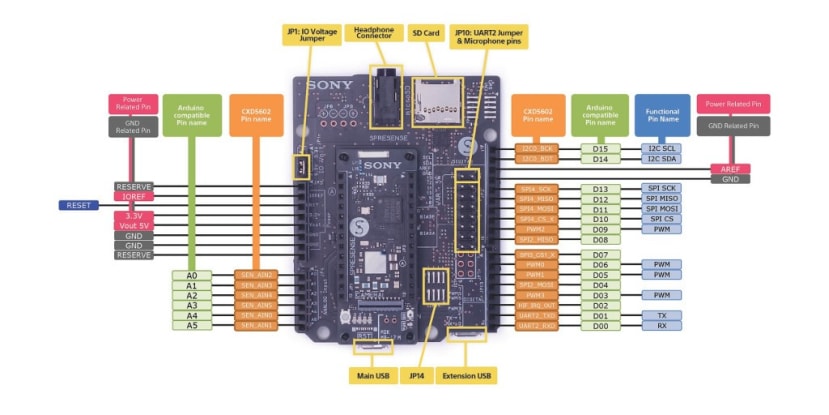
As great as having such a compact module is when it comes to integrating custom hardware, during the early stages of prototyping it’s nice to have something a little larger in size, with perhaps more I/O broken out and if possible, level shifting and modular expansion.
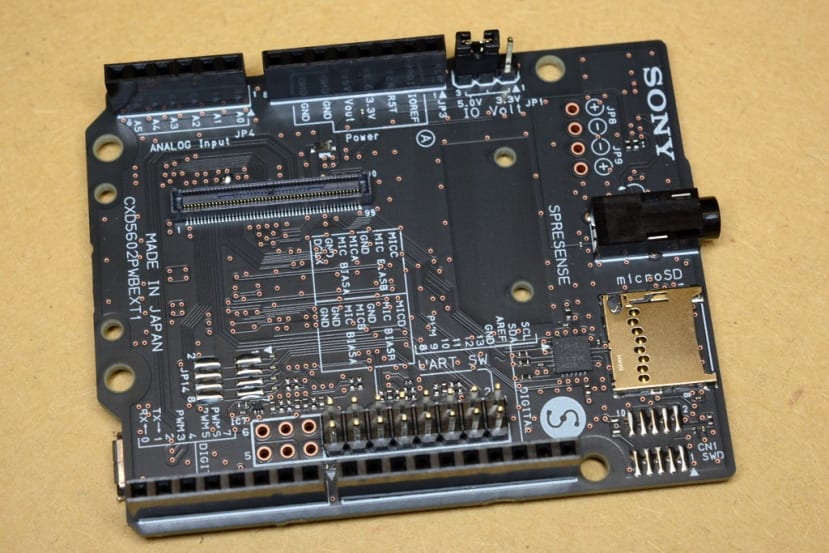
This and more is provided by the Spresense Extension Board (178-3377) , which transforms the module into an Arduino Uno form factor with shield headers, 3.5mm jack, Micro SD, additional USB, and a microphone header.
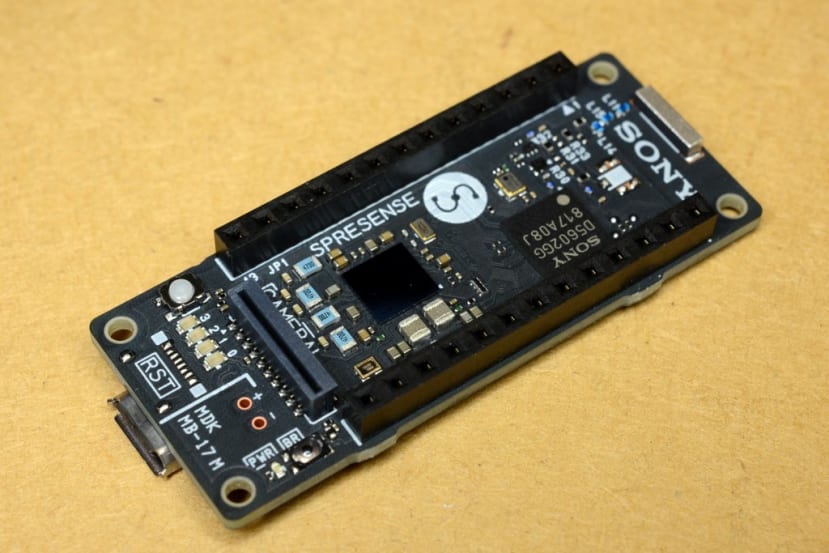
5 Megapixel Camera
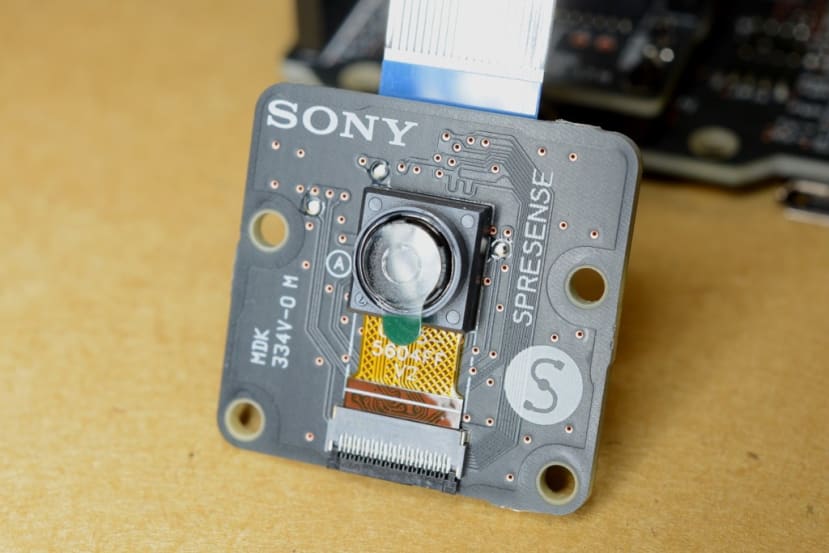
The Camera Board (183-3894) interfaces directly with the Main Board via a short flat cable and adds a 5 megapixel camera with a sensitivity of 40-800 ISO. Featuring various exposure and focus control modes, along with shutter speed ranges and scene selection presets. HD motion format is supported at up to 30 fps with 1080p resolution, and 60fps at 720p.
So with a great mix of hardware capabilities at our disposal, how do we program the Spresense?
Arduino IDE Support
By far the easiest way to get started if you’re not an experienced embedded developer, is to take advantage of the Arduino platform support. Getting up and running is easy and involves:
- If you don’t have it already, installing the Arduino IDE
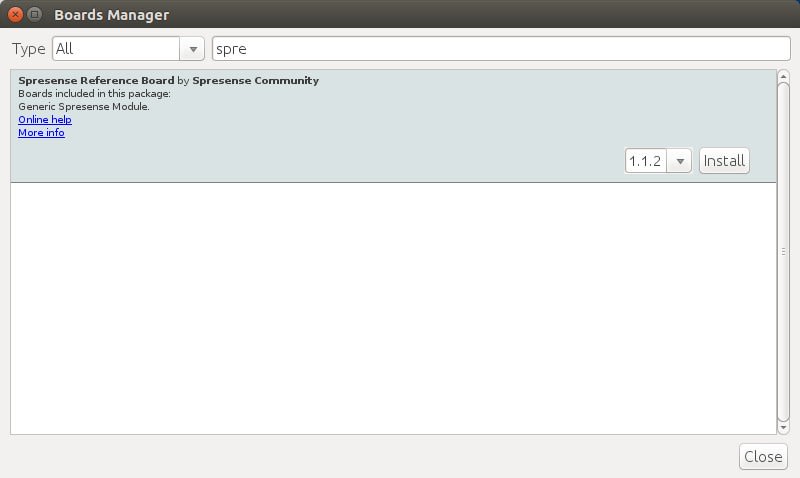
- Adding a new Boards Manager URL
- Searching for and installing Spresense board support
- Updating the Spresense bootloader
For further details see the official documentation.
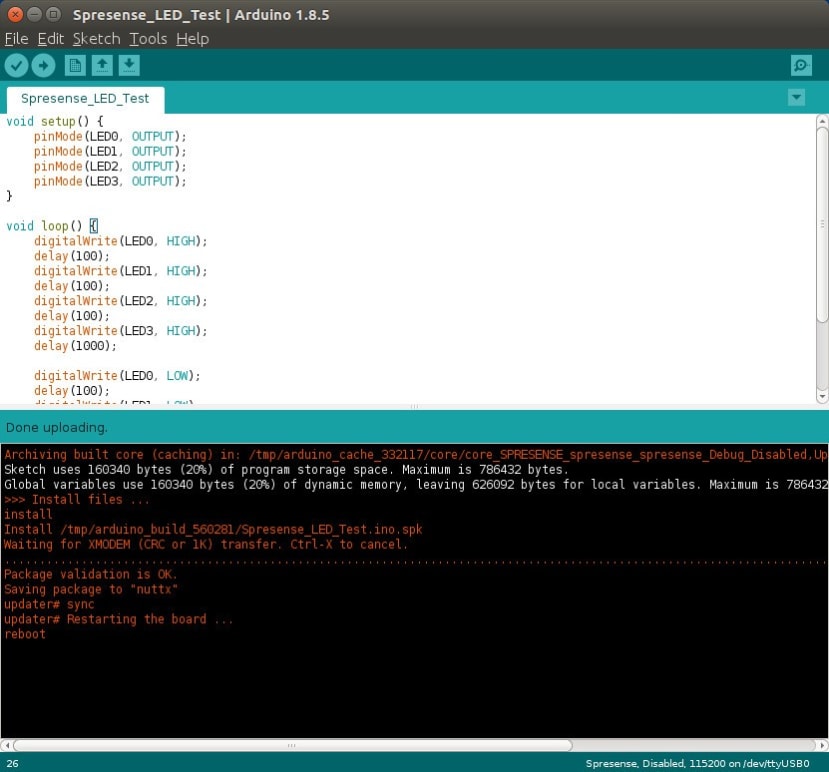
The sketch used to verify installation uses... you guessed it, LEDs! No surprises here and after compiling and uploading, the four LEDs on the Main Board illuminate in sequence.
It’s good to know that the IDE, board support and hardware is working as it should be, but there are obviously much more exciting things we can do than simply blink some LEDs. So if we take a look at the key parts from the provided camera example.
#include <SDHCI.h>
#include <stdio.h>  /* for sprintf */
#include <Camera.h>

SDClass  theSD;
int take_picture_count = 0;

void CamCB(CamImage img)
{

  /* Check the img instance is available or not. */

  if (img.isAvailable())
    {

      /* If you want RGB565 data, convert image data format to RGB565 */

      img.convertPixFormat(CAM_IMAGE_PIX_FMT_RGB565);

      /* You can use image data directly by using getImgSize() and getImgBuff().
       * for displaying image to a display, etc. */
}

void setup()
{

  /* begin() without parameters means that
   * number of buffers = 1, 30FPS, QVGA, YUV 4:2:2 format */

  theCamera.begin();

  /* Start video stream.
   * If received video stream data from camera device,
   *  camera library call CamCB.
   */

  theCamera.startStreaming(true, CamCB);

  /* Auto white balance configuration */

  theCamera.setAutoWhiteBalanceMode(CAM_WHITE_BALANCE_DAYLIGHT);

  /* Set parameters about still picture.
   * In the following case, QUADVGA and JPEG.
   */

  theCamera.setStillPictureImageFormat(
     CAM_IMGSIZE_QUADVGA_H,
     CAM_IMGSIZE_QUADVGA_V,
     CAM_IMAGE_PIX_FMT_JPG);
}

/**
 * @brief Take picture with format JPEG per second
 */

void loop()
{
  sleep(1); /* wait for one second to take still picture. */

  /* This sample code can take 100 pictures in every one second from starting. */

  if (take_picture_count < 100)
    {

      /* Take still picture.
      * Unlike video stream(startStreaming) , this API wait to receive image data
      *  from camera device.
      */

      CamImage img = theCamera.takePicture();

      /* Check availability of the img instance. */
      /* If any error was occured, the img is not available. */

      if (img.isAvailable())
        {
          /* Create file name */

          char filename[16] = {0};
          sprintf(filename, "PICT%03d.JPG", take_picture_count);

          /* Save to SD card as the finename */

          File myFile = theSD.open(filename, FILE_WRITE);
          myFile.write(img.getImgBuff(), img.getImgSize());
          myFile.close();
        }

      take_picture_count++;
    }
}
Here the serial port debug has been removed and it couldn’t be simpler; we include libraries for SD card and camera support, and define a function to check if image data is available and convert it to RGB565. We then set up a few basic parameters and start capturing images.

With the default settings, the results are not bad at all and could likely be improved upon by configuring white balance for indoor fluorescent lighting.
Other provided Arduino examples include:
- Audio record and play, and MP3 encode and decode
- Handwritten number recognition using a deep neural network (DNN)
- GNSS tracker
- Servo motor control
Spresense SDK
A comprehensive SDK is also available and this will appeal more to experience embedded developers and those with more advanced use cases. Getting up and running with this on Ubuntu Linux is simply a matter of installing an Arm toolchain via the package management system, building and installing a package from NuttX, then installing the Spresense SDK itself. This literally took minutes and for detailed information see the official documentation.

With the SDK installed, a few setup commands and two make commands later and we’ve built a NuttX image with the classic "Hello, World" example. It takes one more command to flash this to the board and then we can start a terminal emulator, in this case, Minicom, to connect to it.

Once the board boots we drop into the NuttX shell and from here can type “hello” to run our example.

We can also type “help” to get a list of commands and run ls and ps etc. to list files and processes. Yes, an actual tiny real-time operating system running on our board and with an interactive shell!
Spresense SDK examples include:
- Decimator (data downsampling to reduce processing overhead) with support for a gyroscope, accelerometer and various magnetometers
- Geofence (e.g. keeping drones within a specified area) using on-board GNSS
- HTPP GET (e.g. API access) over LTE using an attached modem
- ADC (analogue sensors, audio)
- PWM (motor and fan speed control etc)
Final thoughts
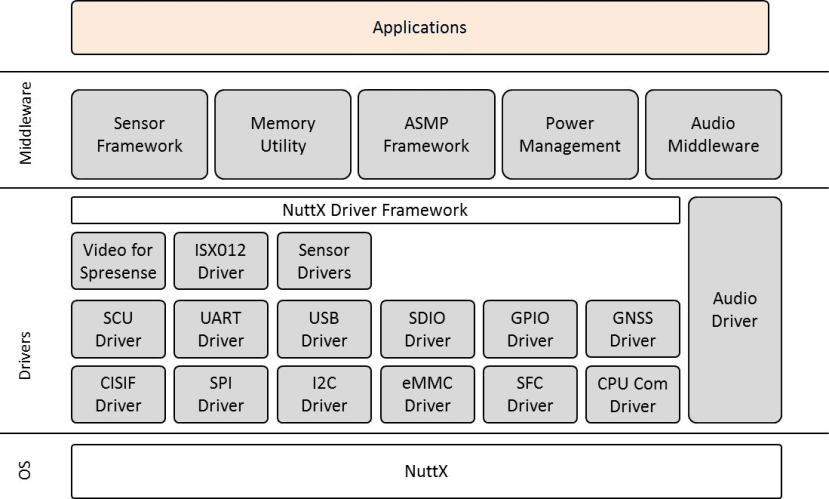
The Spresense hardware is particularly impressive and here we’ve barely scratched the surface of what it’s capable of. With 6x Arm cores running at up to 156MHz, its MCU is capable of running some pretty demanding applications and, thanks to SDK support for message passing and shared memory, developing these to take advantage of the hardware should be made a whole lot easier.
In addition to the raw performance of the MCU application domain, the Spresense also benefits from hardware-based decimation and filtering of sensor data, plus a dedicated system and I/O processor. When all this is combined with plentiful interfacing and the NuttX RTOS support it makes for a powerful combination — albeit one that is also very well suited to low power (consumption) applications and, as such, perfect for advanced IoT use cases.
In short, the Spresense is a featured packed powerhouse of a board with excellent developer tools and high quality documentation, which should enable some pretty exciting applications.