LattePanda - a practical 60 minute challenge
Follow article
 Dave from DesignSpark
How do you feel about this article? Help us to provide better content for you.
Dave from DesignSpark
Thank you! Your feedback has been received.
Dave from DesignSpark
There was a problem submitting your feedback, please try again later.
Dave from DesignSpark
What do you think of this article?

In a previous post we had a quick look at the LattePanda board, what it is and offers. We also mentioned we had ordered a Gravity Series Sensor Kit (126-3114) . In this post we’ll look a little more at what this can offer when paired with the LattePanda, by starting to integrate a simple application to help control some lighting based on a few conditions. Since we like an afternoon challenge we gave ourselves a whole 60 minutes to make this happen — no way, I hear you say!.

Planning
As our first Windows application, we wanted a simple but compelling problem to work upon. A simple application that could solve an issue we have (or at least can perceive), is lighting automation based upon a few conditions:
- Is anyone around and is it worth turning the lighting on?
- Is it already light enough?
Additionally, at a later date, we would like to log the temperature/detect IR radiation in addition to logging occupancy/lighting use.
Having discussed the power of the LattePanda, this maybe somewhat trivial for the platform and there may be simpler solutions out there, such as Arduino for example. One reason to use LattePanda is that having this information in a Windows environment provides a few things Arduino cannot. A Windows-based application means we can push data over IP easily. It’s even possible to provide an internet server for remote control purposes. Finally, the justification that rules them all: “We did it because we wanted to!”
For the light and temperature measurement, we used the analogue temperature sensors in the gravity kit. We also decided to see if we can measure the ambient IR radiation with the flame sensor from the gravity kit, in essence, this part is an IR sensitive diode and will change properties with the amount of IR (of a specific band) in the vicinity. This is how it detects flame, it is also why it’s been reported as problematic outdoors. It should give a good metric of natural light as it will be high in IR compared to our artificial lighting (note certain lights under some conditions may put out a lot of IR e.g. under-driven CFL ).
Getting started
We decided to go with a single window forms application and for simplicity, we will have everything sat in one thread and not have to worry too much about threading. For those who come from a single-threaded environment like Arduino, threading can be confusing. In essence, each thread is a different part of the application/code and in a multi threaded environment, these can run concurrently (depending on the system and scheduler). This means code needs to be thread-safe and any shared resources, like the Arduino in the LattePanda, need to be shared carefully. The main reason for thread use is the performance improvements it brings. More information is available from Wikipedia.
By using a single form we can ignore treading for now. We only have a single thread alive at one time and it acts similar to the Arduino. Although our thread is running in a scheduled environment and so not deterministic. Creating a new “Windows Forms App” in Visual Studio is just a few clicks, leaving us with a standard — although older circa Windows 98 — looking Windows window (try saying that 5 times fast).
If you’ve never used a Visual Studio/Windows forms before there are a few things to highlight:
In the project explorer, there are a few items, Program.cs and Form1.cs. We can actually leave Program.cs alone, as all this will do on application start is run Form1.cs. If we were to put any code in here it would happen either before or after Form1 is launched.
Program.cs
Note the code Application.run: This is where the “form” is launched and any code before the Application.run command will be done before the launch of the form (our application) and any code after wont get run until we close our application.
using System;
using System.Collections.Generic;
using System.Linq;
using System.Threading.Tasks;
using System.Windows.Forms;

namespace WindowsFormsApp1
{
    static class Program
    {
        /// <summary>
        /// The main entry point for the application.
        /// </summary>
        [STAThread]
        static void Main()
        {
            Application.EnableVisualStyles();
            Application.SetCompatibleTextRenderingDefault(false);
            Application.Run(new Form1());
        }
    }
}
Form1.cs
If we double-click on this it will open up the code related to our windows form1. This won’t contain a lot until we add some items from the toolbox to the form. For now, we need to start our Arduino object when the form starts, so we added the code below, as the first line of code before the form code:
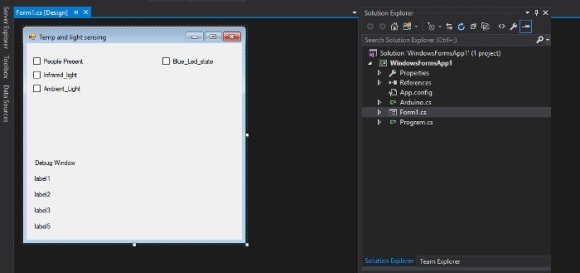
static Arduino arduino = new Arduino();//create an instance and initialize with the default parametersSo the next step was to add some checkboxes and labels (including some labels for debug). Once this was complete we had a window looking like the one pictured below. A point to not is rename added objects in the properties window after adding them, otherwise they will be named “checkbox1” etc.
Since the first step is to get an LED working, double-clicking the Blue_LED checkbox (called LED_Status in our example) it will open Form1.cs at:
private void LED_Status_CheckedChanged(object sender, EventArgs e)

{ }
This code is event driven and will only be called when the checkbox status is changed so we can toggle a LED here, so we added the following code:
private void LED_Status_CheckedChanged(object sender, EventArgs e)
{
	if(LED_Status.Checked)
        {
            arduino.digitalWrite(10, Arduino.HIGH);//set the LED on
        }
        else
        {
            arduino.digitalWrite(10, Arduino.LOW);//set the LED off
        }
}
Running this code allows the LED we had connected to Pin 10 to toggle on and off via Windows. This could be wired to additional lighting. We could continue to add code here, but that would mean nothing will happen until we click a button. Ideally, we would like something to happen every second (temperature logging) and something to happen every 100ms. This is a good period since it is around the perception threshold of humans. Delays beyond 100ms are perceivable anything below is quite hard to distinguish.
Adding two “timers” to the form and configuring them for 1000ms and 100ms delays we get two new lines in our form1.cs. To which we added functions dosomething and readtemp:
        private void timer1_Tick(object sender, EventArgs e)
        {
            dosomething();
        }

        private void timer2_Tick(object sender, EventArgs e)
        {
            readtemp();
        }
Creating a function for both of these as per below and we should be ready to go:
private void dosomething()
        {
            int flamesensorthreshold =  200; // threshold for activation
            int ambientlightthreshold = 500; // threshold for activation
            int PIR_State = arduino.digitalRead(9);// Read the state of pin 9.
            int Light_Present = arduino.analogRead(0);//Read the state of pin 0
            int IR_Present = arduino.analogRead(1);//Read the state of pin 1

            label1.Text = "AnalogueLight sensor output: " + Light_Present.ToString(); //debug
            label2.Text = "Flame sensor output: " + IR_Present.ToString(); //debug
            label5.Text = "PIR sensor ouput: " + PIR_State.ToString(); //debug
            if(IR_Present <flamesensorthreshold)
            {
                Irlight.Checked = true;		// add checkbox
                arduino.digitalWrite(10, 1);    // turn LED on for debug
                LED_Status.Checked = true;      // check LED box too
            }
            else
            {
                Irlight.Checked = false;	// turn off checkbox
            }

            if (Light_Present > ambientlightthreshold)
            {
                abmlight.Checked = true; 	// turn on checkbox
            }
            else
            {
                abmlight.Checked = false;	// turn on checkbox
            }

            if (PIR_State == 1) // is pin 11 high
            {
                PIR_Status.Checked = true;	// turn on checkbox
                arduino.digitalWrite(11, 1);	// turn on led

            }
            else
            {
                PIR_Status.Checked = false;	// turn off checkbox
                arduino.digitalWrite(11, 0);	// turn off leds
            }

        }
At this point, our time was up and we wanted to see results. Fixing a few compile errors (missing brackets as usual) we ran the code and the Windows form/application is generated and, wow it worked!
Maybe not a ground-breaking innovation, but we have an LED that turns on when we are present in the room, a LED that turns on if there is significant IR in the room, and a temperature measurement being updated every second. The IR measurement is very sensitive — more so than the LDR light sensor, so blocking natural light sets it off and it may be useful for some applications.
Final words
Well the whole brief wasn’t completed in the time we allocated, however, we are a good way there. We have a standalone Windows application that monitors temperature/occupation and light levels and does something if the natural light is not present. Using the LattePanda in C# is a breeze and we are looking forward to another project (but maybe we’ll budget more than an hour next time).
Karl Woodward