Create an FPGA-based IoT application by Python
Follow article Dave from DesignSpark
How do you feel about this article? Help us to provide better content for you.
Dave from DesignSpark
Thank you! Your feedback has been received.
Dave from DesignSpark
There was a problem submitting your feedback, please try again later.
Dave from DesignSpark
What do you think of this article?
Internet of Thing (IoT) is no longer just a buzz word. Recently, you can see a range of IoT applications in different industries and consumer electronics markets. The popular IoT applications include SMART home, wearable, connected car, Industrial IoT and precision farming
Xilinx FPGAs have been widely used in Industrial IoT (IIoT) because its FPGAs provide a flexible, standards-based solution that combines software programmability, real-time processing, hardware optimization and any-to-any connectivity with the security and safety needed for Industrial IoT systems. Xilinx Zynq SoC equipped with ARM processor and logic fabric provides let engineers and developers preprocess high-speed incoming data using programmable logic and then perform software-based operations in the processor.
Python is commonly used in IoT application development because of its simplicity and readability. It is the right choice for data analysis in IoT systems. Because of the large community, developers can find help and libraries as and when required. It is the ideal language for data-intensive applications.
Xilinx PYNQ is a new open-source framework that enables embedded programmers to exploit the capabilities of Xilinx Zynq All Programmable SoCs (APSoCs) without having to design programmable logic circuits. The programmable logic circuits are imported as hardware libraries and programmed through their APIs in essentially the same way that the software libraries are imported and programmed. Using Python within PYNQ enables easy access and use of high-level frameworks, including those which connect us to the Internet of Things (IoT) and cloud-based services.
Adam Taylor, an expert in embedded systems design, uses Xilinx PYNQ image, Python, Digilent ZYBO Z7, Xilinx Zynq Soc Platform (164-3487) , Xilinx Zynq SoC Platform, Digilent Pmod ALS Ambient Light Sensor (134-6463) , IFTTT Hue service and adafruit.io to create an IoT application. Adam firstly puts PYNQ on ZYBO Z7 and then writes the application on Python. After that, he connects the hardware (Zybo Z7 + Pmod ALS) with the Internet and makes use of Adafruit.io and IFTTT to run the IoT application.
Load the PYNQ framework on ZYBO Z7
The application is designed on a Linux machine. First of all, Adam uses a Virtual Machine with Ubuntu 16.04. (Note: If you need a little more information on creating the build environmental check out this PYNQ Edition blog). Then, Adam clones the PYNQ directory fro the github.
git clone https://github.com/Xilinx/PYNQ.gitOnce this is downloaded, he creates the base application in Xilinx Vivado Design Suite and uses the IP available within the /PYNQ/Boards/IP directory. Since the Pmod Ambient Light Sensor is used, Adam uses the PYNQ Input Output Processors (IOP) which are Microblaze processors connecting to an input / output switch to support some digital communication protocols.
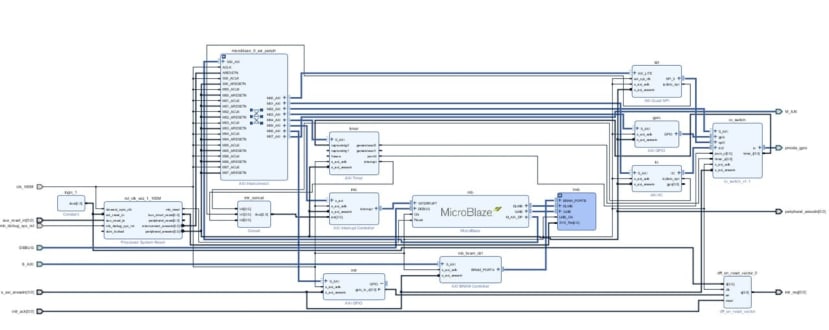
IoP Implementation in Xilinx Vivado
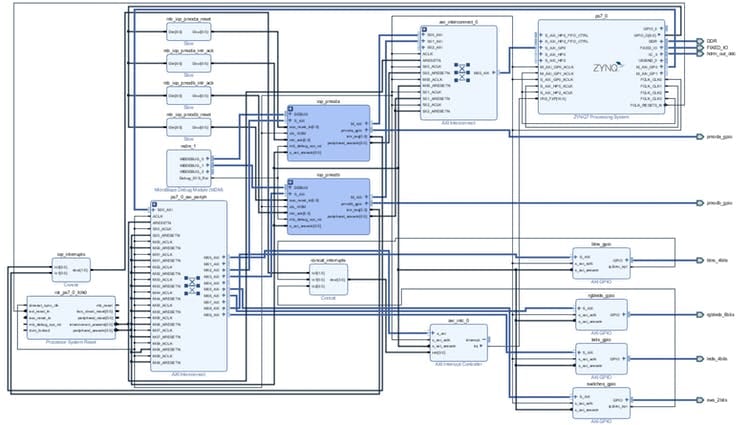
ZYBO Z7 Base PYNQ Design
Once the base design is built-in Viavdo, Adam needs to export it to Xilinx PetaLinux tools and create a PetaLinux project. PetaLinux is an embedded Linux development solution which users can deploy Linux on Xilinx FPGAs. (If you aren't familiar with PetaLinux, you can check out the Getting Started with PetaLinux in Digilent Wiki)
Adam runs the following commands to build the PetaLinux image. The process may take a few minutes.
petalinux-create — type project — template zynq — name zybo
petalinux-config — get-hw-description
Petalinux-build
Once the PetaLinux image is built, Adam ensures the Linux image runs on the hardware. He tests it by the following commands. This download the image to ZYBO Z7 using the JTAG link and run up the image.
petalinux-boot –-jtag –-fpga
petalinux-boot –-jtag –-kernel
After that, he prepares a board support package (BSP) for the PYNQ image creation process. First of all, he needs to package the image.
petalinux-package --boot --fsblzynq_fsbl.elf --u-bootu-booot.elf --fpgasystem.bit
This will create the boot.bin needed to boot from an SDCard. Once the boot files are available, he uses the following command to create BSP.
petalinux-package --bsp -p zybo -o zybo_pynq.bspWith the BSP available, he creates the PYNQ image.
To do so, he creates a new board definition in the folder pynq/boards. Inside the ZYBO folder, he includes the BSP, Bit file, and a board definition.

New ZYBO folder
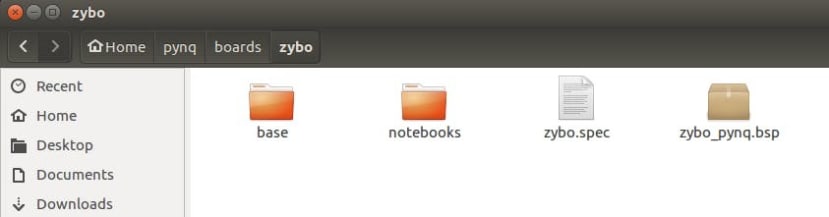
Inside ZYBO folder
Then, he uses the following command to build the PYNQ image from within the pynq/sdbuild directory
make BOARDS=zybo
Once it is completed, the image is available under pynq/sdbuild/output.
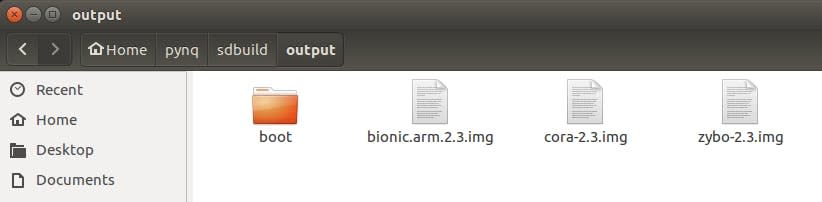
PYNQ Output Image
IoT Application Development
The application is to sample the ambient light level using a Pmod ALS and write this value to the cloud and then use If This Then That (IFTTT) to turns on or off Phillips Hue lights. To get started with this, he uses the Adafruit.io cloud which uses Message Queuing Telemetry (MQTT). Users need to set up an account at http://adafruit.io/ and install the adafruit.io library.
After an account is created, AIO keys are created and can be found under the left-hand side marked "View AIO Key". These key are required in the Python application. The next step is to create the feed to which the ZYBO will push data. In the PYNQ environment, Adam opens up a terminal and installs the adafruit.io packages using the command below.
pip3 install adafruit.ioAfter the package is downloaded, Adam writes the below Python scripts in PYNQ notebook. (You can download at https://pynq.readthedocs.io/en/v2.0/jupyter_notebooks.html). The code will sample the ALS sensor every 5 seconds and push the sampled data to the Adafruit cloud.
from pynq.overlays.base import BaseOverlay
from pynq.lib import Pmod_ALS
from Adafruit_IO import Client
import time
overlay = BaseOverlay("base.bit")
overlay.is_loaded()
aio = Client('NAME', 'ID')
try:
while True:
illum = my_als.read()
aio.send('illumination', illum)
time.sleep(5)
except KeyboardInterrupt:
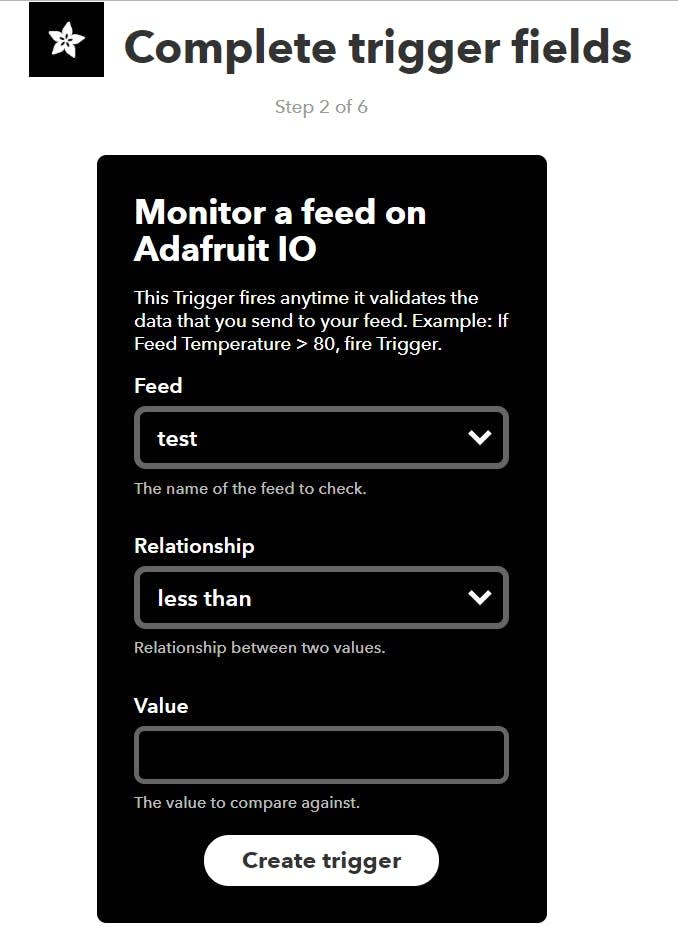
print("CTRL-C!! Exiting...")Adam then uses IFTTT to monitor the adafruit.io cloud feed. Depending upon the value in the feed, the Phillips Hue light can then be turned either on or off. To do this, he creates an IFTTT account and creates a new applet. He connects the IFTTT with adafruit.io. and choose the right condition to control the Philips HUE light.
You can find the project details at Digilant Project Page. Additional Information on Xilinx FPGA / SoC Development can be found weekly on MicroZed Chronicles.
Comments