Intel 深度影像攝影機應用- 在NVIDIA Jetson Nano上使用RealSense D435-辨識人臉與距離
Follow article
 Dave from DesignSpark
How do you feel about this article? Help us to provide better content for you.
Dave from DesignSpark
Thank you! Your feedback has been received.
Dave from DesignSpark
There was a problem submitting your feedback, please try again later.
Dave from DesignSpark
What do you think of this article?
|
作者 |
郭俊廷 |
|
难度 |
中等 |
|
材料表 |
1. NVIDIA Jestson Nano Developer Kit 2. 64GB SD卡 3. Intel RealSense D435 4. 电源供应器 5. 无线网卡(可以用网络线代替) |

相关文章请参考
Intel 深度影像摄影机应用- 在NVIDIA Jetson Nano上使用RealSense D435
[第一次用Jetson Nano 就上手]OpenCV基础应用
OpenCV网站教学资源: OpenCV Tutorials
需要把RealSense D435相关的套件软件安装完成,在执行本篇文章的所有功能,相关安装与设定请参考先前的]文章。上一篇文章-连结
本篇文章使用MobaXterm远程联机操作范例,您也可以直接使用屏幕键盘鼠标编辑相关内容
执行以下指令移动到RealSense的python/example文件夹
cd ~/librealsense/wrappers/python/examples
执行以下指令测试OpenCV是否成功安装,如安装成功会显示OpenCV版本
python -c "import cv2; print(cv2.__version__)"没有安装OpenCV时可以执行以下指令安装OpenCV
sudo apt-get install python3-opencv
STEP1解析范例程序
执行以下指令可以看到RGB影像与深度影像
python3 opencv_viewer_example.py

本范例按下CTRL+C中断程序并关闭摄影机画面
根据下方增加的程序修改成在画面上按Esc或q键关闭摄影机画面
以下解析官方范例程序
这个程序代码使用常见的OpenCV及NumPy套件,并且处理与显示彩色影像信息及深度影像信息。是可以快速入门且方便的程序代码。
首先来看看程序代码的内容及解析。
第一段为汇入函式库,包含PyRealSense2、NumPy、以及OpenCV。
import pyrealsense2 as rs
import numpy as np
import cv2
第二段中设定彩色影像串流以及深度影像串流,分辨率设定为640×480。两个影像数据格式不同:z16为16bit线性深度值,深度比例乘上该像素储存的值可以得到以公尺为单位的测量深度值;bgr8很直观为8bit的蓝绿红三颜色信道信息,与OpenCV格式互通。对其他格式有兴趣可以参考此文件。
pipeline = rs.pipeline()
config = rs.config()
config.enable_stream(rs.stream.depth, 640, 480, rs.format.z16, 30)
config.enable_stream(rs.stream.color, 640, 480, rs.format.bgr8, 30)
接下来就是开始影像串流
pipeline.start(config)主要段落当中,使用了try/finally。我们之前的文章,大多数都是介绍try/except。except为try区块中有发生例外则执行的区块,而finally则是无论try区块有无发生例外,finally区块一定会被执行。常常制作影像相关专题的用户可能会有过以下类似的经验,如果没有正确关闭资源,就会导致程序结束后,镜头模块资源被占用,而无法顺利执行下一个要使用镜头模块资源的程序。所以finally区块可以放入「无论什么状况都需要关闭资源的程序代码」。在这个范例中,finally放入了关闭影像串流的程序代码。
try:
    while True:
        ……
finally:
    # 停止影像串流
    pipeline.stop()
在while True循环中的第一段落为,等待同一帧的彩色跟深度影像才继续执行后续图像处理,两者缺一不可。
frames = pipeline.wait_for_frames()
depth_frame = frames.get_depth_frame()
color_frame = frames.get_color_frame()
if not depth_frame or not color_frame:
    continue
循环中第二段落将两种影像信息都转换成NumPy数组。
depth_image = np.asanyarray(depth_frame.get_data())
color_image = np.asanyarray(color_frame.get_data())
循环中第三段将深度影像信息上假彩色 (影像必须事先转换成每像素8bit)。假彩色很有趣,可以套用OpenCV不同的假彩色设定。除了cv2.
|
作者 |
郭俊廷 |
|
難度 |
中等 |
|
材料表 |
1. NVIDIA Jestson Nano Developer Kit 2. 64GB SD卡 3. Intel RealSense D435 4. 電源供應器 5. 無線網卡(可以用網路線代替) |

之前的文章跟大家介紹深度攝影機RealSense D435相關資訊與應用還有OpenCV的基礎應用。本次的分享如何在Jetson Nano上改寫RealSense D435的Python範例,OpenCV搭配深度資訊辨識畫面中人臉與攝影機的距離。對Jetson Nano、Python、OpenCV不太熟悉有的讀者可以看先前的基礎文章。
相關文章請參考
Intel 深度影像攝影機應用- 在NVIDIA Jetson Nano上使用RealSense D435
[第一次用Jetson Nano 就上手]OpenCV基礎應用
OpenCV網站教學資源: OpenCV Tutorials
需要把RealSense D435相關的套件軟體安裝完成,在執行本篇文章的所有功能,相關安裝與設定請參考先前的]文章。上一篇文章-連結
本篇文章使用MobaXterm遠端連線操作範例,您也可以直接使用螢幕鍵盤滑鼠編輯相關內容
執行以下指令移動到RealSense的python/example資料夾
cd ~/librealsense/wrappers/python/examples
執行以下指令測試OpenCV是否成功安裝,如安裝成功會顯示OpenCV版本
python -c "import cv2; print(cv2.__version__)"沒有安裝OpenCV時可以執行以下指令安裝OpenCV
sudo apt-get install python3-opencv
STEP1解析範例程式
執行以下指令可以看到RGB影像與深度影像
python3 opencv_viewer_example.py
本範例按下CTRL+C中斷程式並關閉攝影機畫面
根據下方增加的程式修改成在畫面上按Esc或q鍵關閉攝影機畫面
以下解析官方範例程式
這個程式碼使用常見的OpenCV及NumPy套件,並且處理與顯示彩色影像資訊及深度影像資訊。是可以快速入門且方便的程式碼。
首先來看看程式碼的內容及解析。
第一段為匯入函式庫,包含PyRealSense2、NumPy、以及OpenCV。
import pyrealsense2 as rs
import numpy as np
import cv2
第二段中設定彩色影像串流以及深度影像串流,解析度設定為640×480。兩個影像資料格式不同:z16為16bit線性深度值,深度比例乘上該像素儲存的值可以得到以公尺為單位的測量深度值;bgr8很直觀為8bit的藍綠紅三顏色通道資訊,與OpenCV格式互通。對其他格式有興趣可以參考此文件。
pipeline = rs.pipeline()
config = rs.config()
config.enable_stream(rs.stream.depth, 640, 480, rs.format.z16, 30)
config.enable_stream(rs.stream.color, 640, 480, rs.format.bgr8, 30)
接下來就是開始影像串流
pipeline.start(config)主要段落當中,使用了try/finally。我們之前的文章,大多數都是介紹try/except。except為try區塊中有發生例外則執行的區塊,而finally則是無論try區塊有無發生例外,finally區塊一定會被執行。常常製作影像相關專題的使用者可能會有過以下類似的經驗,如果沒有正確關閉資源,就會導致程式結束後,鏡頭模組資源被佔用,而無法順利執行下一個要使用鏡頭模組資源的程式。所以finally區塊可以放入「無論什麼狀況都需要關閉資源的程式碼」。在這個範例中,finally放入了關閉影像串流的程式碼。
try:
    while True:
        ……
finally:
    # 停止影像串流
    pipeline.stop()
在while True迴圈中的第一段落為,等待同一幀的彩色跟深度影像才繼續執行後續影像處理,兩者缺一不可。
frames = pipeline.wait_for_frames()
depth_frame = frames.get_depth_frame()
color_frame = frames.get_color_frame()
if not depth_frame or not color_frame:
    continue
迴圈中第二段落將兩種影像資訊都轉換成NumPy陣列。
depth_image = np.asanyarray(depth_frame.get_data())
color_image = np.asanyarray(color_frame.get_data())
迴圈中第三段將深度影像資訊上假彩色 (影像必須事先轉換成每像素8bit)。假彩色很有趣,可以套用OpenCV不同的假彩色設定。除了cv2.COLORMAP_JET這個最常見的設定之外,也可以試試 cv2.COLORMAP_SUMMER、cv2.COLORMAP_OCEAN等不一樣的假彩色設定。
depth_colormap = cv2.applyColorMap(cv2.convertScaleAbs(depth_image, alpha=0.03), cv2.COLORMAP_JET)第四段中,使用hstack將彩色影像及深度影像兩張影像水平方向結合在一起,你也可以改成用vstack將兩張圖垂直結合在一起。能結合在一起的前提是影像要結合的邊像素數目要對上。
images = np.hstack((color_image, depth_colormap))第五段為顯示影像。
cv2.namedWindow('RealSense', cv2.WINDOW_AUTOSIZE)
cv2.imshow('RealSense', images)
第六段為設定按 esc 鍵或是 q 鍵就關閉顯示影像的視窗,也就是我們要增加的程式碼,可以使用nano編輯相關程式或是使用螢幕鍵盤滑鼠直接到目錄底下開啟該程式編輯
        key = cv2.waitKey(1)

        if key & 0xFF == ord('q') or key == 27:
            cv2.destroyAllWindows()
            break
輸入以下指令編輯opencv_viewer_example.py檔案
nano ~/librealsense/wrappers/python/examples/opencv_viewer_example.py
完整程式碼如下:
## License: Apache 2.0. See LICENSE file in root directory.
## Copyright(c) 2015-2017 Intel Corporation. All Rights Reserved.

###############################################
##      Open CV and Numpy integration        ##
###############################################

import pyrealsense2 as rs
import numpy as np
import cv2

pipeline = rs.pipeline()
config = rs.config()
config.enable_stream(rs.stream.depth, 640, 480, rs.format.z16, 30)
config.enable_stream(rs.stream.color, 640, 480, rs.format.bgr8, 30)

pipeline.start(config)

try:
    while True:
        frames = pipeline.wait_for_frames()
        depth_frame = frames.get_depth_frame()
        color_frame = frames.get_color_frame()
        if not depth_frame or not color_frame:
            continue

        depth_image = np.asanyarray(depth_frame.get_data())
        color_image = np.asanyarray(color_frame.get_data())

        depth_colormap = cv2.applyColorMap(cv2.convertScaleAbs(depth_image, alpha=0.03), cv2.COLORMAP_JET)

        images = np.hstack((color_image, depth_colormap))

        cv2.namedWindow('RealSense', cv2.WINDOW_AUTOSIZE)
        cv2.imshow('RealSense', images)

        key = cv2.waitKey(1)
        if key & 0xFF == ord('q') or key == 27:
            cv2.destroyAllWindows()
            break

finally:
    pipeline.stop()
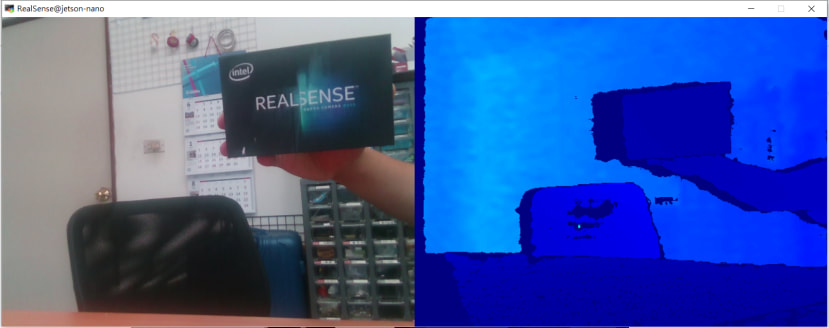
左邊為彩色影像資訊、右邊為深度影像資訊。

這時按 Esc 鍵或是 q 鍵就可以關閉顯示影像的視窗
STEP2取得單點深度資訊
知道如何取得影像及如何影像串流之後,下一步就是練習取得像素單點的深度資訊。
我們要在上述範例中加入一小段程式碼來顯示取得的單點深度資訊。
首先,讓彩色影像跟深度影像對齊很重要!沒有對齊取得彩色資訊跟深度資訊就會搭不上,下列為兩組影像對齊的程式碼:
align_to = rs.stream.color
align = rs.align(align_to)
...
aligned_frames = align.process(frames)
depth_frame = aligned_frames.get_depth_frame()
color_frame = aligned_frames.get_color_frame()
使用下列程式碼取得影像中像素(x, y)的深度資訊:
depth_frame.get_distance(x, y)為了方便示範,接下來的範例中會試圖取得影像正中央的像素,也就是點(320,240)的深度資訊。並將深度資訊做成字串。 深度值太長,所以使用np.round,取前幾個數值即可。
text_depth = "depth value of point (320,240) is "+str(np.round(depth_frame.get_distance(320, 240),4))+"meter(s)"如果你不是很確定你取得的影像大小,可以使用下列的程式來進行確認。
print("shape of color image:{0}".format(color_image.shape))接下來使用OpenCV的circle函式在彩色影像上用黃色標記我們要取值的點
color_image = cv2.circle(color_image,(320,240),1,(0,255,255),-1)並在彩色影像上加上剛剛深度資訊的文字,範例中用紅色顯示。
color_image=cv2.putText(color_image, text_depth, (10,20), cv2.FONT_HERSHEY_PLAIN, 1, (0,0,255), 1, cv2.LINE_AA)輸入以下指令新增並編輯貼上以下程式碼
nano opencv_singlepoint_viewer_example.py 完整程式碼如下:
import pyrealsense2 as rs
import numpy as np
import cv2

pipeline = rs.pipeline()
config = rs.config()
config.enable_stream(rs.stream.depth, 640, 480, rs.format.z16, 30)
config.enable_stream(rs.stream.color, 640, 480, rs.format.bgr8, 30)

pipeline.start(config)

align_to = rs.stream.color
align = rs.align(align_to)

try:
    while True:
        frames = pipeline.wait_for_frames()
        aligned_frames = align.process(frames)
        depth_frame = aligned_frames.get_depth_frame()
        color_frame = aligned_frames.get_color_frame()

        if not depth_frame or not color_frame:
            continue

        depth_image = np.asanyarray(depth_frame.get_data())
        color_image = np.asanyarray(color_frame.get_data())

        depth_colormap = cv2.applyColorMap(cv2.convertScaleAbs(depth_image, alpha=0.03), cv2.COLORMAP_WINTER)

#################加入這段程式#####################

        #print("shape of color image:{0}".format(color_image.shape))
        #print("shape of depth image:{0}".format(depth_colormap.shape))
        #print("depth value in m:{0}".format(depth_frame.get_distance(320, 240)))


        text_depth = "depth value of point (320,240) is "+str(np.round(depth_frame.get_distance(320, 240),4))+"meter(s)"
        color_image = cv2.circle(color_image,(320,240),1,(0,255,255),-1)
        color_image=cv2.putText(color_image, text_depth, (10,20),  cv2.FONT_HERSHEY_PLAIN, 1, (0,0,255), 1, cv2.LINE_AA)

##################################################

        images = np.hstack((color_image, depth_colormap))

        cv2.namedWindow('RealSense', cv2.WINDOW_AUTOSIZE)
        cv2.imshow('RealSense', images)


        key = cv2.waitKey(1)
        if key & 0xFF == ord('q') or key == 27:
            cv2.destroyAllWindows()
            break


finally:
    pipeline.stop()
執行成果如下:

可以看到深度距離訊息在彩色畫面左上角,且畫面正中間有黃色標記的點。這個範例程式可以做很多距離相關的延伸應用,例如放在百米衝刺終點線前,偵測哪位選手最快通過終點、安裝在空拍機上做田間或果園巡視、或是搭配大型螢幕做成展場與參觀者互動的遊戲裝置都很有趣。
STEP3人臉辨識並取得臉部距離
想要做人臉辨識的話,把上一範例中插入的程式碼改成以下內容,就可以偵測人臉,並在人臉的方框左上方顯示人臉距離!
加入的第一行為取得人臉資料集,根據教學經驗,雖然設定相對路徑比較簡潔優雅,但設定絕對路徑比相對路徑的成功率高,不需要確認目前資料夾位置,任意移動檔案時也不會出問題。有興趣的人可以玩看看haarcascades資料夾下的其他資料集。
face_cascade = cv2.CascadeClassifier('/home/your_user_name/opencv/data/haarcascades/haarcascade_frontalface_default.xml')下一步將影像灰階化後比較方便偵測
gray = cv2.cvtColor(color_image, cv2.COLOR_BGR2GRAY)接著設定人臉偵測的參數
faces = face_cascade.detectMultiScale(gray, scaleFactor=1.2, minNeighbors=5, minSize=(50,50))每一張人臉都畫方框後標記深度距離。在這段範例程式中,我們設定偵測人臉方框正中央代表人臉與鏡頭的距離。顯示深度的字串位置如果直接設(x, y)會跟方框重疊在一起,所以將y修改為y-5讓文字高於方框。有任何顏色、粗細、字型、字體等喜好都可以自行做調整。
for (x, y, w, h) in faces:
    cv2.rectangle(color_image, (x, y), (x+w, y+h), (255, 0, 0), 2)
    text_depth = "depth is "+str(np.round(depth_frame.get_distance(int(x+(1/2)*w), int(y+(1/2)*h)),3))+"m"
    color_image = cv2.putText (color_image, text_depth,(x, y-5), cv2.FONT_HERSHEY_PLAIN,1,(0,0,255),1,cv2.LINE_AA)
完整程式碼如下:
import pyrealsense2 as rs
import numpy as np
import cv2

pipeline = rs.pipeline()
config = rs.config()
config.enable_stream(rs.stream.depth, 640, 480, rs.format.z16, 30)
config.enable_stream(rs.stream.color, 640, 480, rs.format.bgr8, 30)

pipeline.start(config)

align_to = rs.stream.color
align = rs.align(align_to)

try:
    while True:
        frames = pipeline.wait_for_frames()
        aligned_frames = align.process(frames)
        depth_frame = aligned_frames.get_depth_frame()
        color_frame = aligned_frames.get_color_frame()
        if not depth_frame or not color_frame:
            continue

        depth_image = np.asanyarray(depth_frame.get_data())
        color_image = np.asanyarray(color_frame.get_data())

        depth_colormap = cv2.applyColorMap(cv2.convertScaleAbs(depth_image, alpha=0.03), cv2.COLORMAP_JET)

        ################加入這段程式##################
        face_cascade = cv2.CascadeClassifier('/home/dlinano/opencv/data/haarcascades/haarcascade_frontalface_default.xml')

        gray = cv2.cvtColor(color_image, cv2.COLOR_BGR2GRAY)

        faces = face_cascade.detectMultiScale(gray, scaleFactor=1.2, minNeighbors=5, minSize=(50,50))

        for (x, y, w, h) in faces:
            cv2.rectangle(color_image, (x, y-5), (x+w, y+h), (255, 0, 0), 2)
            text_depth = "depth is "+str(np.round(depth_frame.get_distance(int(x+(1/2)*w), int(y+(1/2)*h)),3))+"m"
            color_image=cv2.putText(color_image,text_depth,(x,y-5),cv2.FONT_HERSHEY_PLAIN,1,(0,0,255),1,cv2.LINE_AA)
        ###############################################

        images = np.hstack((color_image, depth_colormap))

        cv2.namedWindow('RealSense', cv2.WINDOW_AUTOSIZE)
        cv2.imshow('RealSense', images)


        key = cv2.waitKey(1)

        if key & 0xFF == ord('q') or key == 27:
            cv2.destroyAllWindows()
            break


finally:
    pipeline.stop()
首先我們要先下載OpenCV人臉資料集
輸入以下指令回到家目錄並且下載OpenCV資料集
cd ~
git clone https://github.com/opencv/opencv.git
下載完之後移動回範例資料夾並執行以下指令新增並編輯貼上剛剛的程式碼
cd ~/librealsense/wrappers/python/examples
nano opencv_facedistance_viewer_example.py
執行人臉辨識及距離偵測的程式
python3 opencv_facedistance_viewer_example.py執行成果如下:
戴口罩也可以偵測得到人臉,並且可以偵測到該臉離鏡頭的距離,可是只有某些特定角度時比較容易偵測的到,五官的輪廓度會影響到偵測的效果,不戴口罩的偵測效果較佳。
一人版本:

多人版本:


由於這篇的教學是入門教學,僅取人臉偵測方框的中間點深度值代表整臉。想要進一步練習的人,可以試著將整個方框的所有像素深度值去極值後取平均,會有更精確的效果。或是去除背景及偵測失敗的像素後再取平均值也是好方法。
以上是Intel 深度影像攝影機應用-在NVIDIA Jetson Nano上使用RealSense D435-單點深度資訊和人臉辨識及距離偵測的範例應用改寫,大家有沒有執行成功呢?是不是很有趣呢? 如果你也有做出其他有趣的範例歡迎跟我們分享。
COLORMAP_JET这个最常见的设定之外,也可以试试 cv2.COLORMAP_SUMMER、cv2.COLORMAP_OCEAN等不一样的假彩色设定。
depth_colormap = cv2.applyColorMap(cv2.convertScaleAbs(depth_image, alpha=0.03), cv2.COLORMAP_JET)第四段中,使用hstack将彩色影像及深度影像两张影像水平方向结合在一起,你也可以改成用vstack将两张图垂直结合在一起。能结合在一起的前提是影像要结合的边像素数目要对上。
images = np.hstack((color_image, depth_colormap))第五段为显示影像。
cv2.namedWindow('RealSense', cv2.WINDOW_AUTOSIZE)
cv2.imshow('RealSense', images)
第六段为设定按 esc 键或是 q 键就关闭显示影像的窗口,也就是我们要增加的程序代码,可以使用nano编辑相关程序或是使用屏幕键盘鼠标直接到目录底下开启该程序编辑
        key = cv2.waitKey(1)

        if key & 0xFF == ord('q') or key == 27:
            cv2.destroyAllWindows()
            break
输入以下指令编辑opencv_viewer_example.py档案
nano ~/librealsense/wrappers/python/examples/opencv_viewer_example.py
完整程序代码如下:(红色的为修改及增加的程序代码,也可以全选复制贴上)
## License: Apache 2.0. See LICENSE file in root directory.
## Copyright(c) 2015-2017 Intel Corporation. All Rights Reserved.

###############################################
##      Open CV and Numpy integration        ##
###############################################

import pyrealsense2 as rs
import numpy as np
import cv2

pipeline = rs.pipeline()
config = rs.config()
config.enable_stream(rs.stream.depth, 640, 480, rs.format.z16, 30)
config.enable_stream(rs.stream.color, 640, 480, rs.format.bgr8, 30)

pipeline.start(config)

try:
    while True:
        frames = pipeline.wait_for_frames()
        depth_frame = frames.get_depth_frame()
        color_frame = frames.get_color_frame()
        if not depth_frame or not color_frame:
            continue

        depth_image = np.asanyarray(depth_frame.get_data())
        color_image = np.asanyarray(color_frame.get_data())

        depth_colormap = cv2.applyColorMap(cv2.convertScaleAbs(depth_image, alpha=0.03), cv2.COLORMAP_JET)

        images = np.hstack((color_image, depth_colormap))

        cv2.namedWindow('RealSense', cv2.WINDOW_AUTOSIZE)
        cv2.imshow('RealSense', images)

        key = cv2.waitKey(1)
        if key & 0xFF == ord('q') or key == 27:
            cv2.destroyAllWindows()
            break

finally:
    pipeline.stop()
执行成果如下:
左边为彩色影像信息、右边为深度影像信息。

这时按 Esc 键或是 q 键就可以关闭显示影像的窗口
STEP2取得单点深度信息
知道如何取得影像及如何影像串流之后,下一步就是练习取得像素单点的深度信息。
我们要在上述范例中加入一小段程序代码来显示取得的单点深度信息。
首先,让彩色影像跟深度影像对齐很重要!没有对齐取得彩色信息跟深度信息就会搭不上,下列为两组影像对齐的程序代码:
align_to = rs.stream.color
align = rs.align(align_to)
...
aligned_frames = align.process(frames)
depth_frame = aligned_frames.get_depth_frame()
color_frame = aligned_frames.get_color_frame()
使用下列程序代码取得影像中像素(x, y)的深度信息:
depth_frame.get_distance(x, y)为了方便示范,接下来的范例中会试图取得影像正中央的像素,也就是点(320,240)的深度信息。并将深度信息做成字符串。 深度值太长,所以使用np.round,取前几个数值即可。
text_depth = "depth value of point (320,240) is "+str(np.round(depth_frame.get_distance(320, 240),4))+"meter(s)"如果你不是很确定你取得的影像大小,可以使用下列的程序来进行确认。
print("shape of color image:{0}".format(color_image.shape))接下来使用OpenCV的circle函式在彩色影像上用黄色标记我们要取值的点
color_image = cv2.circle(color_image,(320,240),1,(0,255,255),-1)并在彩色影像上加上刚刚深度信息的文字,范例中用红色显示。
color_image=cv2.putText(color_image, text_depth, (10,20), cv2.FONT_HERSHEY_PLAIN, 1, (0,0,255), 1, cv2.LINE_AA)输入以下指令新增并编辑贴上以下程序代码
nano opencv_singlepoint_viewer_example.py完整程序代码如下:
import pyrealsense2 as rs
import numpy as np
import cv2

pipeline = rs.pipeline()
config = rs.config()
config.enable_stream(rs.stream.depth, 640, 480, rs.format.z16, 30)
config.enable_stream(rs.stream.color, 640, 480, rs.format.bgr8, 30)

pipeline.start(config)

align_to = rs.stream.color
align = rs.align(align_to)

try:
    while True:
        frames = pipeline.wait_for_frames()
        aligned_frames = align.process(frames)
        depth_frame = aligned_frames.get_depth_frame()
        color_frame = aligned_frames.get_color_frame()

        if not depth_frame or not color_frame:
            continue

        depth_image = np.asanyarray(depth_frame.get_data())
        color_image = np.asanyarray(color_frame.get_data())

        depth_colormap = cv2.applyColorMap(cv2.convertScaleAbs(depth_image, alpha=0.03), cv2.COLORMAP_WINTER)

#################加入这段程序#####################

        #print("shape of color image:{0}".format(color_image.shape))
        #print("shape of depth image:{0}".format(depth_colormap.shape))
        #print("depth value in m:{0}".format(depth_frame.get_distance(320, 240)))


        text_depth = "depth value of point (320,240) is "+str(np.round(depth_frame.get_distance(320, 240),4))+"meter(s)"
        color_image = cv2.circle(color_image,(320,240),1,(0,255,255),-1)
        color_image=cv2.putText(color_image, text_depth, (10,20),  cv2.FONT_HERSHEY_PLAIN, 1, (0,0,255), 1, cv2.LINE_AA)

##################################################

        images = np.hstack((color_image, depth_colormap))

        cv2.namedWindow('RealSense', cv2.WINDOW_AUTOSIZE)
        cv2.imshow('RealSense', images)


        key = cv2.waitKey(1)
        if key & 0xFF == ord('q') or key == 27:
            cv2.destroyAllWindows()
            break


finally:
    pipeline.stop()
执行成果如下:

可以看到深度距离讯息在彩色画面左上角,且画面正中间有黄色标记的点。这个范例程序可以做很多距离相关的延伸应用,例如放在百米冲刺终点线前,侦测哪位选手最快通过终点、安装在空拍机上做田间或果园巡视、或是搭配大型屏幕做成展场与参观者互动的游戏设备都很有趣。
STEP3人脸辨识并取得脸部距离
想要做人脸辨识的话,把上一范例中插入的程序代码改成以下内容,就可以侦测人脸,并在人脸的方框左上方显示人脸距离!
加入的第一行为取得人脸数据集,根据教学经验,虽然设定相对路径比较简洁优雅,但设定绝对路径比相对路径的成功率高,不需要确认目前文件夹位置,任意移动档案时也不会出问题。有兴趣的人可以玩看看haarcascades文件夹下的其他数据集。
face_cascade = cv2.CascadeClassifier('/home/your_user_name/opencv/data/haarcascades/haarcascade_frontalface_default.xml')下一步将影像灰阶化后比较方便侦测
gray = cv2.cvtColor(color_image, cv2.COLOR_BGR2GRAY)接着设定人脸侦测的参数
faces = face_cascade.detectMultiScale(gray, scaleFactor=1.2, minNeighbors=5, minSize=(50,50))每一张人脸都画方框后标记深度距离。在这段范例程序中,我们设定侦测人脸方框正中央代表人脸与镜头的距离。显示深度的字符串位置如果直接设(x, y)会跟方框重迭在一起,所以将y修改为y-5,让文字高于方框。有任何颜色、粗细、字型、字体等喜好都可以自行做调整。
for (x, y, w, h) in faces:
    cv2.rectangle(color_image, (x, y), (x+w, y+h), (255, 0, 0), 2)
    text_depth = "depth is "+str(np.round(depth_frame.get_distance(int(x+(1/2)*w), int(y+(1/2)*h)),3))+"m"
    color_image = cv2.putText (color_image, text_depth,(x, y-5), cv2.FONT_HERSHEY_PLAIN,1,(0,0,255),1,cv2.LINE_AA)
完整程序代码如下:
import pyrealsense2 as rs
import numpy as np
import cv2

pipeline = rs.pipeline()
config = rs.config()
config.enable_stream(rs.stream.depth, 640, 480, rs.format.z16, 30)
config.enable_stream(rs.stream.color, 640, 480, rs.format.bgr8, 30)

pipeline.start(config)

align_to = rs.stream.color
align = rs.align(align_to)

try:
    while True:
        frames = pipeline.wait_for_frames()
        aligned_frames = align.process(frames)
        depth_frame = aligned_frames.get_depth_frame()
        color_frame = aligned_frames.get_color_frame()
        if not depth_frame or not color_frame:
            continue

        depth_image = np.asanyarray(depth_frame.get_data())
        color_image = np.asanyarray(color_frame.get_data())

        depth_colormap = cv2.applyColorMap(cv2.convertScaleAbs(depth_image, alpha=0.03), cv2.COLORMAP_JET)

        ################加入这段程序##################
        face_cascade = cv2.CascadeClassifier('/home/dlinano/opencv/data/haarcascades/haarcascade_frontalface_default.xml')

        gray = cv2.cvtColor(color_image, cv2.COLOR_BGR2GRAY)

        faces = face_cascade.detectMultiScale(gray, scaleFactor=1.2, minNeighbors=5, minSize=(50,50))

        for (x, y, w, h) in faces:
            cv2.rectangle(color_image, (x, y-5), (x+w, y+h), (255, 0, 0), 2)
            text_depth = "depth is "+str(np.round(depth_frame.get_distance(int(x+(1/2)*w), int(y+(1/2)*h)),3))+"m"
            color_image=cv2.putText(color_image,text_depth,(x,y-5),cv2.FONT_HERSHEY_PLAIN,1,(0,0,255),1,cv2.LINE_AA)
        ###############################################

        images = np.hstack((color_image, depth_colormap))

        cv2.namedWindow('RealSense', cv2.WINDOW_AUTOSIZE)
        cv2.imshow('RealSense', images)


        key = cv2.waitKey(1)

        if key & 0xFF == ord('q') or key == 27:
            cv2.destroyAllWindows()
            break


finally:
    pipeline.stop()
首先我们要先下载OpenCV人脸数据集
输入以下指令回到家目录并且下载OpenCV数据集
cd ~
git clone https://github.com/opencv/opencv.git
下载完之后移动回范例文件夹并执行以下指令新增并编辑贴上刚刚的程序代码
cd ~/librealsense/wrappers/python/examples
nano opencv_facedistance_viewer_example.py
执行人脸辨识及距离侦测的程序
python3 opencv_facedistance_viewer_example.py执行成果如下:
戴口罩也可以侦测得到人脸,并且可以侦测到该脸离镜头的距离,可是只有某些特定角度时比较容易侦测的到,五官的轮廓度会影响到侦测的效果,不戴口罩的侦测效果较佳。
一人版本:

多人版本:


由于这篇的教学是入门教学,仅取人脸侦测方框的中间点深度值代表整脸。想要进一步练习的人,可以试着将整个方框的所有像素深度值去极值后取平均,会有更精确的效果。或是去除背景及侦测失败的像素后再取平均值也是好方法。
以上是Intel 深度影像摄影机应用-在NVIDIA Jetson Nano上使用RealSense D435-单点深度信息和人脸辨识及距离侦测的范例应用改写,大家有没有执行成功呢?是不是很有趣呢? 如果你也有做出其他有趣的范例欢迎跟我们分享。
Comments