How to connect a MPI3508 display to a Rock 4C+
Follow article Dave from DesignSpark
How do you feel about this article? Help us to provide better content for you.
Dave from DesignSpark
Thank you! Your feedback has been received.
Dave from DesignSpark
There was a problem submitting your feedback, please try again later.
Dave from DesignSpark
What do you think of this article?
While I was searching through the display screens I own, I found an interesting one, labelled "MPI3508 3.5 inch USB Touch Screen Real HD 1920x1080 LCD Display For Raspberry Pi 3/2/B+/B/A+". It can be bought on many online platforms and it is advertised to work on Raspberry Pi 3, though in my tests I found it working well on Raspberry Pi 4B+.
But wait, why am I talking about Raspberry Pi here? Is there any possibility that the display connector that was built originally for a Raspberry Pi to match the 40-pin connector of the Rock 4C+? In the rest of this article let's try and use this little screen to build around a Rock 4C+ (230-6199) a small computing system that can be used for a variety of common tasks: displaying some information, surfing the web, playing a movie or listening to music.
A closer look at the MPI3508 display
Here are some pictures of the display, taken from different angles.
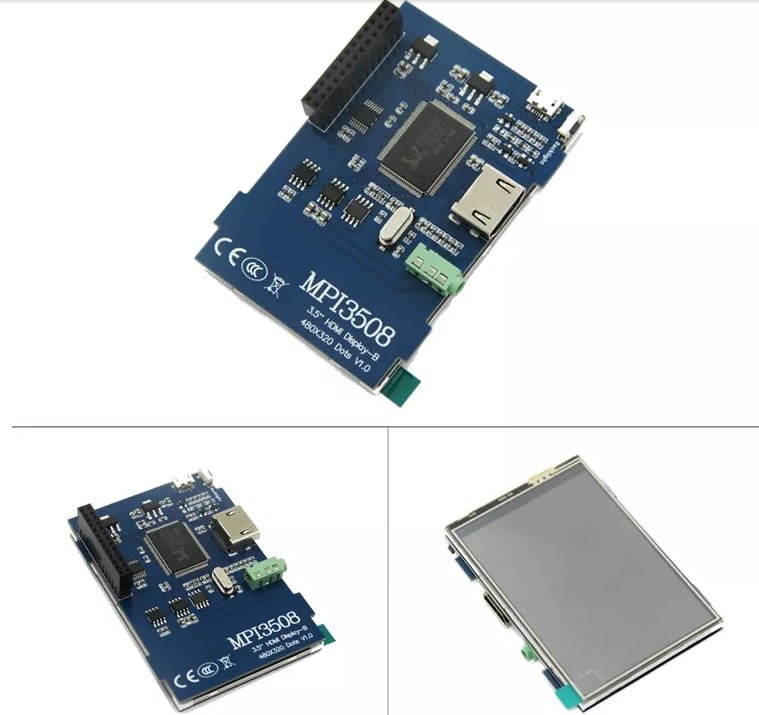
The upper picture shows several key interfaces: a 26-pin connector that is used to connect to the Rock 4C+, a normal HDMI connector for signal input, an audio jack that will output the sound carried by the HDMI signal, and also a mini-USB port used to power the display when it is used stand-alone. Also, there is a small button that can be used to manually change the screen backlight.
The 26-pin connector exposes the following signals:
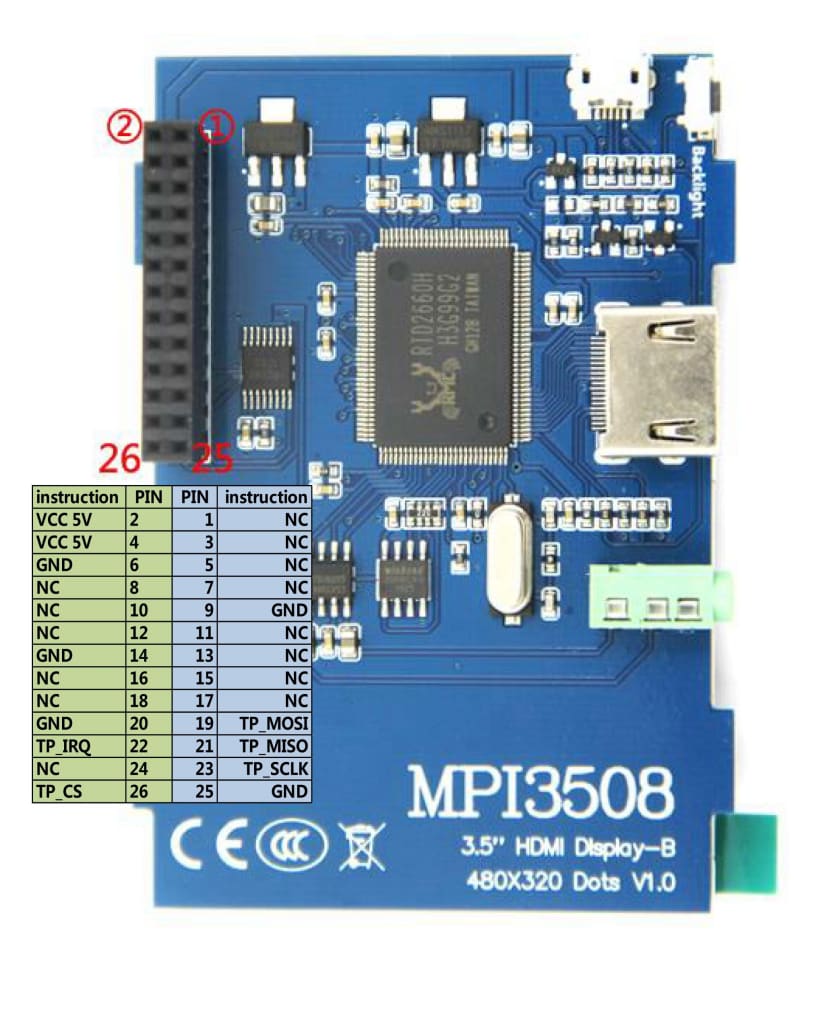
On the other hand, the 40-pin connector of the Rock 4C+ signals are:

As you can see most of the pins in the display connector are NC, or Not Connected, meaning that we can input any signal there as it does not matter. The VCC 5V and GND pins position match perfectly on both the display and the Rock 4C+, and the remaining pins (TP_MOSI, TP_MISO, TP_SCLK, TP_IRQ and TP_CS) correspond to some signals on the 40-pin connector of the ROCK 4C+.
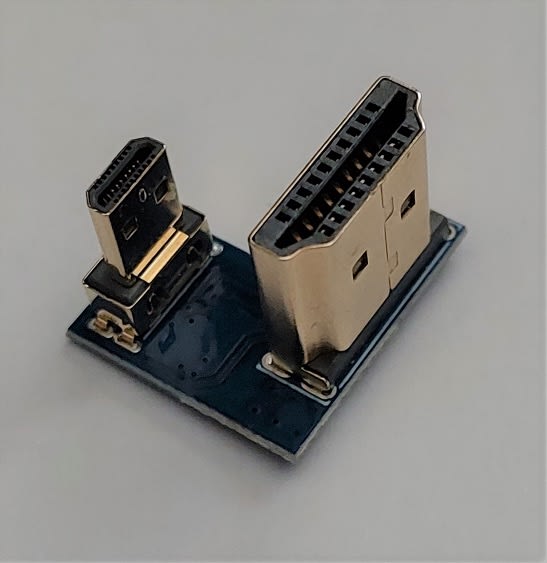
Now, because the display input is provided via a normal HDMI connector and not through a signal on the 26-pin connector, this screen can be used as a display for any system that outputs an HDMI signal. And because the Rock 4C+ already has not one, but two HDMI outputs means that there will be no need for any particular driver in the operating system to drive the display - any OS built for ROCK can be used. But there is one small problem: the form factor of the HDMI connector - the display features a normal HDMI size, while Rock 4C+ uses a micro-HDMI. Of course, we can use the appropriate cable, but it will be very inconvenient.
Fortunately, there is a more elegant solution: a small connector HDMI to micro-HDMI. Most sellers of the MPI3508 display will provide this connector in the package (just be sure to select the version for Raspberry Pi 4, not 3 - fortunately the Rock 4C+ HDMI output is placed on the board in exactly the same position as on Raspberry Pi 4B+). Or you can buy this connector separately and it will look like this:
More information about the MPI5308 display can be found at http://www.lcdwiki.com/3.5inch_HDMI_Display-B.
Step 1. Install an operating system
I started by downloading the Debian OS from the recommended download page at https://wiki.radxa.com/Rockpi4/downloads. Then I used Etcher to write it to an empty SD card that I put into the Rock 4C+. At this point, I did not connect the display yet, as I preferred to do the initial Debian setup on a normal display.
Here you can do the usual configurations, such as configure the WiFi connection, enable remote ssh, choose the favorite display settings and install favorite applications, and also update the system.
Step 2. Connect the MPI3508 display
After the previous step, completely turn off the operating system, and do not forget to turn off the switch on the cable that powers the Rock 4C+ because we need to ensure the board is completely off and has no electrical power. Now you can install the display by plugging it into the 40-pin connector, and because the display 26-pin connector is shorter and does not use all the pins, align it to the upper (the exterior) start of the on-board 40-pin connector.

Also, connect the HDMI to micro-HDMI adapter between the display and the Rock 4C+. Now you are all set and can boot up the system again.
Step 3. Verify the display is functioning as expected
If everything went well in the previous steps, the system will boot and run with all the output on the new MPI3508 display. Note that we still have the mouse and keyboard connected, so use them to test the system, such as playing a YouTube video (you will need to use headsets to hear the sound):

Note that the processor is getting hotter, so it needs to be cooled either passively through radiators or by adding a fan.
As the display was originally purposed for Raspberry Pi and Raspbian operating system, the drivers needed to enable the touch screen function are not working on Debian. These drivers can be found online at https://github.com/goodtft/LCD-show and are available for Ubuntu, Kali and RetroPie - those OSes are not running on Rock 4C+ (with the exception of Ubuntu for which there is available only the server flavour).
To dos and conclusions
One mandatory thing to do is to find a way to cool down the processor, which is getting hotter as you run processing-intensive applications such as videos. This can be accomplished through radiators or fans; one interesting option comes also from the world of Raspberry Pi: a slim fan tied to a grid that can be mounted on the existing holes of a Rock 4C+, and that will fit between the Rock 4C+ and the MPI3508 display:

Another improvement would be to house the Rock + display ensemble in an appropriate case (it can be designed and 3D printed with a fair amount of effort).
And because the touch functionality is not working, we still need to attach a keyboard and a mouse; we can use a slim, portable keyboard that connects through Bluetooth or through a small USB dongle to the Rock and have both keyboard and mouse functions, but it is still inconvenient to some degree. So a third thing to do would be to use a virtual keyboard and keep only a wireless mouse attached to the system. I have used in other occasions something called matchbox-keyboard (with good setup instructions provided at https://pimylifeup.com/raspberry-pi-on-screen-keyboard/).