How can I use the Measure tool in DesignSpark PCB?
Follow tutorial
 Dave from DesignSpark
How do you feel about this tutorial? Help us to provide better content for you.
Dave from DesignSpark
Thank you! Your feedback has been received.
Dave from DesignSpark
There was a problem submitting your feedback, please try again later.
Dave from DesignSpark
What do you think of this tutorial?
This tutorial requires:
DesignSpark PCB V11.0.0When editing a PCB design or PCB symbol you can invoke the new tool by finding it in the menu: Main Menu -> Tools -> Measure
Shortcut Key: Shift + M
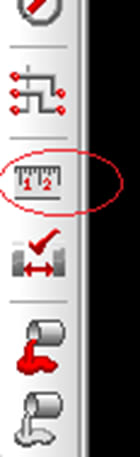
Alternatively, you can click on icon in the left pane menu:
This is an interactive option to obtain the distance between two points, or two items in the design. It can also be used to show the gap between the edges of two items and the required minimum spacing between them. This includes the Drill to Drill distance between selected pads. The tool also provides information about the dimensions of the picked items and allows you to record the measurements in a report.
Using the measure tool
Select the Measure tool from the Utilities menu, or use the shortcut mentioned above. You are now in the measure mode of operation, the cursor will be displayed to show this.
With Snap To Item on, single click to pick the first item, or click in space to specify a gridded position to measure from. Use the shift key to select a whole dimension, component, or shape.
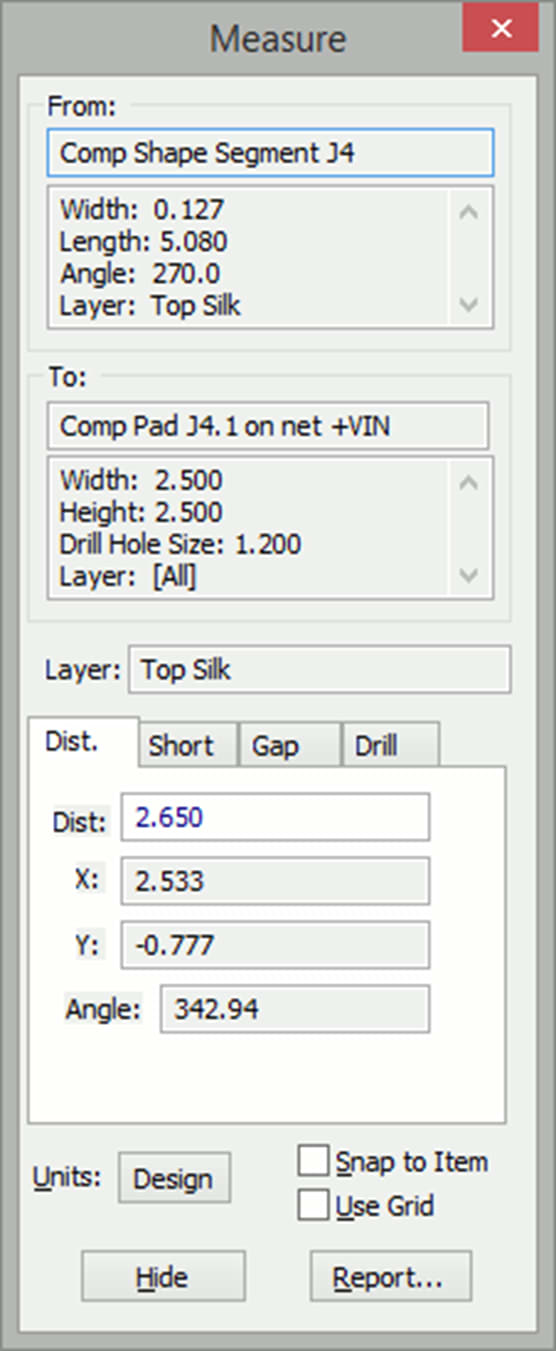
The selected item will be drawn in the selected colour. A measurement line will be drawn in the select colour from the picked point on the item, to the moving cursor. The length of this line is shown on the status bar. If an item was picked, its details will also be shown on this bar. If the Measure dialog is displayed, details of the picked item or position will be shown.
If the wrong item under the cursor was selected, use the Select Next option (press the 'N' key unless reassigned) to cycle through the items under the cursor until you reach the required one.
You will now enter the measurement phase of the operation. Single-click on the item or position that you wish to measure to. The item will be selected, and the measurement line will be shown terminated on that item. Again, use shift click to select whole items, and Select Next option to alter the item.
With both items picked, the Measure dialog (if displayed) will be updated with the measurement item you ended on and various measurements between the items.
"From" and "To" controls
These show dimensional information about the picked Items, or positions. If there is more information than can be displayed, the vertical scroll bars are enabled to view all the data.
Layer
This shows the layer that the Gap between the items is measured on. If the two items are on different layers, "Different" is shown. In this case, the gap is still shown but may not be that relevant. If a picked item contains different shapes on different layers, a pad with layer exceptions for example, you will be offered a drop-down list of common layers between the items to choose from. When choosing a different layer, the measurement information tabs, and the line displayed on the design will be updated to show the measurement on the chosen layer.
Measurement Information Pages
These pages show different measurements between the two items. Picking a measurement tab will change the information page and alter the measurement line displayed in the design. The different measurements are as follows:
Distance - Shows the distance between the picked points and the angle of the line between these points.
Shortest - Is only displayed after two items have been selected. It shows the shortest distance between the two items. Widths of lines are not considered for this measurement, use the Gap tab for edge-to-edge measurement.
Gap - Is only displayed after two items have been selected. It shows the smallest gap between the edges of the two selected items. If both items are electrical items, it shows the required Spacing between these items. This spacing is set to zero if the two items are on the same net. If two components are selected the spacing is the minimal component spacing. This page can be used to check two items to see if they are in error. If the gap is less than the required spacing, it will be drawn in red. If the layer is "Different" then the gap is not relevant unless one of the items changes layer.
Drill - Is only displayed if one of the two selected items has a drill hole. The distance shown is from the edge of the drill hole on these items. If both items have drill holes, the spacing shown is the minimum spacing required between drill holes.
Other options
Snap To Item - Check this box to enable picking of design items for measurement. Leave it unchecked to restrict picking to positions in the design.
Use Grid - Check this box to always have the cursor position gridded using the current working grid. Leave it unchecked to measure an approximate distance between two ungridded positions on the screen.
Hide - Use this to hide the results dialog. Measurements can still be made and the distances are shown on the status bar. Right-click to use the shortcut menu option Show Measurement to display the dialog again.
Report - Use this to generate a report recording the information in the Measure Results dialog.
Units - Use this to change the units used to display the lengths shown in the dialog. The button shows the units currently being used and will show "Design" if the design units are being used. When pressed the following dialog will be displayed:
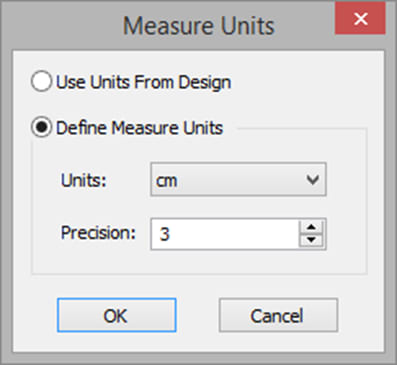
Define Measure Units - Select this button to define your own units for the Measure dialog.
Use Units from Design - Select this button to use the units defined in the current design being measured.
When you have finished viewing the measurement results either on the status bar or in the Measure dialog, select another item to start measuring from, or press the Escape key to reselect the item you are measuring to. To finish using the Measure tool, keep pressing the Escape key, or press the close button at the top right corner of the dialog.