Home monitor with Rock 4C+: Part 1 - Setting the basics
Follow article Dave from DesignSpark
How do you feel about this article? Help us to provide better content for you.
Dave from DesignSpark
Thank you! Your feedback has been received.
Dave from DesignSpark
There was a problem submitting your feedback, please try again later.
Dave from DesignSpark
What do you think of this article?
Our life is full of different gizmos that expose some kind of intelligence. They are designed to entertain us, to make life easier or to command and control other aspects of our life. Devices that can sense temperature, humidity and/ or pressure in the atmosphere and show us the weather are not uncommon, but there are many other types of sensors.
In this series of articles, I will describe a system built around a Rock 4C+ (230-6199) that can collect, display, integrate and interpret some of the information that is present in our home and around us. The system uses open technologies to interface with sensors, gather data, transform it according to our needs and expose information in a meaningful dashboard.
We will start with the basics: What do we need to build such a system, how do we install all the necessary software? Then we will see how to connect the various components and interface the software into one single system. And we will further apply all our discoveries to a real system that monitors our house.
But let's start first with the ground blocks.
Step 1 - Install operating system
Having a system that collects and processes a lot of data means that it needs processing power. Rock 4C+ has it, but we do not want it to be spent on bells and whistles such as a graphical interface or desktop processing software. So we need a basic operating system - a server version that drops a fancy interface and is controlled with command lines.
Looking at all Linux variants available for Rock 4C+ there is only one that matches our requirement: Ubuntu server. We will use the one on the official download page at https://wiki.radxa.com/Rockpi4/downloads, the current file is named "rockpi-4b-ubuntu-focal-server-arm64-20221109-1331-gpt.img.xz".
Having Ubuntu run from an SD card is not the best solution. First, the read and write speed on a SD card is quite slow, so no use in having a nimble board like the Rock 4C+ that is slowed down when it needs to write down that data. And second, an SD card has a limited lifespan used in such a scenario - depending on its quality it can "resist" for about a year or so, after which it ungracefully crashes with all the data being lost.
So we need to apply a trick: move the operating system to an external hard drive (suggest an SSD) connected to one of the USB 3.0 ports. We won't be able to renounce the SD card completely, but at least the boot part of the system will reside on the SD card and will be used only once per boot, while the root filesystem that contains all applications and data will stay on the faster external hard-disk.
We will start by using Etcher to write down the system image on the SD card (as usual); we will then write the operating system on the hard-drive. Now both the SD card and the hard-disk contain the exact same, uninitialized Ubuntu system - on 5 partitions.
DO NOT INSERT YET the SD card into the Rock.
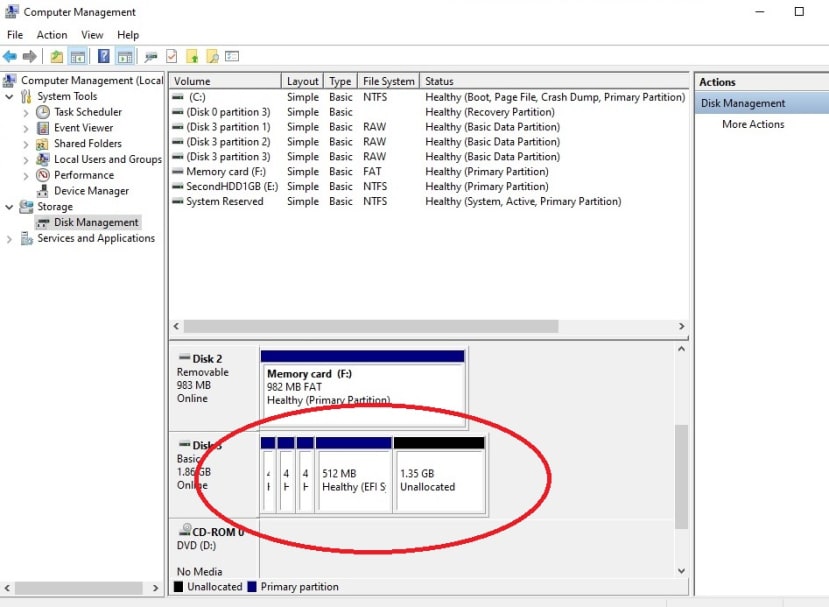
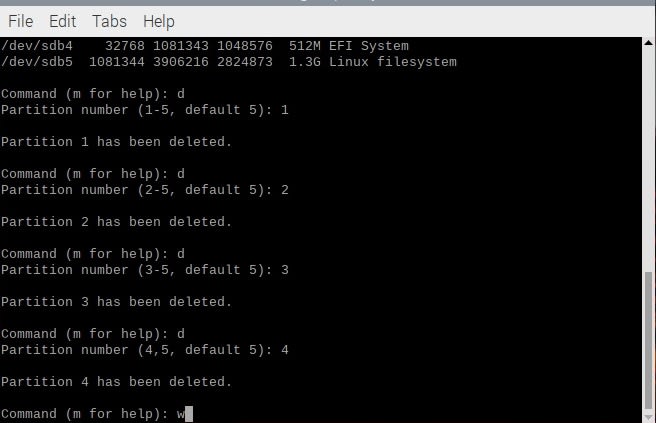
Now we will need a Linux system in order to delete some partitions (because Disk Manager on Windows can delete most types of partitions, including Linux ones, but cannot delete EFI partitions - the fourth one in the above picture):
- on the SD card delete the last partition which size is approximately 1.35GB
- on the hard-disk delete first 4 partitions, and DO NOT touch the last partition (the one of 1.35GB in size) or the unallocated space
These steps can be accomplished by using:
lsblk (to identify the devices hosting the SD card and the hard-disk)
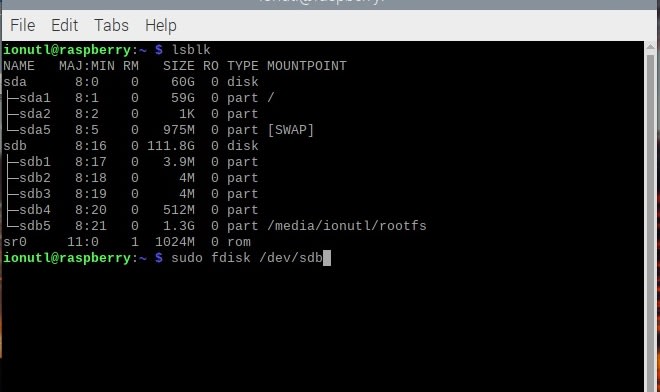
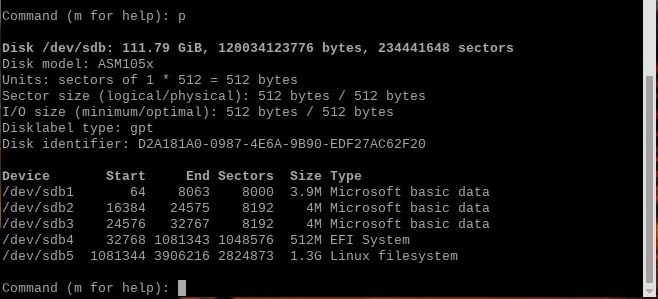
sudo fdisk /dev/sdX (to manipulate partitions on the /dev/sdX device, "d" is the delete command, "w" to write the changes and exit)
Now insert both the SD card and the HDD into the Rock 4C+; for HDD choose a USB3.0 port (I use the blue port on the back, so the upper blue USB3.0 port remains free to connect other accessories).
Power on the Rock, now the blue LED starts blinking, so be patient; the system boots from the HDD drive (the LED of the USB to SATA converter blinks constantly). Please note that there will be nothing on the display, we will manage the system through a remote connection via ssh. So find its IP address in your home router, or use a utility like ipscan.exe to discover the devices in your network. Remember that user is "rock" and password also "rock":
A few notes at this point:
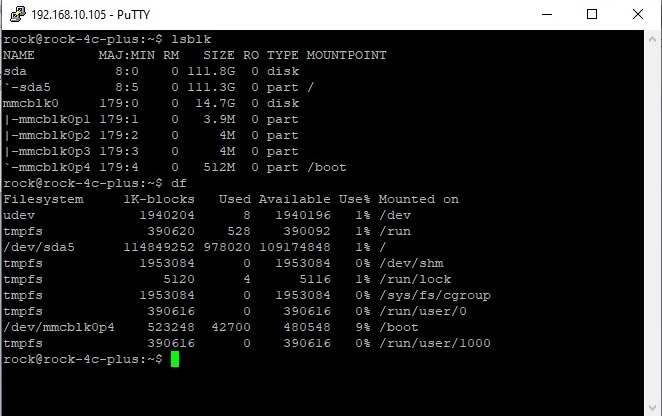
- after the first boot the root partition will expand to all unused space on the hard-disk; only at the beginning of the disk will be a free space of about 500MB which is the effect of deleting the first 4 partitions
- at this point, the SD card will hold only the first 4 partitions; by copying it to a smaller SD card (using dd command or a backup/ restore utility) you can re-purpose older SD cards and give them a new life
- be aware that not all USB to SATA adapters will work; most of the cheap, unnamed adapters bought online that cost under 5 USD will not work. As a rule of thumb, if the adapter cannot connect to a 4TB (or above) disk, or it shows only a portion of the disk (usually around 3.5TB) then it is very likely that it will not work (for reference my adapter is called Inateck UA1001)
- notice that the root filesystem is on /dev/sda5, i.e. the hard-disk, which will reflect into a greater improved performance; a standard benchmark show for my SSD hard-disk holding Ubuntu server the following:
| Category | Test | Result |
|---|---|---|
| HDParm | Disk Read | 245.25 MB/s |
| HDParm | Cached Disk Read | 184.92 MB/s |
| DD | Disk Write | 161 MB/s |
| FIO | 4k random read | 24704 IOPS (98817 KB/s) |
| FIO | 4k random write | 10666 IOPS (42666 KB/s) |
| IOZone | 4k read | 26839 KB/s |
| IOZone | 4k write | 16578 KB/s |
| IOZone | 4k random read | 17440 KB/s |
| IOZone | 4k random write | 23332 KB/s |
| Score: 7168 |
To finish the installation of the operating system we now need to update and upgrade:
sudo apt update
will lead to an error:
...
Get:31 http://ports.ubuntu.com/ubuntu-ports focal-backports/main Translation-en [16.3 kB]
Get:32 http://ports.ubuntu.com/ubuntu-ports focal-backports/universe arm64 Packages [24.3 kB]
Get:33 http://ports.ubuntu.com/ubuntu-ports focal-backports/universe Translation-en [16.3 kB]
Reading package lists... Done
W: GPG error: http://apt.radxa.com/focal-stable focal InRelease: The following signatures couldn't be verified because the public key is not available: NO_PUBKEY 9B98116C9AA302C7
E: The repository 'http://apt.radxa.com/focal-stable focal InRelease' is not signed.
N: Updating from such a repository can't be done securely, and is therefore disabled by default.
N: See apt-secure(8) manpage for repository creation and user configuration details.
There is a solution from a Radxa forum ţo repair it, execute the following command to refresh the public key:
export DISTRO=focal-stable wget -O - apt.radxa.com/$DISTRO/public.key | sudo apt-key add -
After that, the command will run without any errors:
sudo apt-get update
To upgrade the system just type:
sudo apt-get upgrade
Notice that the command completes much faster than if the Rock would run on a micro-SD card, as all the reads and writes go to the faster SSD hard-disk.
Step 2 - Install support applications
Our system has a dynamically allocated IP address, which is not convenient for a server. We should change it to a static address by using the nmcli utility. First, we need to discover the name of the network interface (I am running all my servers on Ethernet, wired connections, as WiFi may depend on factors such as walls, distance to the access point, and interference with other people's WiFi networks and so on).
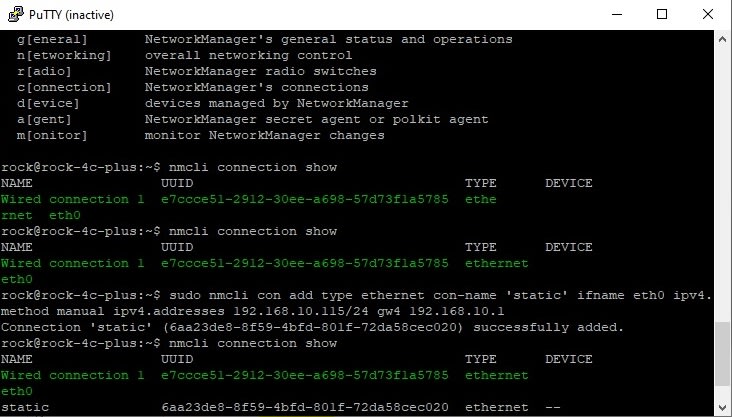
nmcli connection show
will display something like this:
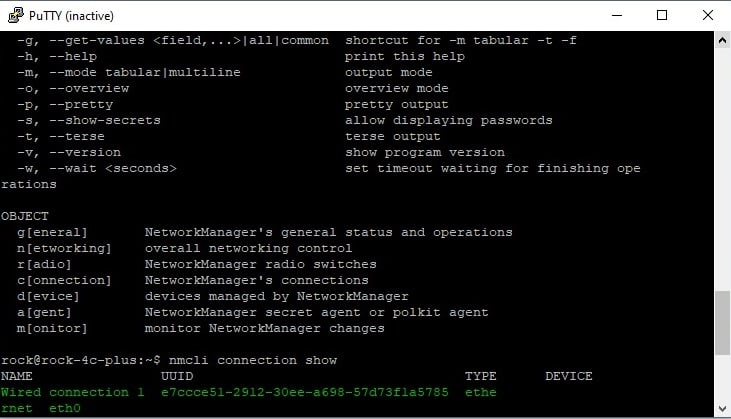
We need to create a new static connection (in my example the static IP will be 192.168.10.115 on the 192.168.10.1 network, and I will use this address in the rest of the article to access our Rock 4C+ system):
sudo nmcli con add type ethernet con-name 'static' ifname eth0 ipv4.method manual ipv4.addresses 192.168.10.115/24 gw4 192.168.10.1
We need to set the DNS address and activate it:
sudo nmcli con mod static ipv4.dns 192.168.10.1
sudo nmcli con up id 'static'
Note that at this point the current ssh connection will be broken, you will need to create a new session to the new IP address.
You can verify the static IP you want to assign to your device by running the following command:
ip route

Now one last reboot before starting to install the applications.
sudo reboot
A few words about applications
Sensors that read various data need to send them to our Rock-based server. This data will need to be then transformed according to our rules and logic. Then information will be displayed on a webpage so we can review it. This is exactly the purpose of the applications we will install.
First, we will need a messaging system that can reliably connect our remote sensors with the consumers of their data, by receiving their messages in a publish-subscribe architecture. Such a communication broker is based on MQTT (MQ Telemetry Transport) protocol that is bandwidth-efficient and lightweight. One of the very popular open-source implementations of MQTT is called Mosquitto.
Second, we will need a logic processing system that can take our rules and "run" them onto the messages received from MQTT broker. It has to be simple yet powerful and allow visual editing of the rules, so we will use Node-RED for this functionality.
To install Mosquitto is as simple as typing:
sudo apt-get install mosquitto
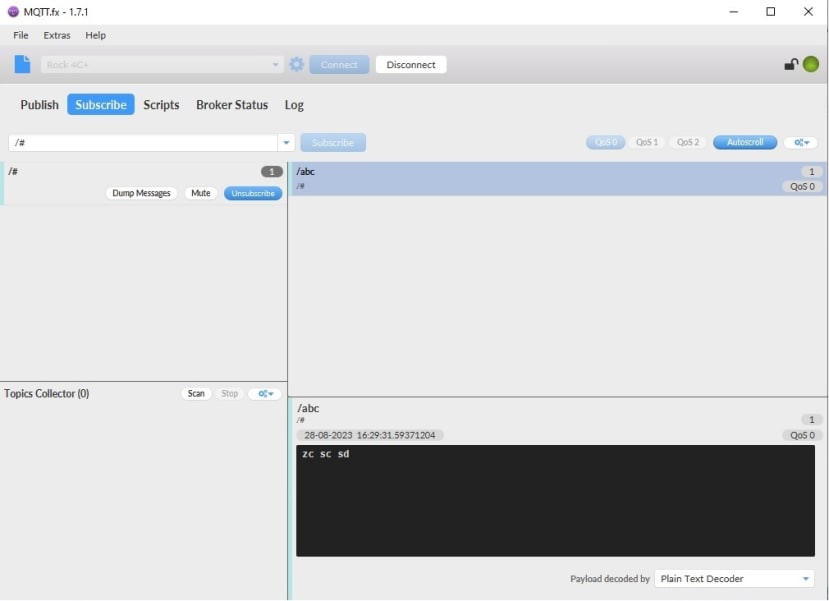
To quickly test the installation you can use a MQTT client (I use MQTT.fx on Windows) to connect to our server.
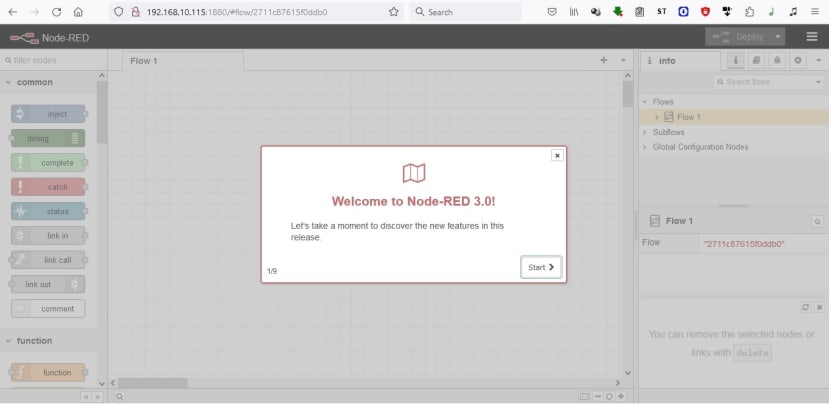
Now for Node-RED: while we can follow the path of physically installing Node-RED on the Rock 4C+, we risk facing all sorts of errors and obstacles. So we will prefer to use a virtualized version of it.
OS-level virtualization is a kind of packing an application with all it needs from the operation system (libraries, configuration files and so on), move it on the target computer and run it isolated from other applications of same kind. You definitely heard of docker as one of the most representative container management, but here we will use Ubuntu's own virtualization software called snap.
The beauty of this kind of software is that you can download an entire application (or set of applications) as a snap and run it immediately. Such a library of applications is published at https://snapcraft.io/, where you can search for snaps containing your favorite application. Such a search for Node-RED leads to several snaps that can be downloaded: node-red, node-red-rpi-lwl or node-red-industrial.
But first, we need to setup the snap environment, install the core snap and then install Node-RED:
sudo apt update
sudo apt upgrade
sudo apt install snapd
sudo snap install core
sudo snap install node-red
To test that Node-RED is running as a snap on our Rock 4C+, use a browser to visit Node-RED design page at http://192.168.10.115:1880