FemEng: ice-cream sticks drone with altitude control and LCD altitude displayed
Follow article Dave from DesignSpark
How do you feel about this article? Help us to provide better content for you.
Dave from DesignSpark
Thank you! Your feedback has been received.
Dave from DesignSpark
There was a problem submitting your feedback, please try again later.
Dave from DesignSpark
What do you think of this article?
During an amazing technical workshop that lasted for two semesters, I learned a lot about Arduino and the uncountable projects that can be created. Merging my passion for electronics and programming with robotics and control, I have decided to create a mini drone altitude-controlled using Arduino which I am excited to show you in this article.
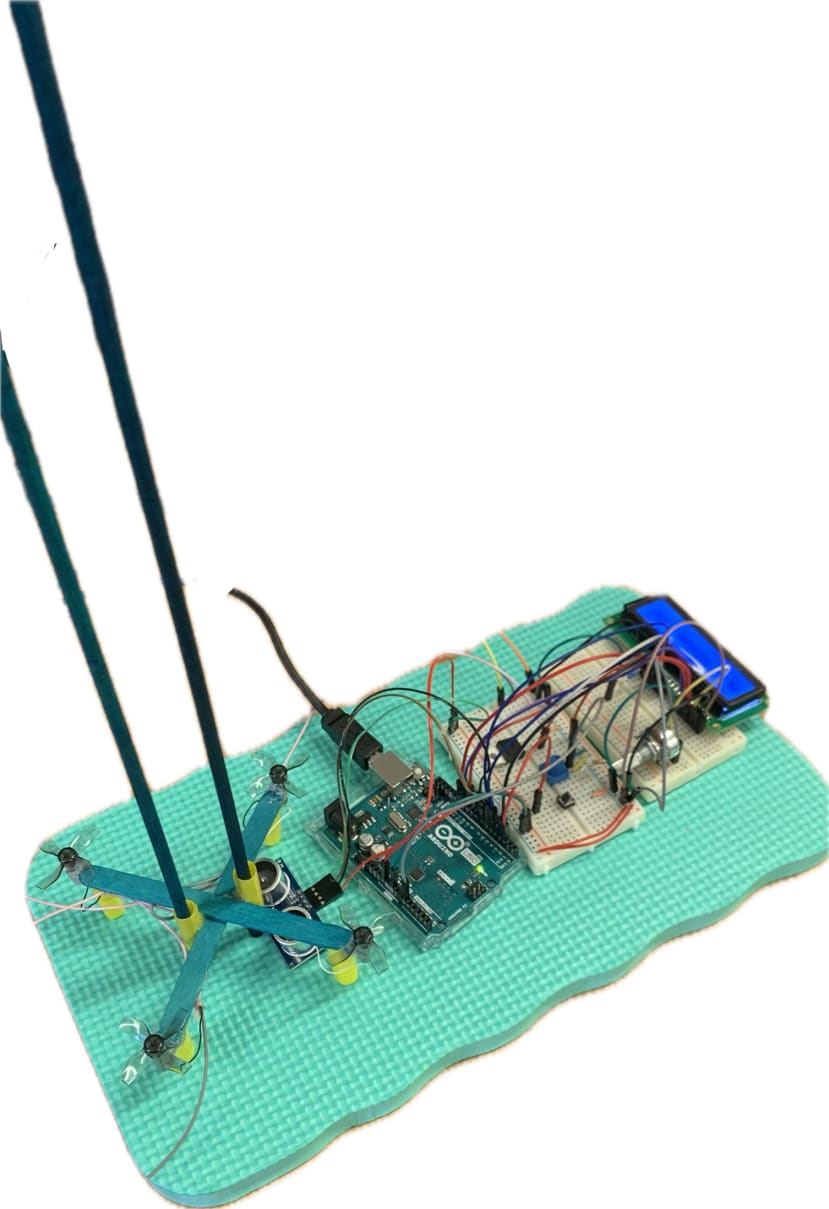
while researching I came across DIY Mini Drone: Arduino™ Altitude Control, a useful website that fuelled me to take the challenge to test the skills I gained from the workshop. I have decided to create the project step by step and then upgrade it with my own personal touch if have got time at the end. After several tries and errors, finally, the obstacle was overcome and the project became a success. I managed to create a mini-drone from ice cream sticks with a PID controller and LCD display that prints a message when the drone is ready to fly, and then the target distance that the drone intends to reach then a message when it is landing. The PID controller is simply a smart mechanism that tries to keep the drone hovering up to the desired altitude and not falling down or flying too far by calculating the difference between the target distance and the actual distance.
To build the drone I followed the tutorial video DIY Mini Drone. In the beginning, I used thick straws instead of ice cream sticks, but they were a little long so the props weren't able to generate enough lift force, so I changed to ice cream sticks.
The circuit I made is similar, but instead of the 6V battery, I have connected it to a power supply of 10V (between 8.5V -10V works well) as I discovered that 6V was not enough. The pushbutton switches the drone on and off while the potentiometer is turned to adjust the drone's height and the second potentiometer next the LCD is used to adjust the screen contrast.
For the Arduino code, I borrowed the code from DIY Mini Drone: Arduino™ Altitude and I took time to understand then I added the LCD display code. It was a bit difficult to find where in the code I should add the strings, so I tried uploading the code until I managed to get it to work successfully as I wanted!!. here is the final code.
/*
  This program uses a potentiometer and the reading from an HC-SR04
  ultrasonic distance sensor to control the altitude of a DIY mini drone.

  Project instructions available at:
  https://www.sciencebuddies.org/stem-activities/diy-mini-drone-arduino-altitude-control

  Ben Finio, Science Buddies
  2023

*/
#include <LiquidCrystal.h>
// define global variables

// constants that don't change (the variables are read-only)
const int triggerPin = 8;        // trigger pin for the ultrasonic sensor
const int echoPin = 7;
const int PWMPin = 10;        // pin for the motor PWM signal
const int but_pin = 2;        // pin for start/stop button
const int min_height = 10;    // minimum desired height in centimeters
const int max_height = 50;    // maximum desired height in centimeters
const float K = 3;            // proportional controller gain
const int ramp_time = 40;     // delay for motor ramp up/ramp down
const int rs = 12, en = 11, d4 = 3, d5 = 4, d6 = 5, d7 = 6;// LCD pins 3-6
LiquidCrystal lcd(rs, en, d4, d5, d6, d7);


// variables that can change
int but_status = 1;     // button status
int target_dist = 0;    // target distance in centimeters (this will be set with potentiometer)
int pot_reading = 0;    // potentiometer reading
long duration;          // duration of the ultrasonic ping
long cm;                // measured distance in centimeters
int PWM_offset = 150;   // offset for PWM signal (between 0-255), roughly the value that makes the drone hover
int PWM_signal = 0;     // PWM value
int error = 0;          // difference between target distance and measured distance

void setup() {    // setup code that only runs once
  pinMode(but_pin, INPUT);    // set button pin to input. You can omit the external pullup resistor and use INPUT_PULLUP instead.
  pinMode(triggerPin,OUTPUT);  // set ultrasonic trigger pin as output
  pinMode(echoPin,INPUT);      // set ultrasonic ech pin as input
  Serial.begin(9600);         // initialize serial communication, use for debugging if needed. Select Tools --> Serial Monitor to open window.
  Serial.print("Press button to start");
  WaitForPress(); // wait for button to be pressed to start
  LiftOff();      // give drone a short boost to get off the ground and prevent bad sensor readings
  delay(250);     // wait briefly before entering loop
  lcd.begin(16, 2);// set up the LCD's number of columns and rows.
}


void loop() {

  // check for button press to stop
  but_status = digitalRead(but_pin);  // read button pin
  if(but_status == LOW){
    Land();  // land slowly to avoid damage
    delay(1000); // wait for one second, then start monitoring for another button press for another liftoff
    but_status = digitalRead(but_pin);
    WaitForPress();   // wait for button to be pressed to start again
    // give drone a short boost to get off the ground and prevent bad sensor readings
    LiftOff();
  }

  // The ultrasonic sensor is triggered by a HIGH pulse of 2 or more microseconds.
  // Give a short LOW pulse beforehand to ensure a clean HIGH pulse:
  digitalWrite(triggerPin, LOW);
  delayMicroseconds(2);
  digitalWrite(triggerPin, HIGH);
  delayMicroseconds(5);
  digitalWrite(triggerPin, LOW);

  // use pulseIn command to measure the duration of the echo pulse in microseconds
  duration = pulseIn(echoPin, HIGH);

  // convert the time into a distance in centimeters
  cm = microsecondsToCentimeters(duration);

  pot_reading = analogRead(A0);                                // read analog value from the potentiometer, returns a value between 0-1023
  target_dist = map(pot_reading,0,1023,min_height,max_height); // map the potentiometer reading to a height between min_height and max_height
  error = target_dist - cm;                                    // calculate difference between target height and actual height
  PWM_signal = K*error+PWM_offset;                             // calculate PWM value using proportional controller
  if(PWM_signal>255){                                          // make sure PWM signal does not exceed allowed range of 0-255
    PWM_signal = 255;
  }
  else if(PWM_signal<0){
      PWM_signal = 0;
  }

  analogWrite(PWMPin, PWM_signal);        // send PWM signal to output pin
//dislpay the target distnace in LCD
  lcd.clear();
  lcd.print(target_dist);


  // Print information for debugging purposes
  // Comment out this code if you don't need it
  Serial.print("Target distance: ");
  Serial.print(target_dist);
  Serial.print(" Measured distance: ");
  Serial.print(cm);
  Serial.print(" Error: ");
  Serial.print(error);
  Serial.print(" PWM: ");
  Serial.print(PWM_signal);
  Serial.print(" Button Status: ");
  Serial.print(but_status);
  Serial.println();

}

long microsecondsToCentimeters(long microseconds) {
  // The speed of sound is 340 m/s or 29 microseconds per centimeter.
  // The ping travels out and back, so to find the distance of the object we
  // take half of the distance travelled.
  return microseconds / 29 / 2;
}

void WaitForPress(){     // wait for button to be pressed to start
  while(but_status == HIGH){            // get stuck in a loop and wait to start until the button is pressed
    but_status = digitalRead(but_pin);  // read button pin
  }
}

void LiftOff(){    // slowly ramp up motor speed to lift off
lcd.clear();
lcd.print("Ready!");
  while(PWM_signal<PWM_offset){ //slowly ramp up motor speed for smooth takeoff
    analogWrite(PWMPin, PWM_signal);  // send PWM signal to output pin
    PWM_signal++;
    delay(ramp_time);
  }
}

void Land(){           // slowly ramp down motor speed to land safely
lcd.clear();
lcd.print("Landing");
  while(PWM_signal>0){
      PWM_signal--;
      analogWrite(PWMPin, PWM_signal);
      delay(ramp_time);
    }
}
The final result was pretty impressive and a relief after all the problems encountered !! the video here shows the completed work and LCD display during lifting off, hovering up and landing caused by pressing the button.
This workshop was a wonderful experience for me thanks to FemEng, RS Grass Roots and Jana the workshop convener for their great effort to offer us this fantastic opportunity that I undoubtedly encourage every engineering student to be part of in the upcoming years.
Comments