Build an open source MCU and program it with Arduino
Follow article
 Dave from DesignSpark
How do you feel about this article? Help us to provide better content for you.
Dave from DesignSpark
Thank you! Your feedback has been received.
Dave from DesignSpark
There was a problem submitting your feedback, please try again later.
Dave from DesignSpark
What do you think of this article?
Configuring the low cost Arty FPGA board with an Arduino compatible RISC-V platform.
In this post we take a look at how the eminently affordable Xilinx Artix-7 based Digilent Arty Board — which was designed with makers and hobbyists in mind — can be configured with an open source RISC-V microcontroller that can optionally be built from RTL sources, and which can then be programmed via the Arduino IDE or alternatively a makefile driven GNU toolchain.
Basic familiarity with Linux, git and makefile driven software build is assumed.
Freedom E310

Top-Level Block Diagram of the E300 platform, © 2017 SiFive Inc.
RISC-V is a free and open instruction set architecture (ISA), published under a liberal licence that encourages widespread adoption and allows anyone to implement their own compatible devices, whether in simulation, FPGA or ASIC. These might be anything from an ultra-low power IoT class device, through to mobile, laptop/desktop and server class, and right up to devices targeting HPC applications.
Note that RISC-V, however, it not a processor per se — it is an ISA specification. Although the RISC-V Foundation do provide a reference processor implementation called Rocket, along with tools that facilitate generating cores, plus a GNU compiler toolchain.
SiFive, the commercial organisation that was founded by inventors of RISC-V, provide products that include IP cores and SoC platforms, supported by consultancy services. Their Freedom E300 SoC platform is based around an E3 Coreplex, available as an ASIC and can be targeted to FPGA.
The Freedom E310 chip design that we will be loading into the Arty board configuration memory is based on the SoC architecture pictured above.
Hardware

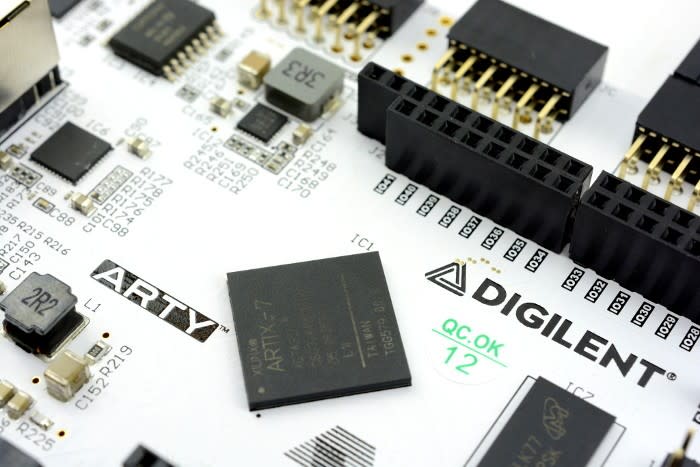
While the Digilent Arty 410-319, RS st no (134-6478) integrates a USB-JTAG adapter that can be used to program the Xilinx Artix-35T FPGA directly, along with the Quad-SPI flash that is typically used to configure the FPGA upon power-up, an ARM-USB-TINY-H USB JTAG adapter is also required in order to provide a debug/programming connection to the RISC-V core.
So many interfaces and options! Well, remember that we are talking about a fully programmable platform, where you are free to modify the design of the MCU itself, in addition to being able to upload your own code to run on this.
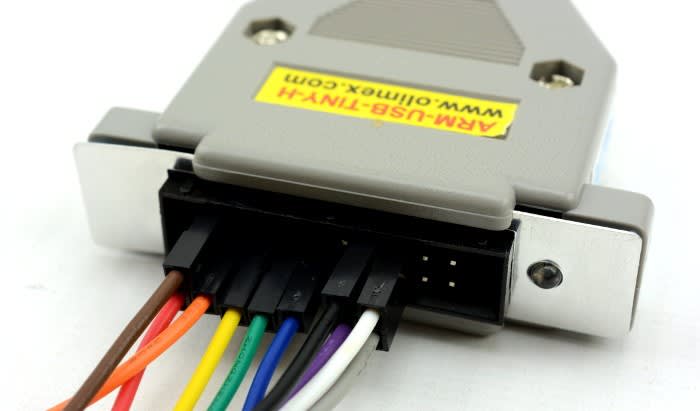
USB-JTAG wiring
The Freedom E300 Arty FPGA Dev Kit Getting Started Guide contains details of how to wire up the adapter, along with instructions on how to build the SoC and GNU toolchain, and program the board etc. This is obviously the canonical documentation, to be referred to if ever unsure, and the steps described in this post are based on the instructions contained in the guide.

PMOD connector JD wiring
The wire colours suggested in the guide were used, no jumpers need to be fitted or removed from the board as supplied, and simply ensure that you connect to PMOD JD and not one of the others.
New udev rules will also need to be added so that the ARM-USB-TINY-H can be accessed:
Edit /etc/udev/rules.d/99-openocd.rules and add:
# These are for the Olimex Debugger for use with E310 Arty Dev Kit
SUBSYSTEM=="usb", ATTR{idVendor}=="15ba", ATTR{idProduct}=="002a", MODE="664", GROUP="plugdev"
SUBSYSTEM=="tty", ATTRS{idVendor}=="15ba", ATTRS{idProduct}=="002a", MODE="664", GROUP="plugdev"
Then enter:
$ sudo udevadm control --reload-rules
If your user account is not already in the plugdev group it will need to be added to it, followed by logging out and then back in again.
FPGA toolchain

The free “WebPACK” version of the Vivado HL tools will suffice and a downloader is available once you are logged in to the Xilinx website. Upon completing installation, support for Digilent boards must be added and this is just a matter of obtaining the files and copying them into place.
For example, after downloading the Vivado 2017.1 installer, the process was:
Make the installer executable and run this as root:
$ chmod +x Xilinx_Vivado_SDK_2017.1_0415_1_Lin64.bin
$ sudo ./Xilinx_Vivado_SDK_2017.1_0415_1_Lin64.bin
Install the cable drivers:
$ cd /opt/Xilinx/Vivado/2017.1/data/xicom/cable_drivers/lin64/install_script/install_drivers
$ sudo ./install_drivers
Get the Digilent board support files and copy them into place:
$ git clone https://github.com/Digilent/vivado-boards.git
$ sudo cp -r vivado-boards/new/board_files/* /opt/Xilinx/Vivado/2017.1/data/boards/board_files/
Return to home directory and setup environment variables:
$ cd
$ source /opt/Xilinx/Vivado/2017.1/settings64.sh
This script needs to be sourced each time you log in or a new terminal is opened.
At this point the GUI can be started by typing:
$ vivado
Board configuration
A flash programming file that integrates a pre-built FPGA bitstream and demo program can be downloaded from the SiFive website (requires registration).
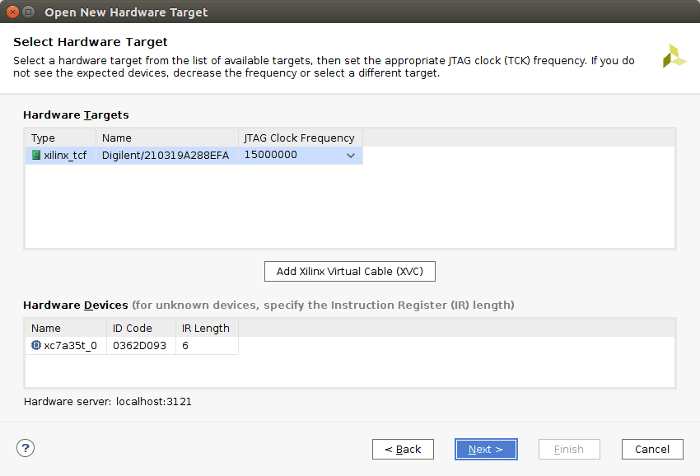
After launching Vivado, open the Hardware Manager and connect to the board target. Following which, right-click on the FPGA, select to Add Configuration Memory Device, then select Micron part n25q128-3.3v. If you then opt to program the device the downloaded .mcs file can be selected.

Once programming has completed, if the red button marked PROG is pressed the FPGA will be configured and the demo program should start executing, with LED1 and LED2 illuminating.
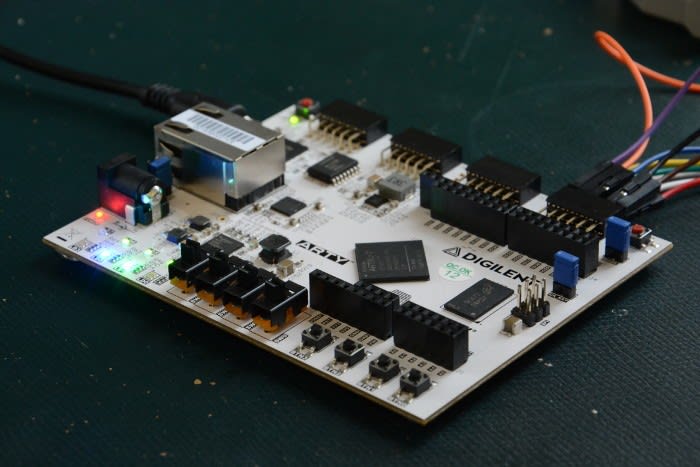
And if you use a terminal emulator to connect to /dev/ttyUSB1 you should see a message output.

At this point you could either skip the next section and move straight on to programming the SoC via the Arduino IDE / GNU toolchain, else proceed to have a go at building the SoC itself.
Chip build!
First we need to recursively clone the GitHub repository that contains the Chisel RTL sources for the SiFive E300 and U500 platforms.
$ git clone --recursive
https://github.com/sifive/freedom.git
This will take a little while as in turn all the git submodules which pull in dependencies, such as the Rocket Chip Generator and Chisel etc. are cloned.
Once we have everything the Chisel sources can be compiled down to Verilog by entering:
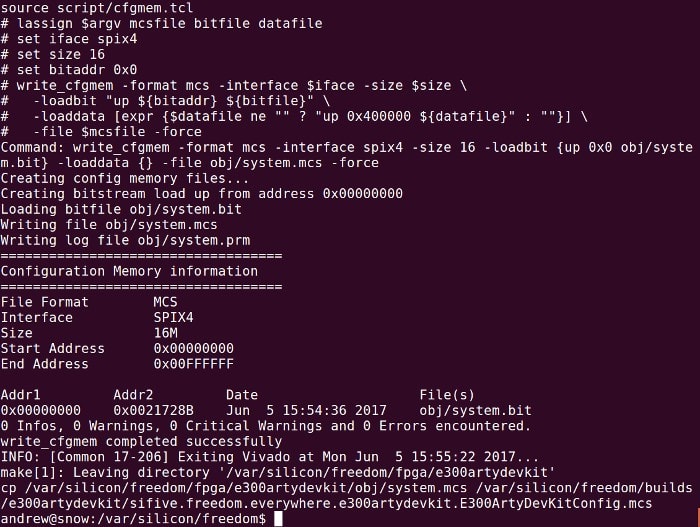
$ make -f Makefile.e300artydevkit verilog
And to make a configuration memory file, we first need to make sure that the Vivado environment variables have been set by sourcing the appropriate shell file as noted previously, and then enter:
$ make -f Makefile.e300artydevkit mcs
This will drive synthesis for the Xilinx FPGA, along with place-and-route etc. and after a little while you should have a shiny new .mcs file than can be used to program the configuration flash.
Note that by default the flash image generated does not contain a demo program as with the pre-built version. However, a program can be baked into the image by editing the appropriate makefile and for further details please see this forum post.
Arduino compatible

By far the easiest way to start developing software for the Freedom E310 is to take advantage of the fact that there is support for using the Arduino IDE with it targeted to the Arty board. All we need to do is to first go to File → Preferences → Settings and add the Board Manager URL:
http://static.dev.sifive.com/bsp/arduino/package_sifive_index.json
Then we can go to Tools → Board → Board Manager, search for SiFive Freedom Boards and install support for them. Following which we can select the Freedom E300 Arty DevKit board, before opening the trusty blink example, and compiling and uploading this to the board.

Note that if at this point programming fails, it is possible that the USB-JTAG was not correctly wired to the PMOD connector, udev is not configured, else you’re not in the plugdev group.
freedom-e-sdk
If using a text editor of your own choice and makefile driven development is more your thing, fear not, as it’s just as easily to build the standalone GNU toolchain, freedom-e-sdk.
First we need to get the build dependencies:
$ sudo apt-get install autoconf automake libmpc-dev libmpfr-dev libgmp-dev
gawk bison flex texinfo libtool libusb-1.0-0-dev make g++ pkg-config libexpat1-dev zlib1g-dev
Then clone the sources and build:
$ git clone --recursive https://github.com/sifive/freedom-e-sdk.git
$ cd freedom-e-sdk

$ make tools
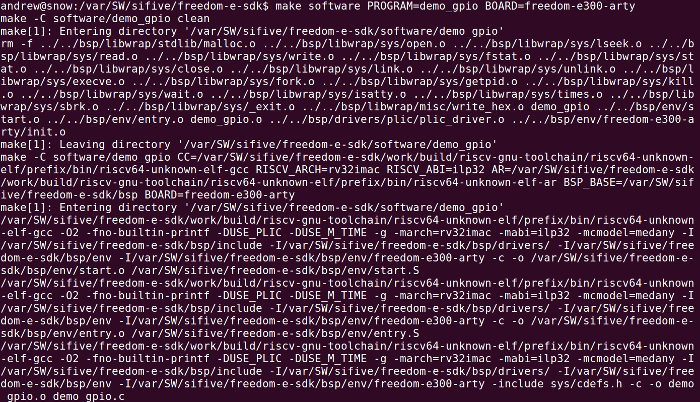
Finally, to build and then upload the demo program, enter:
$ make software PROGRAM=demo_gpio BOARD=freedom-e300-arty
$ make upload PROGRAM=demo_gpio BOARD=freedom-e300-arty
Freedom to hack
So for a modest outlay and in no time at all you can be up and running with a customisable microcontroller platform, where you are free to hack away at the SoC design. Or if that is a little beyond your comfort zone, you can have what is likely the coolest Arduino-compatible right now.