BARTH lococube® mini-PLC STG-800 dispenses a predetermined amount of... anything?
Follow project Dave from DesignSpark
How do you feel about this article? Help us to provide better content for you.
Dave from DesignSpark
Thank you! Your feedback has been received.
Dave from DesignSpark
There was a problem submitting your feedback, please try again later.
Dave from DesignSpark
What do you think of this article?
 Tired of squeezing 310 ml cartridges by hand? Just build yourself an automatic dispenser!
Parts list
| Qty | Product | Part number | |
|---|---|---|---|
| 1 | RS PRO Strut, 40 x 40 mm, 8mm Groove , 1000mm Length | 761-3319 | |
| 1 | Profile 8 80x40 light 3m | 761-3329 | |
| 4 | Bosch Rexroth Strut Profile Angle Bracket, strut profile 45 mm, Groove Size 10mm | 390-1805 | |
| 2 | Bosch Rexroth Black Polypropylene End Cap 40 x 40 mm strut profile , Groove 10mm | 459-7283 | |
| 8 | Bosch Rexroth Strut Profile Tension Connector, strut profile 40 mm, 45 mm, 50 mm, 60 mm, Groove Size 10mm | 667-0582 | |
| 4 | Bosch Rexroth POM, Sliding Element, MGE 10mm Slot | 390-2319 | |
| 1 | RS PRO Pneumatic Solenoid Valve - Pilot/Spring G 1/4 V51 Series | 907-6416 | |
| 1 | F + R 105-106-110-111 Manometer 0-10bar 0-140psi 1.Stück | AR5148 | |
| 4 | RS PRO Round Anti Vibration Mount 19mm dia. PE | 054-3232 | |
| 1 | RS PRO Filter Regulator 20μm G 1/4, 12 | 197-7905 | |
| 1 | BARTH lococube mini-PLC PLC I/O Module - 5 Inputs, 9 Outputs, Digital, PWM, Solid State, For Use With STG-800, CANOpen | 134-8863 | |
| 1 | Cartridge presses - for 310 ml cartridges - with pressure relief - 6.2 bar | 943183514000 | |
| 1 | RS PRO Air Hose Natural Nylon 6mm x 30m NMSF Series | 386-6190 | |
| 1 | Legris LF3000 Series Straight Threaded Adaptor, G 1/4 Male to Push In 6 mm, Threaded-to-Tube Connection Style | 265-5719 | |
| 2 | Legrand Cable Clip Natural Self Adhesive Nylon Cable Tie Holder | 704-8655 | |
| 2 | RS PRO Black Cable Tie Nylon Sub Miniature, 71mm x 1.6 mm | 664-2887 | |
| 1 | BARTH DMA-15 Series CAN Touch Touch Screen HMI - 2.4 in, TFT Display, 240 x 320pixels | 174-5641 | |
| 2 | Switch,pushbutton,min,latching,square,illuminated, | 022-3874 | |
| 5 | Festo Elbow Threaded Adaptor, R 1/8 Male to Push In 8 mm, Threaded-to-Tube Connection Style | 202-2753 | |
| 1 | High quality DC connection cable from RND | RND 205-01302 | |
| 1 | Mean Well, 36W Plug In Power Supply 24V dc, 1.5A, Level VI Efficiency, 1 Output Universal, Type C | 791-0941 | |
| 16 | RS PRO M6 x 16mm Hex Socket Cap Screw Plain Stainless Steel | 028-1114 | |
| 4 | Cylinder screw DIN 912 - M6 x 40 mm - 8.8 steel, galvanized | 912 8.8 6 40 A2K | |
| 1 | RS PRO Yellow Double Sided Plastic Tape, 50mm x 50m | 051-2884 | |
| 1 | BARTH - Cable for use with STG-550/560/650/660 Mini PLC, VK-16 | 122-1523 | |
| 1 | RS PRO 1.75mm Black PLA 3D Printer Filament, 1kg | 832-0214 | |
1. Intro
Let me ask you straight away: What do you think about when using a kitchen appliance or driving a car?
Whatever the answer would have been, "dispensing“ was probably not it. This goes to show that even though modern amenities go through several steps of dispensing during production (silicone-based sealant, glue, potting compound, etc.), we usually pay little attention to the process...until we have to do it ourselves.
2. Challenges of dispensing
There can be many application-dependent challenges associated with dispensing. Replacement of a car windshield is a prime example of this, as the location and shape of the glue bead, needs to be controlled tightly to produce optically and structurally sound results.
But even applying the right amount of industrial glue into a case can be challenging. If you decide to do it by hand you will face all the drawbacks associated with manual labour like uncontrollable tolerances, wasted material, ergonomics and so on.
3. Our Solution
To remedy the situation, we built a dispensing unit that will accept any flavour of the de facto standard 310 ml cartridge. It is opened and inserted into the steel cylinder. Once the cylinder is screwed shut, pushing the "dispense" button on the side will open an air valve for a predetermined amount of time. The air, in turn, forces a certain amount of material through the nozzle. After the time is up the valve vents the cylinder and dispensing stops.
The amount that's dispensed is determined by counting dispensing time. Because the flow rate is dependent on many factors, such as nozzle diameter, viscosity and temperature, the operator will teach the device once with each change of a cartridge. The teach-time is saved and used for each successive dispensing.
4. Mechanical setup
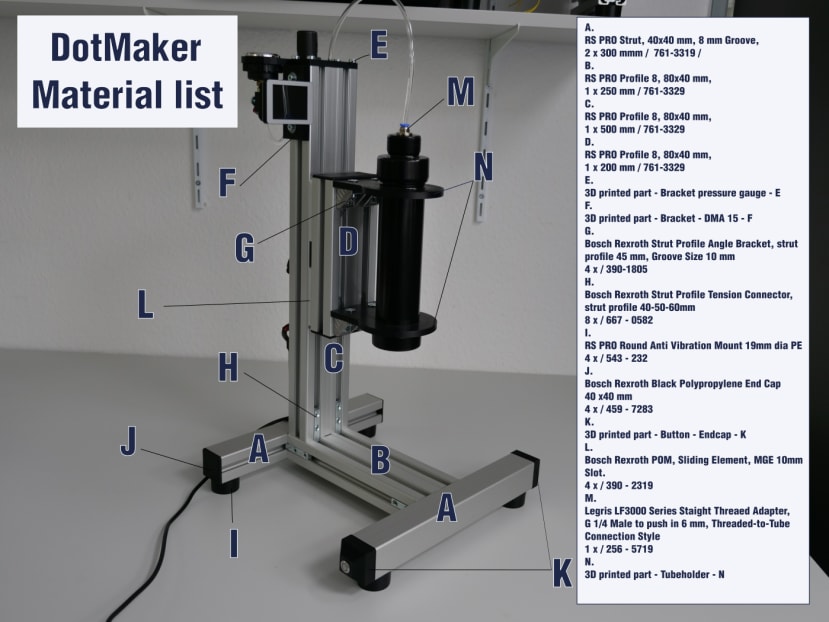
The device was designed to be easily reproducible. Therefore we mostly used standardized parts like the aluminium extrusions [A, B & C] to which all other components are attached. They allow for the height of the glider [D] to be adjusted by placing a single t-nut and screw in the slot below it. Otherwise, it can glide freely up and down the beam on sliding elements [L].
The commercially available metal cylinder is adapted to the regulator by a special fitting [M]. Additionally, four different 3D printed parts are required. One holds the pressure regulator and gauge [E], another holds the lococube® HMI [F], another pair of parts holds the buttons [K] and yet another the metal cylinder [N].
5. Electrical setup
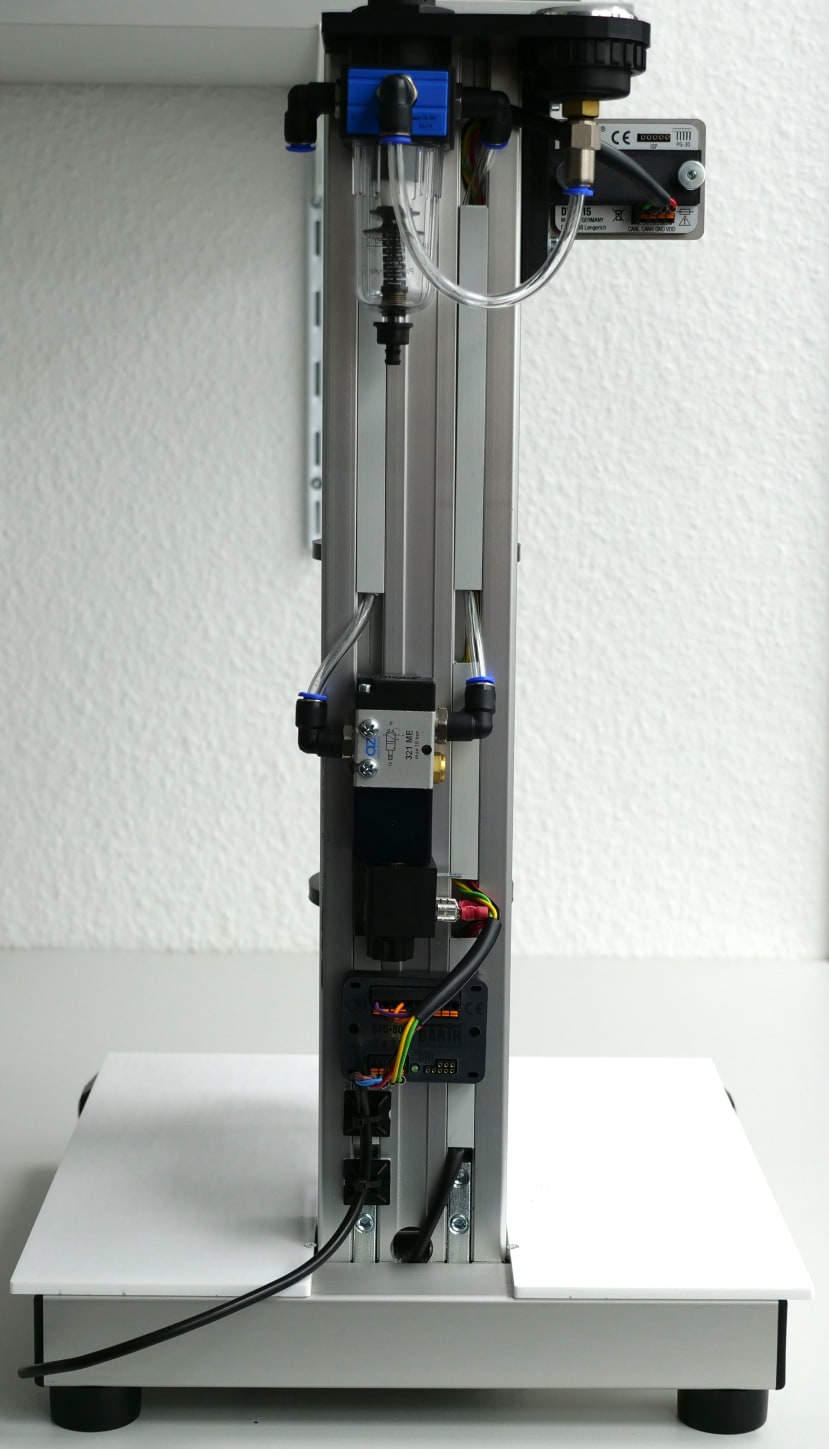
Except for the buttons, all electrical parts are mounted on the backside of the extrusion [C]. lococube® PLCs can be mounted with screws or zip ties but also have a smooth backside that allows for adhesion to surfaces with double-sided sticky tape. We used the latter option and routed all cables through the extrusion´s slots.
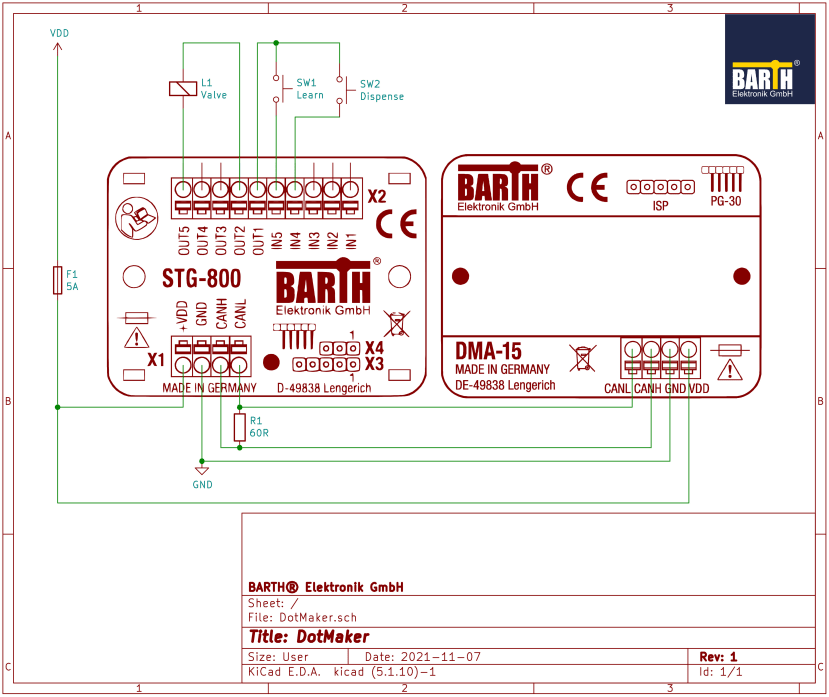
If you want to use the provided program please wire all components according to the schematic below.
Since not all outputs are needed we used OUT1 (high side switch) as a signal voltage supply for the buttons and OUT5 (low side switch) to supply power ground to the valve; this makes for neater wiring without additional clamps.
lococube® HMI (DMA-15) and -PLC (STG-800) communicate via CAN-bus. This kind of bus must almost always be terminated with a total resistance of about 60Ω. For longer runs of cable, we recommend to terminate a bus with a 120Ω resistor at each end. In this application, the cables are short enough to terminate it with a single 60Ω resistor at the PLC though.
6. Software description
The device has two modes as shown in the flowchart below.
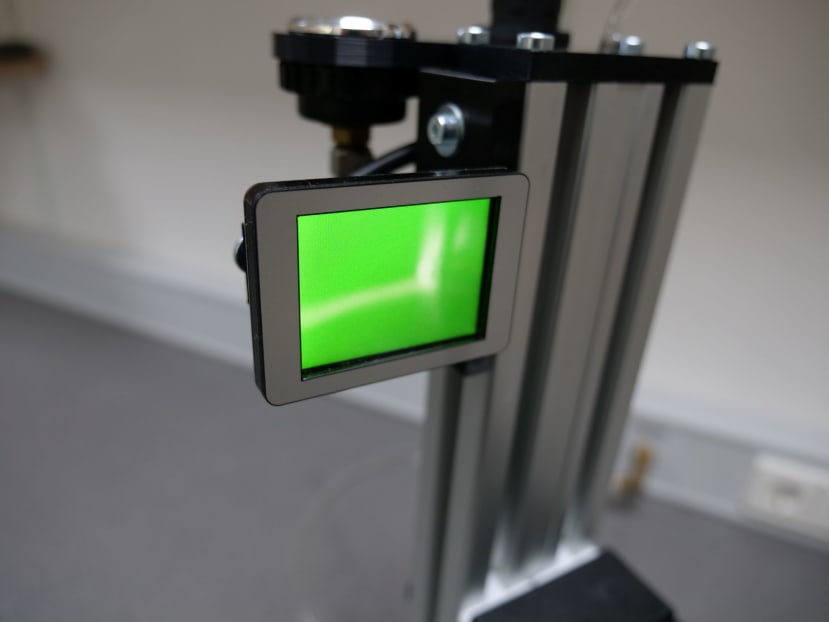
At first, a dispense time has to be set. This is done by pressing the learn button for more than 3 seconds. The display will light up red as an indication of the mode change. If the dispense button is pressed, the timer starts and the valve opens. Dispensing begins and takes place until the user releases the dispense button. To deal with viscous materials, it can dispense in several increments and take breaks in between. These increments add up to the total dispense time. It is saved when the learn button is pressed momentarily. As a result, the display turns green to show that the dispenser is ready.
In dispense mode, the air valve is opened as long as the user presses the dispense button and the dispense time has not elapsed. Incremental dispensing is possible in this mode as well, as the PLC keeps track of time during dispensing.
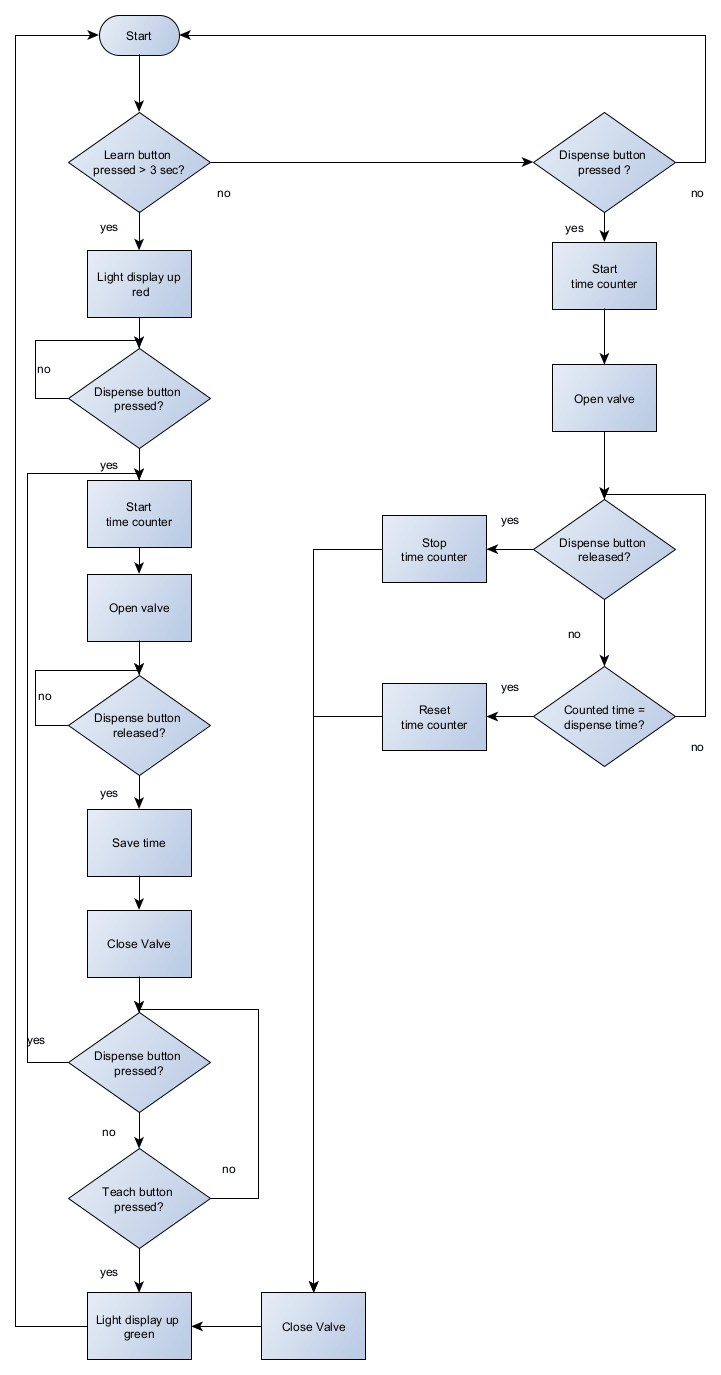
To gain the functionality described in the flowchart we created the following program. We attached it for you so that you can just download it, open it with miCon-L and download it to the PLC with the inexpensive VK-16 programmer. You can get your copy of miCon-L here (totally free and without registration by the way).

7. Hints for building one yourself
Please cut the aluminium extrusions [A, B, C & D] according to the lengths mentioned in the parts diagram. Parts [A, F, K & N] are 3D-printed parts. Please find all corresponding .obj files below. We printed the parts from PLA with a 0.4mm nozzle and used the following settings:
- Bed temperature: 60 °C
- Nozzle temperature: 215 °C
- Layer height: 0.2 mm
- Infill percentage: 15 %
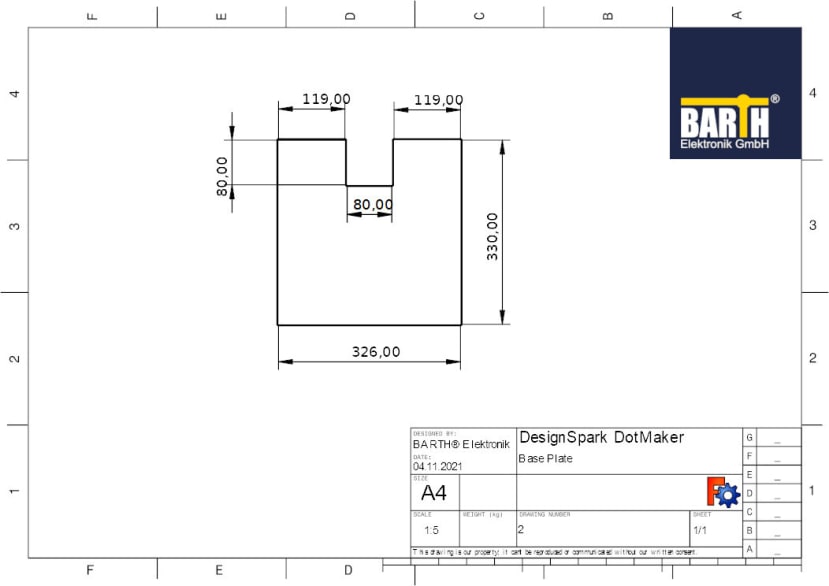
The baseplate rests on parts [A & B] and is not shown in the parts diagram. We used a CO2 laser to cut it from 5mm thick opaque acrylic. This is how to set your laser:
... just kidding; any material with a smooth surface, like plywood, will work as a baseplate. Please cut it to the following dimensions by a suitable method.
Comments