pi-topPULSE: an audiovisual experience for your Pi
この記事を購読
 Dave from DesignSpark
こちらの記事について、内容・翻訳・視点・長さなど、皆様のご意見をお送りください。今後の記事製作の参考にしたいと思います。
Dave from DesignSpark
Thank you! Your feedback has been received.
Dave from DesignSpark
There was a problem submitting your feedback, please try again later.
Dave from DesignSpark
こちらの記事の感想をお聞かせください。
The pi-topPUSLE is the lasted accessory from the pi-top family. The pi-top range is based around STEAM (Science, Technology, Engineering, Arts and Mathematics) learning and the PULSE is designed to provide functionality to fulfil all of the STEAM principles.
The PULSE adds the following features to any Pi based platform:
Microphone
The pi-top PULSE comes with an integrated microphone that performs admirably, working even within a sealed pi-top.
Speaker
The integrated speaker is 2watt with a I2S amplifier to give loud and clear sound from the PULSE. As an aside, I2S is not a mistype of I2C although a very similar acronym. I2S stands for Inter IC Sound and is a standard audio interface specification.
7 x 7 Led matrix and backlighting
On the top side of the PULSE there is 7x7 pixel RGB display made up of discrete LEDs. This is a step up from just audio and gives the ability to provide feedback from a standalone Pi without the need for an addition display. In addition to the top side display matrix there is under lighting and speaker lighting to add that little extra impact if required.
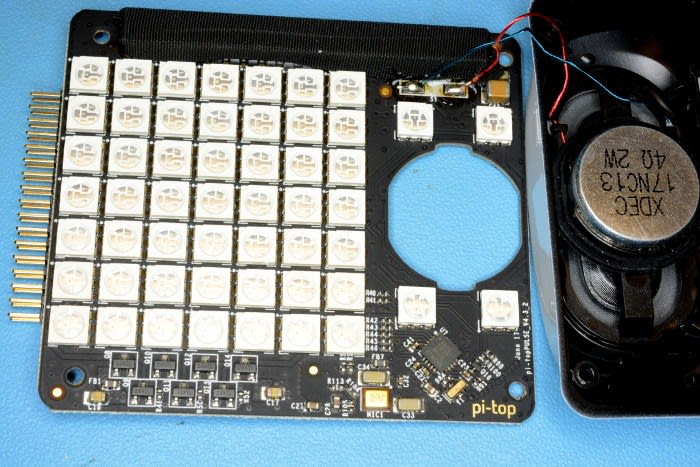
The insides of the pi-top PULSE
Fitting options
The PULSE is just as happy plugged into a basic Pi board as it would be in a pi-top or CEED. There are two methods of connection provided “pi-top Mag Rail” and as a “HAT” (mates to the Pi or the pi-topPROTO to suit your needs). The magnetic screws of the “Mag Rail” are a nice feature giving 4 magnetic mounting feet to the PULSE module, but watch out if you drop a screw into your pi-top as it’ll most likely end up stuck to these.

Software
There are two OS options for the PULSE: The first is pi-topOS, which is available from here and this is by far the least difficult of the two options. The second option is to manually download the PULSE software on Raspbian. Both setup instructions are documented at the Github for the pi-topPULSE.
Amazon Alexa integration
Starting pi-topDASHBOARD and pairing our pi-top account to the Amazon Alexa service was simply a case of following the on-screen instructions; before we knew it our pi-top was telling us jokes (albeit very bad ones). We put Alexia to one side and fired up the pi-topCODER to test the matrix led functionality.

Lessons are included
As with most things pi-top there are a set of bite sized lessons available on how to get up and running. The PULSE is no different there were two lessons at the time of writing:
- Getting Started with pi-topPULSE
- Introduction to pi-topPULSE LEDs
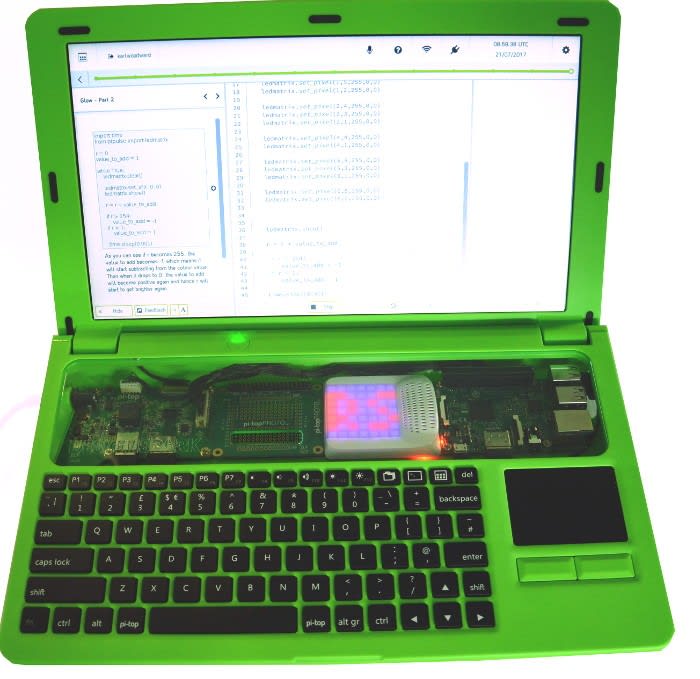
The “Getting Started with pi-topPULSE” has a lot of demo’s and functionality, however was aimed at a 3 dot level of expertise, so it is not the best starting point for someone new to the pi-top. The “Introduction to pi-topPULSE LED’s” is probably the best starting point and most structured lesson. The tutorial is fairly self explanatory and quickly we picked up a few of the functions, by the end of the tutorial it had taught us enough to customise our PULSE with a pixel RS logo with a pulsing blue background.

Using a matrix we sketched the pixels we needed illuminating and wrote a line of code for each pixel to turn it on. This code uses the method .set_pixel(X,Y,R,G,B), X and Y are coordinates numbered from bottom-left to top-right 0-6. The RGB values are 8 bit (0-255) 0 being off and 255 being fully on.
Our code example is below:
Code
import time
from ptpulse import ledmatrix

r = 0
value_to_add = 1

while True:
	ledmatrix.clear()
	#This sets the background to r brightness (r,0,0) for red (0,r,0) for green (0,0,r) for blue
	#(r,r,r) for white
	ledmatrix.set_all(0, 0, r)
	#Instead of the whole matrix lets make a logo
	#Column 0 pixels
	ledmatrix.set_pixel(0,1,255,0,0)
	ledmatrix.set_pixel(0,2,255,0,0)
	ledmatrix.set_pixel(0,3,255,0,0)
	ledmatrix.set_pixel(0,4,255,0,0)
	ledmatrix.set_pixel(0,5,255,0,0)

	#Column 1 pixels
	ledmatrix.set_pixel(1,2,255,0,0)
	ledmatrix.set_pixel(1,5,255,0,0)

	#Column 2 pixels
	ledmatrix.set_pixel(2,1,255,0,0)
	ledmatrix.set_pixel(2,3,255,0,0)
	ledmatrix.set_pixel(2,4,255,0,0)

	#Column 3 has no pixels

	#Column 4 pixels
	ledmatrix.set_pixel(4,1,255,0,0)
	ledmatrix.set_pixel(4,4,255,0,0)

	#Column 5 pixels
	ledmatrix.set_pixel(5,1,255,0,0)
	ledmatrix.set_pixel(5,3,255,0,0)
	ledmatrix.set_pixel(5,5,255,0,0)

	#Column 6 pixels
	ledmatrix.set_pixel(6,2,255,0,0)
	ledmatrix.set_pixel(6,5,255,0,0)


	#This is the demo code, It gradually increases or decreases the display brightness by r
	ledmatrix.show()

	r = r + value_to_add

	#Swap direction at max/min brightness
	if r > 254:
		value_to_add = -1
	if r < 1:
		value_to_add = 1
	time.sleep(0.01)
If you have a pi-top or just want to spruce up your standard Pi, the pi-topPULSE is a nice addition to add engaging and visual/audio feedback to your coding. The Alexa functionality is a nice addition too, but the PULSE really shines (excuse the pun) with its visual/audio enhancement of the Pi and what this will allow you to do.
Karl Woodward
Check out the DesignSpark branded Raspberry Pi 3 B and pi-topPULSE kit here