 戴夫来自 DesignSpark
你觉得这篇文章怎么样? 帮助我们为您提供更好的内容。
戴夫来自 DesignSpark
Thank you! Your feedback has been received.
戴夫来自 DesignSpark
There was a problem submitting your feedback, please try again later.
戴夫来自 DesignSpark
你觉得这篇文章怎么样?
 物联网在数字化现实数据方面发挥着至关重要的作用。Zerynth和XinaBox帮助你快速撘建物联网设计原型。本文旨在帮助您编程Xinabox以收集SW03传感器天气数据,并与OKdo Cloud连接,在自行设计的仪表板上显示数据。
零件清单
| 数量 | 产品 | 库存编号 | |
|---|---|---|---|
| 1 | XinaBox xCHIP Wi-Fi & Bluetooth Core Module CW02 | 174-3702 | |
| 1 | XinaBox SW03, Weather Sensor Module for MPL3115A2 | 174-3746 | |
| 1 | XinaBox, USB Programming Interface Module for FT232R - IP01 | 174-3703 | |
| 1 | Zerynth Studio | ||
| 1 | OKdo Cloud | ||
其他需要的东西
- WiFi网络名称和密码(我使用手机作Wi-Fi热点)
- OKdo Cloud帐户
什么是OKdo Cloud?
OKdo是一家专注于物联网的全球新技术企业。 OKdo Cloud是他们的服务之一。 OKdo Cloud为您提供物联网云平台,用于连接您的IoT并与之互动。 OKdo Cloud的GUI简单易用。您可以构建自己的仪表板(在OKdo Cloud中称为“Pinboard”)以显示接收到的数据。借助OKdo Cloud中的API,您可以通过几个步骤连接您的IoT,捕获数据并可视化您的结果。最重要的是它完全免费。
创建OKdo Cloud帐户
使用您的电子邮件地址、用户名和密码在https://okdo.allthingstalk.com/注册帐户。
登录后,您可以看到类似下面的页面。
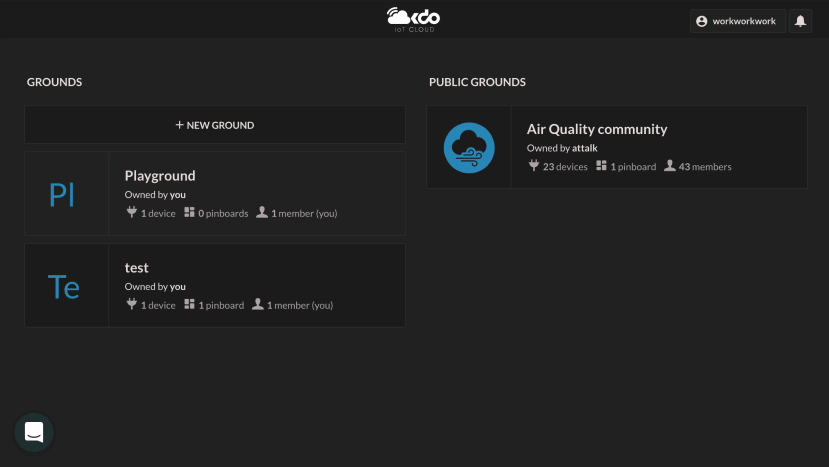
「OKdo Cloud将成员和设备组织成"Grounds",这是管理IoT装置和访问数据的方法。在注册后,OKdo Cloud会自动创建第一个Ground,称为"Playground"」在okdo.com中的一个项目中提到。
设置OKdo Cloud以连接设备
您可以使用默认的Ground或创建自己的Ground。
要创建新Ground,请单击"+ NEW GROUND"。输入所需的名称,然后单击"创建"。在此之后,您可以看到以下内容。

点击"+ CONNECT A DEVICE"。选择"Your own device",然后根据需要输入设备名称。之后点击"CONNECT"。

接下来创建新的"Device Assets"使OKdo Cloud能够接收设备发送的内容。在"Profile"中,输入"random"为Name和在Choose type选择"Number"。如下所示。点击"CREATE ASSET"。

连接XinaBox
连接XinaBox的模块如下图所示:
- 将CW02连接到USB编程接口模块IP01。
- 将SW03天气传感器连接到CW02。
- 通过USB将XinaBox连接到您的计算机。

编写XinaBox
启动Zerynth Studio,在Example中寻找OKdo Cloud→Mqtt的示例项目。您亦可以复制以下代码来创建自己的项目。
################################################################################
# MQTT at OKDO Cloud IoT
#
# Created at 2019-05-06 08:40:34.990336
#
################################################################################

import streams
from wireless import wifi
# choose a wifi chip (esp32)
from espressif.esp32net import esp32wifi as wifi_driver

# let's import the OKDO cloud modules; first the IoT module...
from okdo.iot import iot
# ...then the mqtt client
from okdo.iot import mqtt_client

# Let's define a global variable to store the publishing rate (in ms)
rate = 3000

# Customize the following variables
ssid = "SSID"                  # this is the SSID of the WiFi network
wifipwd = "Password"                   # this is the Password for WiFi
device_id = "device_id"        # this is the device identifier. Can be obtained from the OKDO cloud dashboard
device_token = "device_token"  # this is the device token. Can be obtained from the OKDO cloud dashboard

# Remember to add a device to your okdo cloud and define some assets:
# - a "rate" actuator, with type integer
# - a "random" sensor of type integer


def rate_cb(asset,value, previous_value):
    global rate
    value = int(value)
    if value<1000:
        value=1000
    rate=value
    print("Rate changed to",rate,"ms")


streams.serial()

try:
    # Let's initialize the WiFi
    wifi_driver.auto_init()

    for _ in range(0,5):
        # put your SSID and password here
        try:
            wifi.link(ssid,wifi.WIFI_WPA2,wifipwd)
            break
        except:
            print("Trying to connect...")
            sleep(2000)
    else:
        print("oops, can't attach to wifi!")
        raise IOError

    print("Connecting to OKDO IoT Cloud...")

    # let's create a device passing the id, the token and the type of client
    device = iot.Device(device_id,device_token,mqtt_client.MqttClient)

    device.connect()
    print("Device is connected")

    # define the callbacks to call when an asset command is received
    device.watch_command("rate",rate_cb)

    # start the device
    device.run()
    print("Device is up and running")

    while True:
        # sleep as indicated by rate
        sleep(rate)
        x = random(0,100)
        msg = device.publish_asset("random",x)
        print("Published asset",msg)
        # alternatively, you can publish more than one asset state at a time
        # by providing them as a dictionary to the following function (uncomment to test)
        # msg = device.publish_state({"random":x})
        # print("Published state",msg)
except Exception as e:
    print(e)
Take a look into the code. This python function "device.publish_asset("random",x)" sends a MQTT packet contains a payload ("random": {value}) to OKdo Cloud. It is the function to send data to OKdo Cloud. We must recognise this function later on.
msg = device.publish_asset("random",x)
來看一下代碼。python函数
device.publish_asset("random",x)发送包含payload"("random":{value})"的MQTT数据包到OKdo Cloud。它是向OKdo Cloud发送数据的函数。
此外,您还需要更改4个变量的内容, SSID, Password, device_id 和 device_token。 SSID和Password位于您的Wi-Fi网络设置下。我使用我的手机作为Wi-Fi热点,当然,我的手机也有连接到互联网(通过4G蜂窝网络)。关于device_id和device_token,它们是在云中用于验证设备。因此,它们是每个设备的唯一。您可以在OKdo Cloud中获取唯一的Device ID和Device Token。
回到您的浏览器。在你创建的Ground中,找到左边的"DEVICE"标签,然后点击你之前创建的裝置。您可以看到以下内容。

点击右上角的"SETTING",然后点击"Authentication"以查看您的Device ID和Token。它们是一个独特的string,包含英文字母,数字或符号。您可以找到类似的页面如下。

在找到这4个变量SSID, Password, device_id 和 device_token的内容后,我的变量是。
# Customize the following variables
ssid = "Rxxxxxxxs"                  # this is the SSID of the WiFi network
wifipwd = "axxxx"                   # this is the Password for WiFi
device_id = "MxxxxxxxxxxxxQ"        # this is the device identifier. Can be obtained from the OKDO cloud dashboard
device_token = "maker:4QRxxxxxJo0"  # this is the device token. Can be obtained from the OKDO cloud dashboard
在Zerynth Studio中,Verify并Upload您的代码。打开Console,以察看结果。

回到OKdo Cloud。 "random"的左侧显示一个数字。您可以单击"LIVE"或"CHARTS"查看显示的内容(如果在"LIVE"或"CHARTS"中看不到任何数据,请稍等片刻、在浏览器中重新加载页面,或将XinaBox拔出并再次连接PC USB )。

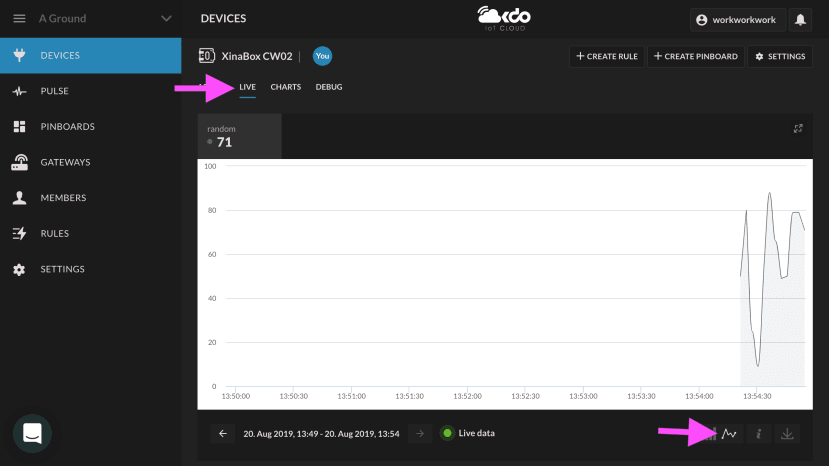
在"CHARTS"中,您可能看不到任何数据,如下图所示。您可以打开数据存储功能,以便将数据存储在OKdo Cloud中。

要打开数据存储,请导航到右上角的"SETTINGS"→"Data"类别下的"Data storage"→点击"Store Device Data"。当启用存储功能后,在底部会显示绿色通知。

之后,您可以在OKdo Cloud中查看所有过去的数据。(如看不到任何数据,请稍等片刻、在浏览器中重新加载页面,或将XinaBox拔出并再次连接PC USB )。

创建在线仪表板
在OKdo Cloud中,仪表板称为pinboard。您可以在此处决定显示哪些数据,您并可以设计数据的可视化方式。
查看视频,了解如何构建简单的仪表板。
从SW03天气传感器收集数据
在Zerynth Studio中,您只需导航到"Example"并搜索"SW03"。克隆项目"环境数据"并将此程序Uplink到XinaBox。可以在Console查看结果。
##############################################
#   This is an example for SW03 ambient
#   temperature, altitude and pressure
#   sensor.
#
#   Ambient temperature, altitude and pressure
#   is measured and printed out on the console.
##############################################
import streams
from xinabox.sw03 import sw03

streams.serial()

# SW03 instance
SW03 = sw03.SW03(I2C0)

# configure SW03
SW03.init()

while True:
    temp = SW03.getTempC()      # return temp in degree celcius
    alt = SW03.getAltitude()    # return alitude in meters
    pres = SW03.getPressure()   # return pressure in pascals

    print('Temperature: ', temp, ' C')
    print('Altitude   : ', alt, ' m')
    print('Pressure   : ', pres, ' Pa')

    sleep(1000)
将SW03传感器数据转发给OKdo Cloud
我们只需要将上面的代码整合,就能发送SW03数据至OKdo Cloud。传感器数据传可以显示在OKdo Cloud的仪表板中。
您必须更改 SSID,Password, device_id 和 device_token 变量。
这是合并后main.py的代码,亦可从附件下载此项目:
# xinabox_zerynth_okdo_mqtt
# Created at 2019-08-14 08:36:17.078318

#################### SETTING 1 <BEGIN> ####################
## Uploading data to OKDO Cloud
## Example: MQTT at OKDO Cloud IoT

import streams
from wireless import wifi
# choose a wifi chip (esp32)
from espressif.esp32net import esp32wifi as wifi_driver

# let's import the OKDO cloud modules; first the IoT module...
from okdo.iot import iot
# ...then the mqtt client
from okdo.iot import mqtt_client

# Let's define a global variable to store the publishing rate (in ms)
rate = 3000

# Customize the following variables
ssid = "Rxxxxxxxxxs"                  # this is the SSID of the WiFi network
wifipwd = "axxxxx4"                   # this is the Password for WiFi
device_id = "Qxxxxxxxxxxxxxx3"        # this is the device identifier. Can be obtained from the OKDO cloud dashboard
device_token = "maker:4xxxxxxxxxxxP"  # this is the device token. Can be obtained from the OKDO cloud dashboard

# Remember to add a device to your okdo cloud and define some assets:
# - a "rate" actuator, with type integer
# - a "random" sensor of type integer


def rate_cb(asset,value, previous_value):
    global rate
    value = int(value)
    if value<1000:
        value=1000
    rate=value
    print("Rate changed to",rate,"ms")


streams.serial()
#################### SETTING 1 <END> ####################


#################### SETTING 2 <BEGIN> ####################
## Collecting ambient temperature, altitude and pressure sensor.
## Example: environmental_data, for SW03 weather sensor

#import streams
from xinabox.sw03 import sw03

#streams.serial()

# SW03 instance
SW03 = sw03.SW03(I2C0)

# configure SW03
SW03.init()
#################### SETTING 2 <END> ####################

# As a counter
a=0

try:
    # Let's initialize the WiFi
    wifi_driver.auto_init()

    for _ in range(0,5):
        try:
            wifi.link(ssid,wifi.WIFI_WPA2,wifipwd)
            break
        except:
            print("Trying to connect...")
            sleep(2000)
    else:
        print("oops, can't attach to wifi!")
        raise IOError

    print("Connecting to OKDO IoT Cloud...")

    # let's create a device passing the id, the token and the type of client
    device = iot.Device(device_id,device_token,mqtt_client.MqttClient)

    device.connect()
    print("Device is connected")

    # define the callbacks to call when an asset command is received
    device.watch_command("rate",rate_cb)

    # start the device
    device.run()
    print("Device is up and running")

    while True:
        # sleep as indicated by rate
        sleep(rate)

    ############ Modified code <BEGIN> ############
        ###### SW03 weather sensor <BEGIN> ######
        temp = SW03.getTempC()      # return temp in degree celcius
        alt = SW03.getAltitude()    # return alitude in meters
        pres = SW03.getPressure()   # return pressure in pascals
        ###### SW03 weather sensor <END> ######
        a=a+1
        print("#", a)
        msg = device.publish_asset("temperature",temp)
        print("Published asset: Temperature",msg)
        msg = device.publish_asset("altitude",alt)
        print("Published asset: Altitude",msg)
        msg = device.publish_asset("pressure",pres)
        print("Published asset: Pressure",msg)
        print(".")
        print(".")
        # alternatively, you can publish more than one asset state at a time
        # by providing them as a dictionary to the following function (uncomment to test)
        # msg = device.publish_state({"random":x})
        # print("Published state",msg)
    ############ Modified code <END> ############

except Exception as e:
    print(e)
结果:

在OKdo Cloud中创建一个新的仪表板。视频显示了仪表板的结果。
我的文章
另一篇文章实例 - XinaBox气象站和ubidots云,介绍了XinaBox和Zerynth。有兴趣的可以去看看。