Pumpkin Robots
Follow project
 Dave from DesignSpark
Que pensez-vous de cet article ? Aidez-nous à vous fournir un meilleur contenu.
Dave from DesignSpark
Merci! Vos commentaires ont été reçus.
Dave from DesignSpark
There was a problem submitting your feedback, please try again later.
Dave from DesignSpark
Que pensez-vous de cet article ?
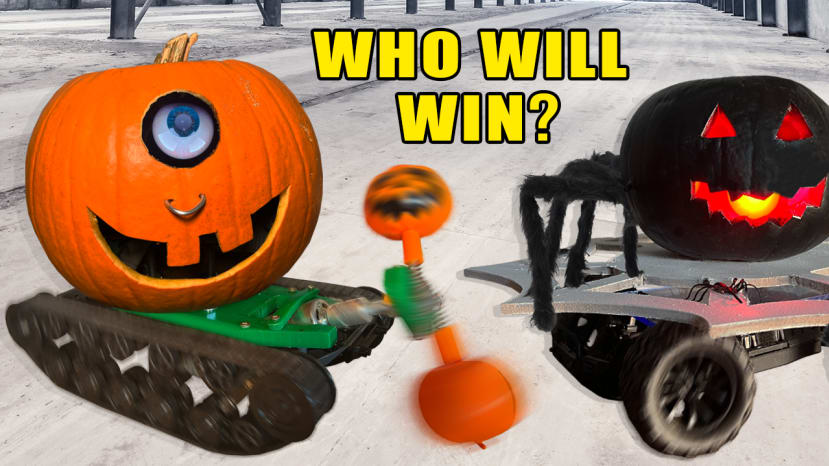 It's Pumpkin season, so we thought we would make them a little different. Robot Pumpkins! Think Robot Wars, but with pumpkins. A fun activity to do at home.
Parts list
| Qty | Produit | Part number | |
|---|---|---|---|
| 1 | Non-Rechargeable AA Alkaline Battery | 744-2199 | |
| 3 | RS PRO AA Battery Holder | 185-4633 | |
| 7 | Connector,Terminal,Block,with levers,3 conductor,400V,32A | 475-1437 | |
| 1 | Cutters,wire,general purpose,copper,electronic,130mm,flush | 060-6490 | |
| 1 | Wire Stripper | 399-1066 | |
You can make one and test it on an assault course, we made one each and battled them Robot Wars style. Watch the video here:
You Will Need:
- A Pumpkin
- A Remote Control Car (we used second-hand ones)
- Remote Control Relay Board (1 channel)
- Batteries (we used AA Batteries, but you could use a 9V battery or whatever battery makes your motos spin at a safe and fun speed) e.g. (744-2199)
- Battery Holder (make sure you get one to match your battery voltage) e.g. (185-4633)
- Old DC Motor
- Motor Coupler (to fit your motor)
- Wago Connectors or Terminal Blocks (475-1437)
- Plastic sheet material (we used old chopping boards & off cuts of acrylic)
- M8 nuts, bolts & washers
- Self-tapping screws
Tools:
- Wire cutters (060-6490) / strippers (399-1066)
- Serrated knife and large spoon (for pumpkin carving)
- Permanent Maker
- Electric Drill
- Adjustable Spanner
Let's Get Making!
1. Strip down your remote control car, removing any surplus bodywork.
2. Mark up your pumpkin with a marker pen and carve it using a knife and a large spoon, taking care when using a blade and getting adult supervision where needed.
Note: If you want to add an old phone with a cool animated eye like we did, then you can download the animated GIF graphic for that here: https://kidsinventstuff.com/wp-content/uploads/2022/10/Pumpkin-Eye50.gif
3. Test out the carrying ability of your stripped-down remote control car chassis to determine what size and weight of pumpkin might be able to be added to it, while not adding too much weight that it can’t drive!
4. Work out how to mount your pumpkin to your car chassis. We attached plastic plates made out of old chopping boards and off-cuts of acrylic using self-tapping screws.
5. We then drilled holes in our pumpkins and our plastic plates and used a series of M8 nuts, bolts & washers to join them together.
6. Work out what spinning battling element you’d like to add to your motor (we added spinning plastic pumpkins & a large spinning wooden spiders web). Attach these to your motor using an appropriately sized coupler.
7. Mount your motor onto your remote control pumpkin body. We did this using either a simple plastic plate to hold the motor down, or mini bolts into the threaded holes in the shaft end of the motor.
8. Connect your motor to your battery via the remote control relay board. We used Wago connectors to do this, with the components wired as shown in the diagram below:
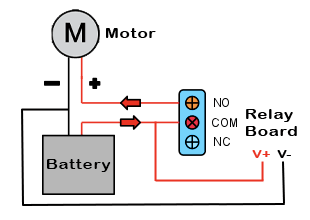
Note: Depending on what voltage you use for your battery, you may need to add a separate battery with an appropriate voltage to power the relay board separately from your motor.
9. Find a place to mount your wiring components on your battling pumpkin. We located all of ours inside our pumpkins!
10. Test your remote control to see if the motor works.
11. Finish decorating your battling pumpkins.
12. Battle!
Commentaires