在Raspberry Pi 4设计GUI介面,汇入机器学习模型实现人脸辨识篇
关注文章
 戴夫来自 DesignSpark
你觉得这篇文章怎么样? 帮助我们为您提供更好的内容。
戴夫来自 DesignSpark
Thank you! Your feedback has been received.
戴夫来自 DesignSpark
There was a problem submitting your feedback, please try again later.
戴夫来自 DesignSpark
你觉得这篇文章怎么样?

|
作者 |
许钰莨/曾俊霖 |
|
难度 |
简单 |
|
材料表 |
一支网络摄影机 屏幕、键盘、鼠标 |
本文章先备知识教学文章
使用Google Teachable Machine来实现Raspberry Pi 4 的影像分类推论
在Raspberry Pi 4设计GUI接口,汇入机器学习模型实现商品结账应用
本篇文章完整范例程序请由本文最下方附件下载
笔者在使用Teachable Machine时,发现网站除了可以分辨对象的图像外,也能分辨人脸,故智能商店才将此功能结合进去。本主题会将焦点会放在脸部的图像分类,在Teachable Machine收集人脸资料后,导出人脸的模型档案后,再使用Tkinter 的图形化接口设计一套分辨人脸系统。
本文将分成下列几个步骤来完成此专题
1.在Teachable Machine 收集人脸数据,并可以在网站上实时推论人脸图像
2.将模型汇入到RPI4,并可执行人脸图像分类程序
3.设计人脸GUI图形化接口之程序说明,并执行智能商店人脸程序
1.在Teachable Machine 收集人脸数据,并可以在网站上实时推论人脸图像
先在Teachable Machine网页训练人脸模型,相关步骤可以参考"使用Google Teachable Machine 来实现Raspberry Pi 4 的影像分类推论",考虑到一般的商店的结账系统,只要有人即可结账,并不会去纪录人名,所以在Teachable Machine 的模型卷标只有两种情形,有人和无人。

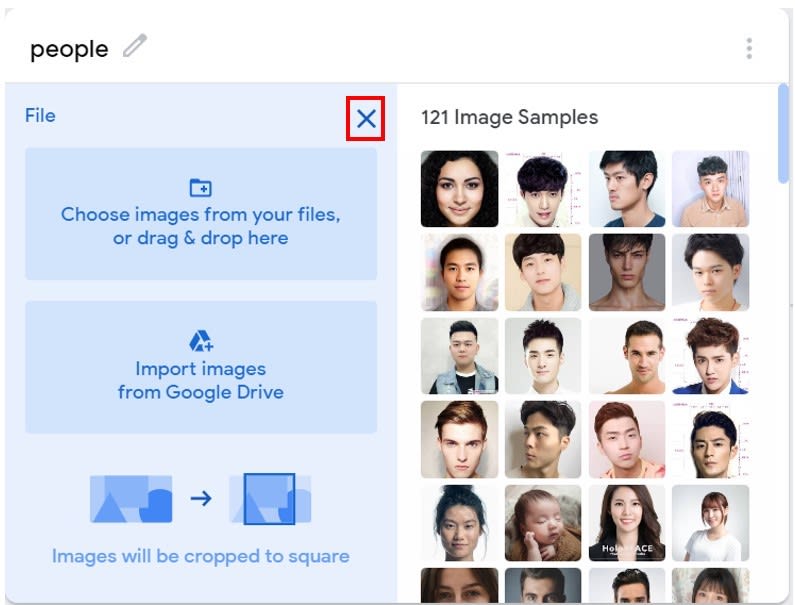
因为只要判别是否有人接近,所以笔者是到网络上收集男性和女性,东方人或西方人的脸孔图片约莫共120张,直接上传至"people"的标签中,读者也可以程序下载区Store-->face_dataset文件夹中找到图片,并且全选上传。另外当初也有想过拍照,但是拍的人数样本太少,不如直接上网收集人脸图片,也考虑到不同的肤色、年龄、地方相关的因素。
而收集没有人脸的图片则是可以直接设定用Webcam拍照即可。


设定计算机使用的摄影机,本次使用Webcam的是Logi C170

另外,建议可以在计算机外接一个Webcam,收集图片较为方便。

按下"Train Model" 即可开始训练模型。

因为在训练集中放入了相同两张有带口罩的人脸,所以即使戴着口罩,推论出来的结果也可以分类得出来是"people"。

无人脸接近则是"no_people"

但如果人脸太远离镜头,则也会被分类到"no_people"


输出模型

2.将模型汇入到RPI4,并可执行人脸图像分类程序
点选Tensorflow Lite -->Quantized-->Download my model

下载得到扩展名[专案名称]+.txt、.tflite的两个档案

请将下载的文件夹解压缩后,将两个档名分别改成"label_face.txt"和"model_face.tflite",并传送数据到Rpi4 的"Store"文件夹中。

在"Store"文件夹中有"TM2_tflite_new.py",可以执行程序,并将有无人脸的状态显示及预测值显示在窗口上面。
先移动文件夹位置到Store
$ cd Store/
执行程序
$ python3 TM2_tflite_new.py --model model_face.tflite --label labels_face.txt 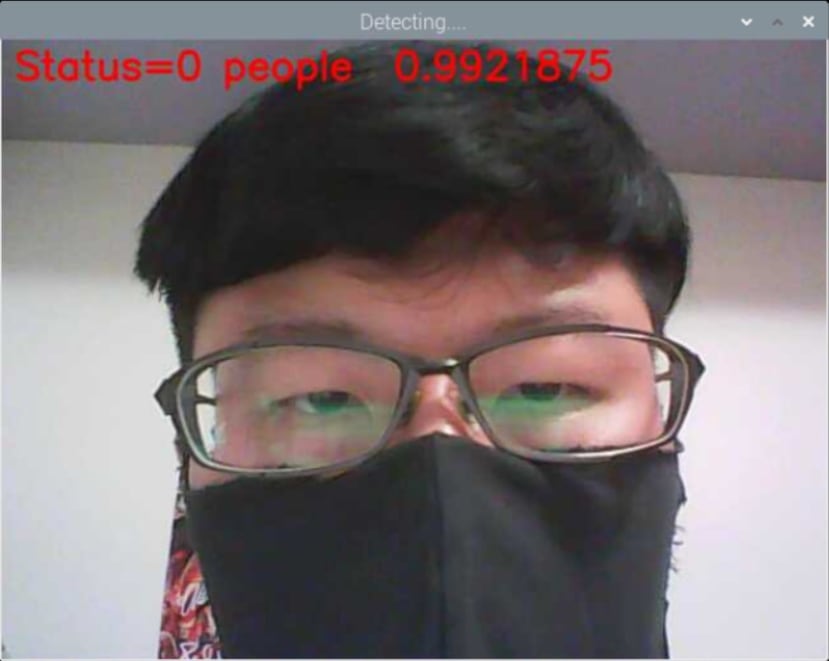
在执行程序的窗口中,笔者有将结果显示在窗口上,"0"为标签、"people"为预测出人脸的名称、"0.9921875"为预测值,说明能分辨出人脸类别的预测值为99%。
3.设计人脸GUI图形化接口之程序说明,并执行智能商店人脸程序
3-1人脸GUI图形化接口程序说明
设定窗口大小 300*300像素
 self.window.geometry('300x300')
 self.window.resizable(False, False)

开启Webcam摄影机
self.vid_0 = MyVideoCapture(self.video_source_0)
建立人脸尺寸为240*180像素的图像画布
self.canvas_face = tkinter.Canvas(window, width = 240, height = 180)
设置画布尺寸窗口中的于第0行第0列,在grid网格中使用"sticky"参数,是west向左对齐
self.canvas_face.grid(row=0, column=0, sticky="w")
建立具有拍照功能按钮,并名称为"Face",排列在第1行第0列
tkinter.Button(window, text="Face", command=self.face).grid(row=1, column=0)
Webcam得到影像后,必须使用PIL套件,才能在Tkinter 画布中显示动态影像。
  def face(self):
        ret_0, frame_0 = self.vid_0.get_frame()

        if (ret_0):
            Face_class(frame_0)


    def update(self):
        ret_0, frame_0 = self.vid_0.get_frame()


        #调整Webcam影像之画面大小,需和Tkinter画布同尺寸
        frame_0_small=cv2.resize(frame_0,(240,180))


        if ret_0:
            self.photo_2 = PIL.ImageTk.PhotoImage(image = PIL.Image.fromarray(frame_0_small))
            self.canvas_face.create_image(241,0,image = self.photo_2, anchor="ne")


        self.window.after(self.delay, self.update)
Webcam影像画面相关尺寸大小设定
class MyVideoCapture:
    def __init__(self, video_source):

        #将原本Webcam影像画面大小设定为320X240
        self.vid = cv2.VideoCapture(video_source)
        self.vid.set(cv2.CAP_PROP_FRAME_WIDTH,320)
        self.vid.set(cv2.CAP_PROP_FRAME_HEIGHT,240)


        if not self.vid.isOpened():
            raise ValueError("Unable to open video source", video_source)

        # 设定视讯来源的尺寸
        self.width = self.vid.get(cv2.CAP_PROP_FRAME_WIDTH)
        self.height = self.vid.get(cv2.CAP_PROP_FRAME_HEIGHT)

    def get_frame(self):
        if self.vid.isOpened():
            ret, frame = self.vid.read()
            if ret:
                # 将影像画面转换成RGB格式
                return (ret, cv2.cvtColor(frame, cv2.COLOR_BGR2RGB))
            else:
                return (ret, None)
        else:
            return (ret, None)

    # 释放影像资源
    def __del__(self):
        if self.vid.isOpened():
            self.vid.release()
做人脸图像推论,若侦测到人脸时则显示"欢迎光临智能商店",讯息会排序在第2行第0列中显示出来,并播放欢迎词音讯,也同时启动拍照功能。
class Face_class:
    def load_labels(self,path):
        with open(path, 'r') as f:
            return {i: line.strip() for i, line in enumerate(f.readlines())}

    def set_input_tensor(self, interpreter, image):
        tensor_index = interpreter.get_input_details()[0]['index']
        input_tensor = interpreter.tensor(tensor_index)()[0]
        input_tensor[:, :] = image


    def classify_image(self, interpreter, image, top_k=1):
        self.set_input_tensor(interpreter, image)
        interpreter.invoke()
        output_details = interpreter.get_output_details()[0]
        output = np.squeeze(interpreter.get_tensor(output_details['index']))

        # If the model is quantized (uint8 data), then dequantize the results
        if output_details['dtype'] == np.uint8:
            scale, zero_point = output_details['quantization']
            output = scale * (output - zero_point)

        ordered = np.argpartition(-output, top_k)
        return [(i, output[i]) for i in ordered[:top_k]]

    def __init__(self,image_src):
        labels = self.load_labels('/home/pi/Store/labels_face.txt')

        interpreter = Interpreter('/home/pi/Store/model_face.tflite')
        interpreter.allocate_tensors()
        _, height, width, _ = interpreter.get_input_details()[0]['shape']

        image=cv2.resize(image_src,(224,224))

        results = self.classify_image(interpreter, image)
        label_id, prob = results[0]


        if (labels[label_id] == "1 no_people"):
            labelExample = tkinter.Label(text="____________________")
            labelExample.grid(row=2, column=0)


        else :
            labelExample = tkinter.Label(text="____________________")
            labelExample.grid(row=2, column=0)
            labelExample = tkinter.Label(text="欢迎光临智慧商店")
            labelExample.grid(row=2, column=0)

            #开启拍照功能并存在face_collect文件夹中
            cv2.imwrite("face_collect/" + "face-" + time.strftime("%d-%m-%Y-%H-%M-%S") + ".jpg", cv2.cvtColor(image_src, cv2.COLOR_RGB2BGR))

            #播放欢迎光临音讯文件
            file=r'/home/pi/Store/welcome.mp3'
            while (pygame.mixer.music.get_busy()!=1):
                track = pygame.mixer.music.load(file)
                pygame.mixer.music.play()


#窗口标题为"智能商店"
App(tkinter.Tk(), "智慧商店")
3-2 执行程序画面及组件位置
执行Python程序
$python3 tk_cv_face.py
Tkinter排列的组件,分别为画布(Canvas)在第0行第0列、"Face"按钮(Button)在第1行第0列、文字卷标(Label)在第2行第0列。侦测到人脸时,除了可以播放音讯档案外,也同时会开启拍照功能,其目的在于收集使用者脸孔,可以达成两种目的,一、可以大致推论出性别或年龄,哪种族群较多人使用。二、可重新训练模型,虽然google taechable machine在一般的情况下已经可以侦测人脸,但数据集中却没有使用者的照片,会使得预测有稍微的偏差,若要符合真实情形,则需要将收集到的人脸照片到google taechable machine再做一次训练。
评论