Accelerometer Animal Tracker
Follow project
 Dave from DesignSpark
How do you feel about this article? Help us to provide better content for you.
Dave from DesignSpark
Thank you! Your feedback has been received.
Dave from DesignSpark
There was a problem submitting your feedback, please try again later.
Dave from DesignSpark
What do you think of this article?
Parts list
| Qty | Product | Part number | |
|---|---|---|---|
| 1 | ADAFRUIT Feather 32u4 Bluefruit LE MCU Development Board 2829 | 124-5513 | |
| 1 | FLORA LSM303 1247 ADAFRUIT INDUSTRIES, 3-Axis Accelerometer, Magnetometer, Serial-I2C, 14-Pin LGA | 905-4586 | |
| 1 | RS PRO, 3.7V, Lithium Polymer Rechargeable Battery, 2Ah | 125-1266 | |
| 1 | https://www.rs-online.com/designspark/lipo-battery-switch | Battery Switch | |
What does wildlife get up to when no-one's watching? Scientists are using accelerometers, such as those originally developed for airbags in cars or used in mobile phones, to find out. More is revealed in The Engineering Edge Podcast episode "The everyday tech revealing wildlife secrets".
I don't have any wildlife to track - but I do have Encke, a 12-year-old black labrador dog.
So I decided to see what sort of things the scientists can see ...
Full of bravado and over-confidence, I skimmed one of the Adafruit tutorials and set about connecting the LSM303 accelerometer & magnetometer to an Adafruit Flora board and covering it in Sugru (a moldable glue that helps to insulate the boards from each other). Only to discover when programming it, that I had no easy way of extracting the data for use later. The tutorial was the Citi Bike Helmet https://learn.adafruit.com/citi-bike-helmet/overview - which is ideal if you want to use the data "live".
So I then had to de-solder and unpick the Sugru. This is why the board below is covered in white sticky goo.

Having learnt my lesson, and done a bit more research, I used a breadboard and crocodile clips to make a working prototype before sticking it all together and using it!
Accelerometer Animal Tracker
1) Connect the LSM303 to an Adafruit Feather 32UE Bluefruit LE board
a) Make sure the wires are long enough to enable the LSM303 to be stuck to the Bluefruit board with the x-axis along the short side, and the y-axis pointing along the long side. (The x,y and z axes are labelled on the LSM303)
b) Using I2C, the wiring is:
3V to 3V (Shown with red wire)
Ground to Ground (Shown with black wire)
SCL to SCL (Shown with orange wire)
SDA to SDA (Shown with pink wire)

c) Stick the two boards together, using Sugru - the x-axis along the short side, and the y-axis pointing along the long side.
2) Install the Adafruit Bluefruit-LE Connect app
This allows Bluefruit LE devices to connect with your phone (Android or iPhone). Details can be found here: https://learn.adafruit.com/bluefruit-le-connect
3) Program the Adafruit Feather 32UE Bluefruit LE board
(Thanks to Andy Standford-Clark (@AndySC) for his help in combining some of the Adafruit examples to produce this).
Using the Arduino IDE select the Adafruit Feather 32U4 board and upload the required libraries. (Further info on this given in the Adafruit Tutorials https://learn.adafruit.com/lsm303-accelerometer-slash-compass-breakout/coding and https://learn.adafruit.com/adafruit-feather-32u4-bluefruit-le/setup)
Then copy and paste the code below to an empty sketch file and upload it to the Feather 32U4.
/*********************************************************************
 * This file is based on Adafruit's LE Connect Plotter - licence given below,
 * with adaptations by Andy Stanford-Clark and Lucy Rogers.
 * All errors are by Lucy Rogers. Sorry
 */

/*********************************************************************
  Bluefruit LE Connect Plotter
  for Feather Bluefruit -> Bluefruit LE Connect app

  outputs dummy values for demo use with BLuefruit LE Connect app
  change SEND_SECOND_PLOT define to 1 to output second plot using sine wave table

  Adafruit invests time and resources providing this open source code,
  please support Adafruit and open-source hardware by purchasing
  products from Adafruit!

  MIT license, check LICENSE for more information
  All text above, and the splash screen below must be included in
  any redistribution
*********************************************************************/

#include <Adafruit_LSM303_Accel.h>
#include <Adafruit_Sensor.h>
#include <Wire.h>

#include <Arduino.h>
#include <SPI.h>
#if not defined (_VARIANT_ARDUINO_DUE_X_) && not defined (_VARIANT_ARDUINO_ZERO_)
#include <SoftwareSerial.h>
#endif

#include "Adafruit_BLE.h"
#include "Adafruit_BluefruitLE_SPI.h"
#include "Adafruit_BluefruitLE_UART.h"
#include "BluefruitConfig.h"
#include "sine.h"

/*=========================================================================
    APPLICATION SETTINGS

      FACTORYRESET_ENABLE       Perform a factory reset when running this sketch

                                Enabling this will put your Bluefruit LE module
                              in a 'known good' state and clear any config
                              data set in previous sketches or projects, so
                                running this at least once is a good idea.

                                When deploying your project, however, you will
                              want to disable factory reset by setting this
                              value to 0.  If you are making changes to your
                                Bluefruit LE device via AT commands, and those
                              changes aren't persisting across resets, this
                              is the reason why.  Factory reset will erase
                              the non-volatile memory where config data is
                              stored, setting it back to factory default
                              values.

                                Some sketches that require you to bond to a
                              central device (HID mouse, keyboard, etc.)
                              won't work at all with this feature enabled
                              since the factory reset will clear all of the
                              bonding data stored on the chip, meaning the
                              central device won't be able to reconnect.
    MINIMUM_FIRMWARE_VERSION  Minimum firmware version to have some new features
    MODE_LED_BEHAVIOUR        LED activity, valid options are
                              "DISABLE" or "MODE" or "BLEUART" or
                              "HWUART"  or "SPI"  or "MANUAL"
    -----------------------------------------------------------------------*/
#define FACTORYRESET_ENABLE         0
#define MINIMUM_FIRMWARE_VERSION    "0.6.6"
#define MODE_LED_BEHAVIOUR          "MODE"
#define SEND_SECOND_PLOT            0
/*=========================================================================*/

// Create the bluefruit object, either software serial...uncomment these lines
/*
  SoftwareSerial bluefruitSS = SoftwareSerial(BLUEFRUIT_SWUART_TXD_PIN, BLUEFRUIT_SWUART_RXD_PIN);

  Adafruit_BluefruitLE_UART ble(bluefruitSS, BLUEFRUIT_UART_MODE_PIN,
                      BLUEFRUIT_UART_CTS_PIN, BLUEFRUIT_UART_RTS_PIN);
*/

/* ...or hardware serial, which does not need the RTS/CTS pins. Uncomment this line */
// Adafruit_BluefruitLE_UART ble(BLUEFRUIT_HWSERIAL_NAME, BLUEFRUIT_UART_MODE_PIN);

/* ...hardware SPI, using SCK/MOSI/MISO hardware SPI pins and then user selected CS/IRQ/RST */
Adafruit_BluefruitLE_SPI ble(BLUEFRUIT_SPI_CS, BLUEFRUIT_SPI_IRQ, BLUEFRUIT_SPI_RST);

/* ...software SPI, using SCK/MOSI/MISO user-defined SPI pins and then user selected CS/IRQ/RST */
//Adafruit_BluefruitLE_SPI ble(BLUEFRUIT_SPI_SCK, BLUEFRUIT_SPI_MISO,
//                             BLUEFRUIT_SPI_MOSI, BLUEFRUIT_SPI_CS,
//                             BLUEFRUIT_SPI_IRQ, BLUEFRUIT_SPI_RST);


/* Assign a unique ID to this sensor at the same time */
Adafruit_LSM303_Accel_Unified accel = Adafruit_LSM303_Accel_Unified(54321);


// A small helper
void error(const __FlashStringHelper*err) {
  Serial.println(err);
  while (1);
}


void displaySensorDetails(void) {
  sensor_t sensor;
  accel.getSensor(&sensor);
  Serial.println("------------------------------------");
  Serial.print("Sensor:       ");
  Serial.println(sensor.name);
  Serial.print("Driver Ver:   ");
  Serial.println(sensor.version);
  Serial.print("Unique ID:    ");
  Serial.println(sensor.sensor_id);
  Serial.print("Max Value:    ");
  Serial.print(sensor.max_value);
  Serial.println(" m/s^2");
  Serial.print("Min Value:    ");
  Serial.print(sensor.min_value);
  Serial.println(" m/s^2");
  Serial.print("Resolution:   ");
  Serial.print(sensor.resolution);
  Serial.println(" m/s^2");
  Serial.println("------------------------------------");
  Serial.println("");
  delay(500);
}

/**************************************************************************/
/*!
    @brief  Sets up the HW an the BLE module (this function is called
            automatically on startup)
*/
/**************************************************************************/
void setup(void)
{
  //  while (!Serial);  // required for Flora & Micro
  delay(500);

  Serial.begin(115200);
  Serial.println(F("Adafruit Bluefruit Command <-> Data Mode Example"));
  Serial.println(F("------------------------------------------------"));

  Serial.println("Accelerometer Test");
  Serial.println("");

  /* Initialise the module */
  Serial.print(F("Initialising the Bluefruit LE module: "));

  if ( !ble.begin(VERBOSE_MODE) )
  {
    error(F("Couldn't find Bluefruit, make sure it's in CoMmanD mode & check wiring?"));
  }
  Serial.println( F("OK!") );

  if ( FACTORYRESET_ENABLE )
  {
    /* Perform a factory reset to make sure everything is in a known state */
    Serial.println(F("Performing a factory reset: "));
    if ( ! ble.factoryReset() ) {
      error(F("Couldn't factory reset"));
    }
  }

  /* Disable command echo from Bluefruit */
  ble.echo(false);

  Serial.println("Requesting Bluefruit info:");
  /* Print Bluefruit information */
  ble.info();

  Serial.println(F("Please use Adafruit Bluefruit LE app to connect in UART mode"));
  Serial.println(F("Then Enter characters to send to Bluefruit"));
  Serial.println();

  ble.verbose(false);  // debug info is a little annoying after this point!

  /* Wait for connection */
  while (! ble.isConnected()) {
    delay(500);
  }

  Serial.println(F("******************************"));

  // LED Activity command is only supported from 0.6.6
  if ( ble.isVersionAtLeast(MINIMUM_FIRMWARE_VERSION) )
  {
    // Change Mode LED Activity
    Serial.println(F("Change LED activity to " MODE_LED_BEHAVIOUR));
    ble.sendCommandCheckOK("AT+HWModeLED=" MODE_LED_BEHAVIOUR);
  }

  // Set module to DATA mode
  Serial.println( F("Switching to DATA mode!") );
  ble.setMode(BLUEFRUIT_MODE_DATA);

  Serial.println(F("******************************"));

 /* Initialise the sensor */
  if (!accel.begin()) {
    /* There was a problem detecting the ADXL345 ... check your connections */
    Serial.println("Ooops, no LSM303 detected ... Check your wiring!");
    while (1)
      ;
  }

  /* Display some basic information on this sensor */
  displaySensorDetails();

  accel.setRange(LSM303_RANGE_4G);
  Serial.print("Range set to: ");
  lsm303_accel_range_t new_range = accel.getRange();
  switch (new_range) {
  case LSM303_RANGE_2G:
    Serial.println("+- 2G");
    break;
  case LSM303_RANGE_4G:
    Serial.println("+- 4G");
    break;
  case LSM303_RANGE_8G:
    Serial.println("+- 8G");
    break;
  case LSM303_RANGE_16G:
    Serial.println("+- 16G");
    break;
  }

  accel.setMode(LSM303_MODE_NORMAL);
  Serial.print("Mode set to: ");
  lsm303_accel_mode_t new_mode = accel.getMode();
  switch (new_mode) {
  case LSM303_MODE_NORMAL:
    Serial.println("Normal");
    break;
  case LSM303_MODE_LOW_POWER:
    Serial.println("Low Power");
    break;
  case LSM303_MODE_HIGH_RESOLUTION:
    Serial.println("High Resolution");
    break;
  }


}


void loop(void) {


  /* Get a new sensor event */
  sensors_event_t event;
  accel.getEvent(&event);

  // send the results to BLE
  ble.print(event.acceleration.x);
  ble.print(",");
  ble.print(event.acceleration.y);
  ble.print(",");
  ble.print(event.acceleration.z);
  ble.println();  //print newline so app knows to plot the values


  /* Display the results (acceleration is measured in m/s^2) */
  Serial.print("X: ");
  Serial.print(event.acceleration.x);
  Serial.print("  ");
  Serial.print("Y: ");
  Serial.print(event.acceleration.y);
  Serial.print("  ");
  Serial.print("Z: ");
  Serial.print(event.acceleration.z);
  Serial.print("  ");
  Serial.println("m/s^2");

  /* Delay before the next sample */
  delay(500);


}
4) Test 1
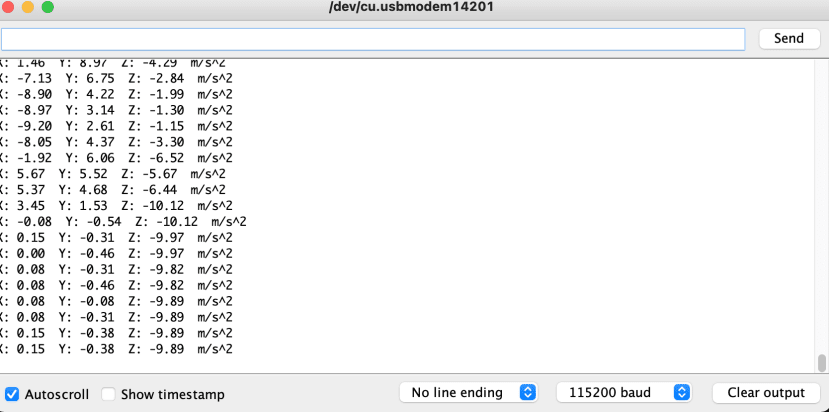
Once the file is uploaded, open the Arduino IDE Serial Monitor, and you will see x,y and z values. Move the LSM303 to an Adafruit Feather 32UE Bluefruit LE board combination, and the numbers will change.
5) Test 2
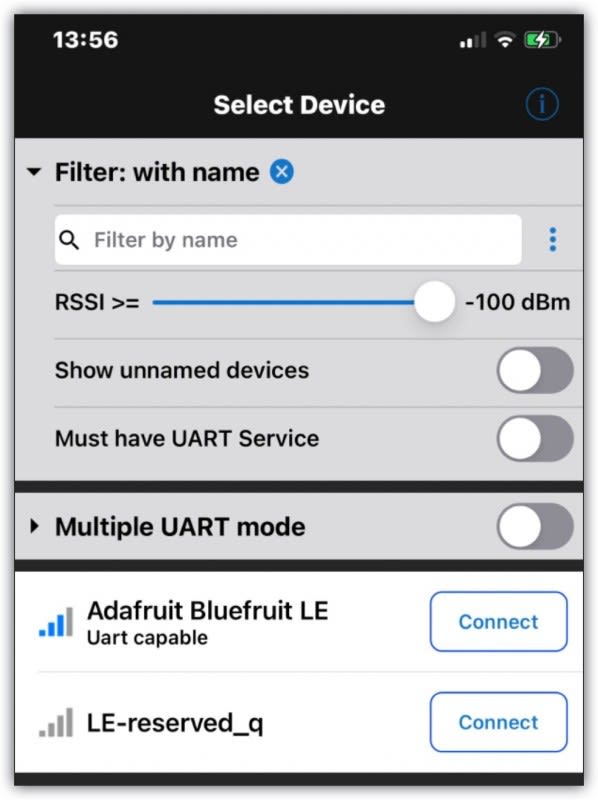
a) Open the Bluefruit LE Connect app and under "select device", click "Connect" next to the "Adafruit Bluefruit LE Uart capable" device.
b) Click UART and you will see the same numbers as appearing in the Serial Monitor.

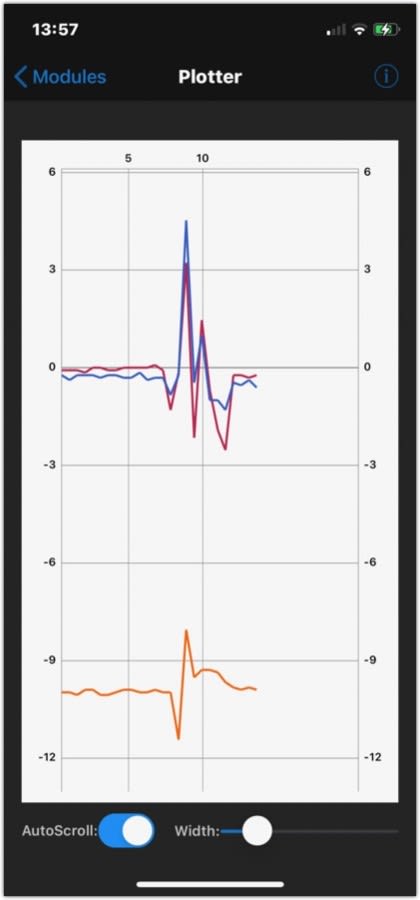
Click back "Modules" and then select "Plotter" and you will see x, y and z plotted on a graph.
6) Make it mobile
a) Make a switch such as described here: https://www.rs-online.com/designspark/lipo-battery-switch - this will allow the device to be turned on and off without having to pull out the fiddly JST connector.
b) Connect the LiPo battery to the Bluefruit 32U4 via the switch, and stick the battery to the boards using Sugru as an insulator and adhesive.
NOTE: The LiPo battery will have an effect on the magnetometer and accelerometer.
c) Place the assembly into a waterproof container.

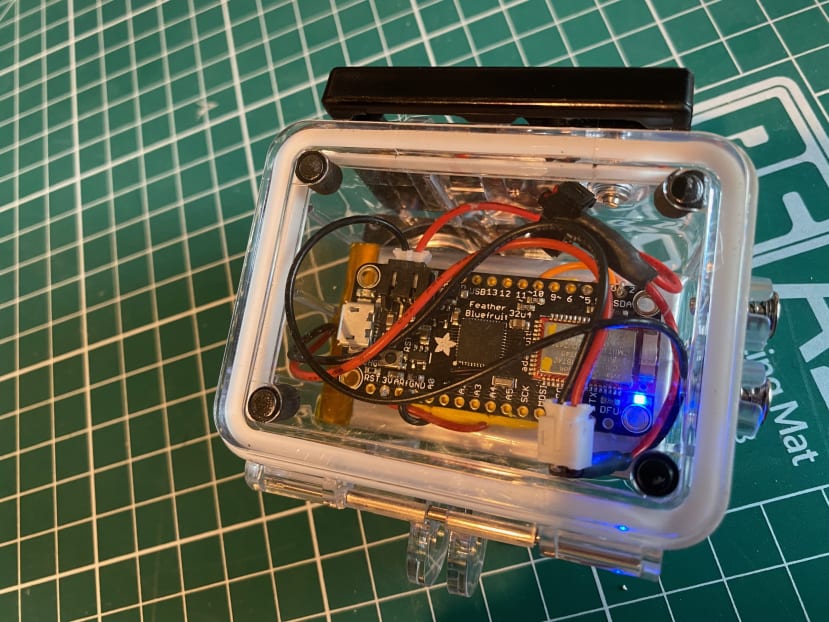
d) Attach to your animal.

7) Track your animal
Watch your animal and the graph, and see which movements correlate to which plots.
Here Encke the dog was (not in order), running, ambling, walking, trotting etc.
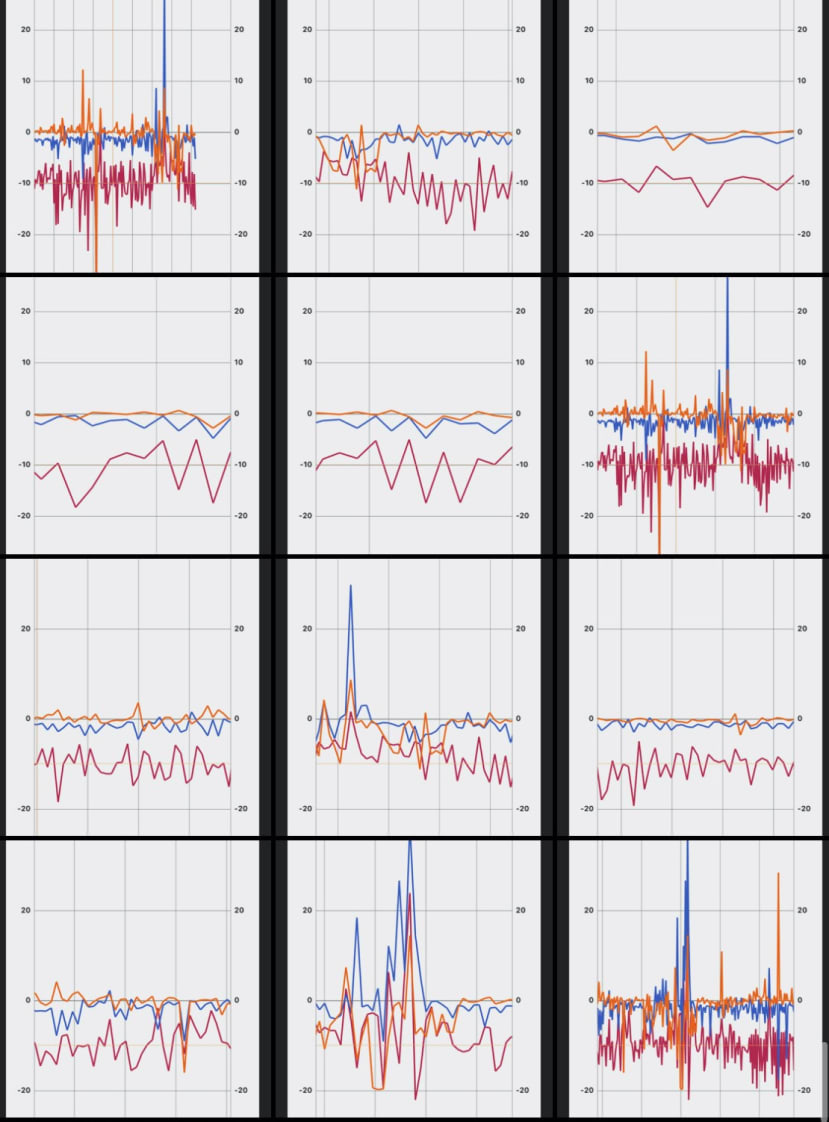
These pictures were all taken as screenshots from the phone. However, the numerical values in the UART tab can be copied and pasted into other files for later analysis.
I can now see what my dog gets up to when I'm not watching! Although, with this setup, the device needs to be within about 10m of my phone for me to pick up the data.
To listen to the main episode visit: The everyday tech Revealing Wildlife Secrets