The Connected Campervan | Building A Sensor Database | ROCK 5B
Follow article
 Dave from DesignSpark
How do you feel about this article? Help us to provide better content for you.
Dave from DesignSpark
Thank you! Your feedback has been received.
Dave from DesignSpark
There was a problem submitting your feedback, please try again later.
Dave from DesignSpark
What do you think of this article?
In the last article, we successfully managed to design and build an environmental sensor cluster that we needed to monitor conditions within our off-grid living environment as part of the connected campervan project. Using a BBC micro:bit as a dedicated sensor node, we could collect and send an array of environmental sensor data periodically back to our data server, hosted on our ROCK 5B.
This sensor data included things like temperature, humidity and light levels which will all be used to dynamically monitor different metrics within our campervan, as well as any broader atmospheric and meteorological changes. Most importantly however, this hardware will inform the quantitative part of our research into the feasibility of off-grid lifestyles and green alternatives.
Given that all of our data so far comes from digital sources, it makes sense for us to now establish a method of storing these data points for future interpretation, and to identify trends over time. This article therefore will focus on establishing the database part of our local data server.
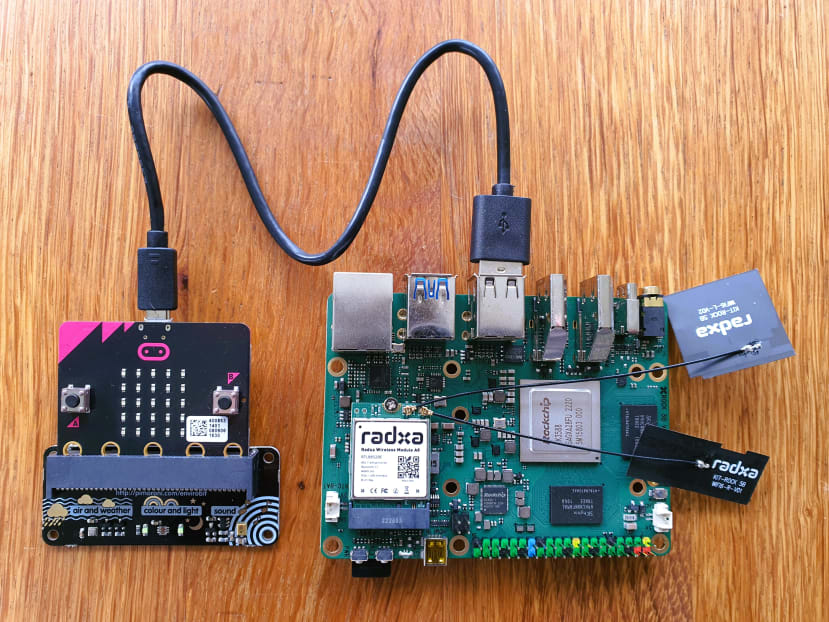
Current hardware setup with sensor cluster and data server
Method
This project has so far derived a lot of its design from a number of server-side influences, including the use of Linux and Node.js to serve dynamic web pages to a connected user. In sticking with this theme, and with an aim to finish our data-server, we will be looking to add a database service to our project which will give us a robust method of recording and interacting with historic sensor data.
While the obvious choice for any database would be MySQL, I did have some trouble installing the service on the ROCK board. In contrast, I had a much easier time installing the MariaDB variant of MySQL which is a very popular open-source fork for both desktop and single-board computers.
sudo apt update
sudo apt install mariadb-server
sudo mysql_secure_installation
Installing MariaDB and setting a password
Installing MariaDB was very straightforward and, as we always hope with Linux distributions, is just a matter of using the apt install command to sort everything out for us, while using the sudo command if we need permissions. We can then configure the service and set a password for the root user using the secure installation command as MariaDB doesn’t like the default being left as a blank space.
sudo npm install mariadbSetting up the MariaDB package in Node
We can then do much the same in node, by adding the MariaDB package using the npm command (node package manager), as we have done with other Node packages in the past. MariaDB is now ready to use within the Node.js environment.
mysql -u [username] -p[password]
CREATE DATABASE CampervanData
Accessing the database service in the terminal and creating a new database in the shell
The only prerequisite we really need after installation, is to create our project-specific database by jumping into the MariaDB/MySQL shell with our newly defined username and password. For now, I am using the root username for simplicity, and I have aptly named the database containing the data taken from our campervan… Campervan Data.
Once MariaDB has been setup, we are ready to build our database functions in Node. In this project, we will first need to establish the format that our database table will use, what sensor data we will be storing, and how often it will be stored. For our initial trial and error testing, we will be keeping track of temperature, pressure, humidity and light in five-minute intervals, over a period of an hour.
const mariadb = require('mariadb');
async function SensorDBSetup() {
console.log("Setting up DB");
let conn = await mariadb.createConnection({
  host: 'localhost',
  user: 'root',
  password: '[password]',
database: 'CampervanData'
 });
try{
// delete old short-term data table on startup
await conn.query('DROP TABLE IF EXISTS SensorData');
// create new data table for time data
const result = await conn.query('CREATE TABLE IF NOT EXISTS SensorData (minute VARCHAR(255), temperature VARCHAR(255), pressure VARCHAR(255), humidity VARCHAR(255), light VARCHAR(255))');
// now initialise the table with each 5 minute row, and 0 data for each sensor
await conn.query("INSERT INTO SensorData (minute, temperature, pressure, humidity, light) VALUES " +
"('0', '0', '0', '0', '0'), " +
"('5', '0', '0', '0', '0'), " +
"('10', '0', '0', '0', '0'), " +
"('15', '0', '0', '0', '0'), " +
"('20', '0', '0', '0', '0'), " +
"('25', '0', '0', '0', '0'), " +
"('30', '0', '0', '0', '0'), " +
"('35', '0', '0', '0', '0'), " +
"('40', '0', '0', '0', '0'), " +
"('45', '0', '0', '0', '0'), " +
"('50', '0', '0', '0', '0'), " +
"('55', '0', '0', '0', '0') "
);
console.log(result);
}
catch(err)
{
console.log(err);
}
finally {
  conn.end();
}
}
Database setup function
The code above illustrates our setup function that is called once at the beginning of the code, where we are using a non-blocking thread to create a connection to our local database service, using the credentials and database name we previously established.
Once complete, we can then create a new table inside our database, intuitively called Sensor Data, to hold our historic sensor values, where we can populate it with the appropriate column names and formatting, as well as the default sensor values for every five-minute increment. With the setup complete, we can close the connection to our database at the end of the setup function.
Note that for debugging purposes we are currently deleting (dropping) and recreating this table to save any confusion between Node sessions. Also, note that the syntax of any database queries sent through MariaDB are basically the same as MySQL.
async function SensorDBUpdate() {
let conn = await mariadb.createConnection({
  host: 'localhost',
  user: 'root',
  password: '[password]',
database: 'CampervanData'
 });
let current_temp = String(Cluster_Temperature);
let current_press = String(Cluster_Pressure);
let current_humid = String(Cluster_Humidity);
let current_light = String(Cluster_Light);
let current_time = new Date();
let current_min = String(current_time.getMinutes());
try{
await conn.query("UPDATE SensorData SET temperature = " + current_temp + " WHERE minute = " + current_min);
await conn.query("UPDATE SensorData SET pressure = " + current_press + " WHERE minute = " + current_min);
await conn.query("UPDATE SensorData SET humidity = " + current_humid + " WHERE minute = " + current_min);
await conn.query("UPDATE SensorData SET light = " + current_light + " WHERE minute = " + current_min);
}
catch(err)
{
console.log(err);
}
finally {
  conn.end();
}
}
Database update function
Once our database table has been setup, we can start periodically populating it with real data taken from our sensor cluster that we configured in the previous article. In much the same way as before, we can create a connection to our database service using our predefined credentials, but this time we can start populating our table with actual sensor data.
To do this, we first need a reference to the current time, as well as access to the predefined variables that hold the most recent data taken from the sensor cluster. For the former, we are using the native JavaScript Date class to read the current time from the OS, and for the latter, we are just using the global variables that we established in a previous article and converting them to strings.
Finally, we can use the UPDATE MySQL command to SET the values of each row in our database table WHERE the current minute taken from the OS needs to match one of the five-minute intervals that exists in the minute column of the database table. We can then just let the system run for an hour until the table is populated.
mysql -u [username] -p[password]
USE CampervanData
SELECT * FROM SensorData
Access shell again in terminal, open the database and view table
We can check the status of our table and any historic data using the MySQL shell and the commands featured above, where we should be presented with a graphical representation of our populated Sensor Data table that resides within our Campervan Data database.
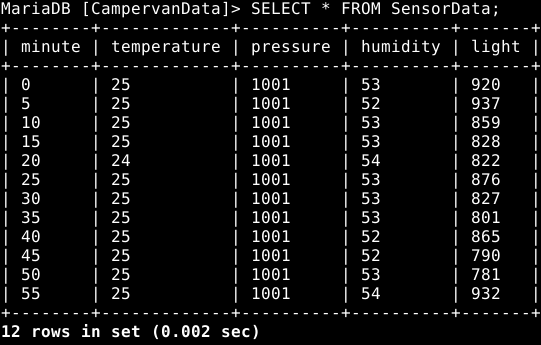
Viewing the recorded sensor data over an hour
With that now complete, we have successfully recorded our first set of environmental data into our database service that runs alongside our local server on the ROCK 5B.
Conclusion
While it has taken a lot of trial and error to get this far, we now have a great foundation to expand our data logging and analytical capabilities within the campervan. In the future, we will likely look at implementing a more long-term time-series database, potentially logging the status of our off-grid environment over months and even years. MariaDB and MySQL are particularly well equipped to continuously run and create new records with very minimal computing and memory resources, this also means I can run the server 24/7 using the onboard solar and battery storage currently installed on the van, and the server should eventually be able to monitor the conditions of these too.