The Connected Campervan | Collecting Environmental Data | ROCK 5B
Follow article
 Dave from DesignSpark
How do you feel about this article? Help us to provide better content for you.
Dave from DesignSpark
Thank you! Your feedback has been received.
Dave from DesignSpark
There was a problem submitting your feedback, please try again later.
Dave from DesignSpark
What do you think of this article?
In the previous article, we underlined the importance of both empirical and numeric data in the discussion around sustainability, and how we can use this data to raise awareness of existing low-impact alternatives and to further develop emerging solutions. To this end, we started to build a local data server using the powerful ROCK 5B single-board computer, that will eventually be able to collect, log, visualise and interpret key metrics taken from inside our off-grid campervan.
So far, we have managed to build the foundation of our data server, using the popular Node.js runtime to serve a dynamic web-interface to our local browser and use HTTP requests to retrieve periodic updates. However, while our initial attempts worked brilliantly, it was a bit underwhelming as we were not using live sensor data… that is until now.
This article will therefore focus on collecting real environmental data from a cluster of sensors that will be mounted inside our off-grid living space, using the very capable BBC micro:bit and the rather brilliant enviro:bit breakout board from Pimoroni.
Parts List
- OKdo ROCK 5B
- ROCK 5B Wireless Module
- BBC micro:bit v1 development board
- Pimoroni enviro:bit breakout board
The Proposal
In this article then, we will be making good use of the micro:bit platform alongside its surprisingly powerful MicroPython code base, to build a dedicated sensor cluster for our connected campervan project. This will serve as the first and most diverse data point that our server will have access to inside our mobile living space and will include:
- Magnetic heading angle
- Pitch and roll positioning angles
- Temperature
- Pressure
- Relative humidity
- Calculated altitude
- Light intensity
Acting as the cluster controller, the micro:bit can then process, format and send this information off to our data server on the ROCK 5B using a USB serial connection. It is also worth noting that this setup can also double as a thermostat for controlling the internal temperature automatically, as well as a weather station for predicting meteorological conditions when placed near an open window.
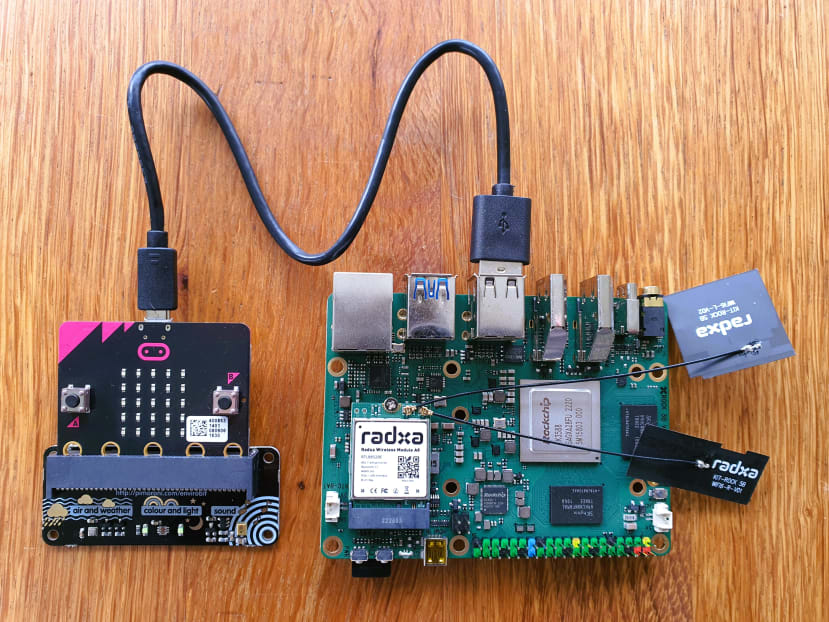
The proposed sensor cluster and data server hardware setup
Building the Sensor Cluster
In order to make best use of our available hardware, we will be developing our sensor cluster in the Mu editor, which is an excellent tool for developing Micropython code specifically for micro:bit. We will also need to download and import the premade code libraries for the enviro:bit sensor board.
# IMPORTS
import bme280
import tcs3472
import microbit
import math

# INITS
bme = bme280.bme280()  # BME280 Humidity, Pressure and Temperature Sensor
light_sensor = tcs3472.tcs3472()  # TCS3472 Visable Light and Colour Sensor
There is a lot to like about MicroPython, but largely its appeal is in its refreshing ability to get low-level functions up and running extremely quickly and effortlessly. As in this project, we can import our libraries and initialise each sensor module with just four lines of code.
# MAIN LOOP
while True:
    # Read onboard sensors to determine magnetic heading, pitch and roll
    MB_Heading = microbit.compass.heading()
    MB_Pitch = van_pitch()
    MB_Roll = van_roll()

    # Read BME280 Air Values
    EB_Temp = int(bme.temperature())  # return the temperature in degrees C
    EB_Press = int(bme.pressure())  # return the pressure in hectopascals/millibars (100 pascals) - 1 bar = 100,000 pascals
    EB_Humid = int(bme.humidity())  # return the relative humidity in %
    EB_Alt = int(bme.altitude())  # return the altitude in feet, calculated against average pressure at sea level

    # Read the TCS3472 Light Values
    EB_Light = light_sensor.light()  # return a raw reading of light level on a scale of 0-65535


    # CSV Data Structure: Heading,Pitch,Roll,Temperature,Pressure,Humidty,Altitude,Light
    print(str(MB_Heading) + "," + str(MB_Pitch) + "," + str(MB_Roll) + "," + str(EB_Temp) + "," + str(EB_Press) + "," + str(EB_Humid) + "," + str(EB_Alt) + "," + str(EB_Light))
    microbit.sleep(1000)  # Sleep for 1 second
We can then define our main loop and immediately start reading a broad range of data from the sensor modules we just initialised.
# FUNCTIONS
# for van levelling and off-road driving
def van_pitch():
    # get accelerometer readings for hill incline in degrees
    pitch_y = microbit.accelerometer.get_y()
    pitch_z = microbit.accelerometer.get_z()
    pitch_result = int(math.degrees(math.atan2(pitch_y, -pitch_z)))
    return pitch_result

def van_roll():
    # get accelerometer readings for side camber
    roll_x = microbit.accelerometer.get_x()
    roll_z = microbit.accelerometer.get_z()
    roll_result = int(math.degrees(math.atan2(roll_x, -roll_z)))
    return roll_result
Any additional data processing can then be done in custom function definitions, in this case, we are deriving pitch and roll angles of the van from the onboard accelerometer using the trigonometric methods in the MicroPython math module.
# CSV Data Structure: Heading,Pitch,Roll,Temperature,Pressure,Humidty,Altitude,Light
    print(str(MB_Heading) + "," + str(MB_Pitch) + "," + str(MB_Roll) + "," + str(EB_Temp) + "," + str(EB_Press) + "," + str(EB_Humid) + "," + str(EB_Alt) + "," + str(EB_Light))
    microbit.sleep(1000)  # Sleep for 1 second
Once all our data has been collected and properly formatted, we can use the default print method to output our results as a string over the USB port, which will be connected to our ROCK board. Each data packet is defined in much the same way as a CSV file, where each variable is separated with a comma and each dataset is marked with a newline character. We then can send these messages periodically and use the sleep method to define the frequency of updates. This formatting method will make receiving and unpacking our sensor data extremely easy when it reaches our data server.
const serialport = require('serialport');
var SerialPort = serialport.SerialPort;

// don't change this, it works
var USB_Serial = new SerialPort({path: "/dev/ttyACM0", baudRate: 115200,}); // default REPL/Serial baud rate of the microbit
In order to receive this data then, we need to modify our previously written Node.js code to handle incoming serial events from the USB port. To this end, we can use the serialport node library to initialise a serialport object using the known path and baudrate of the USB port associated with the micro:bit.
// parse microbit print() serial data to console
const data_parser = USB_Serial.pipe(new serialport.ReadlineParser({ delimiter: '\r\n' }))
data_parser.on('data', function(MB_Data)
{
let CSVData = MB_Data.split(',') // seperate out data

Cluster_Heading = CSVData[0];
Cluster_Pitch = CSVData[1];
Cluster_Roll = CSVData[2];
Cluster_Temperature = CSVData[3];
Cluster_Pressure = CSVData[4];
Cluster_Humidity = CSVData[5];
Cluster_Altitude = CSVData[6];
Cluster_Light = CSVData[7];
});
We can then attach a parser object to the port that will trigger a read event when it detects the newline character in the serial data sent from the micro:bit. We can then unpack our data using the JavaScript native split method and output our variables to an array using the comma as a delimiter.

The updated user-interface now features a lot more real and dynamic data
These variables can then be stored locally on the server as the most up-to-date sensor values, which can then be requested over HTTP from our web interface. Lastly, we can then update our client-side HTML to include these new real and dynamic values, and watch them automatically change with the physical orientation of the micro:bit, as well as any movement in ambient air and light conditions.
Conclusion
Having successfully finished our sensor cluster, the data server is now looking a lot more functional, and it’s very exciting to see such a wide range of data-points being periodically updated through the user-interface. I have also been greatly impressed with how well both the micro:bit and enviro:bit boards work together to create a reliable and effortless development experience. It was also a very simple matter to catch any USB serial data on the other end using Node and ROCK. Needless to say, I am looking forward to seeing how well we can use this data in our off-grid living environment.
For more details on this project check out the latest annotated code available on the Kickstart Kamper GitHub.