Setting up a C/C++ Development Environment on the ROCK 4 C+
Follow article
 Dave from DesignSpark
How do you feel about this article? Help us to provide better content for you.
Dave from DesignSpark
Thank you! Your feedback has been received.
Dave from DesignSpark
There was a problem submitting your feedback, please try again later.
Dave from DesignSpark
What do you think of this article?
Since one of the areas I like to do projects in with single-board computers such as the ROCK 4 C+ is audio, C and C++ tend to be the weapons of choice. Therefore, when I was setting up my board, getting all the necessary programs installed and setting up some quality-of-life ~stuff~ was the first order of business. This article aims to act as a streamlined (as opposed to the rather circular path I took without the hindsight I now possess) overview of how to do so. If you’re getting set up for DIY ROCK projects but inexperienced with jumping through Linux-shaped hoops and installing tools from source, I think this will be helpful.
What do we need
The three main categories of software we need to start writing C/C++ code are as follows:
- A compiler
- Other build tools
- An editor
So that’s what we’ll go through in order. This is assuming you have already gone through the first-time setup instructions available here. It’s especially important you download the Linux image file and flash the SD card. I used the Debian Bullseye image.
Step 1: A Compiler
Since we’re using Linux, I decided to stick wi-
But Wait! Here be Dragons!
I discovered after an unfortunate amount of effort that the version of Debian in the downloadable image was hard-frozen in 2021. This means that without any further tomfoolery, any packages installed via apt will be stuck in whatever version was available at the time, and we’re going to want much newer versions of our tools. A fix for this is to add the following line to the /etc/apt/sources.list file:
deb http://ftp.ie.debian.org/debian bookworm mainTo get the latest stable releases for Debian 12. I’m using the IE mirror because I’m in Ireland, you should use whichever location suits you best listed here. After adding this line, you should run
$ sudo apt update && sudo apt upgradein your terminal (press Ctrl + Alt + T) to upgrade all pre-installed packages. Now, we’re ready to rock and/or roll.
Step 1: A Compiler
Since we’re using Linux, I decided to stick with GCC (the GNU Compiler Collection). Many of the common compilers and build tools are included in the build-essential package, so run sudo apt update && sudo apt install build-essential.
We can verify we got g++ 12 installed in the terminal now and seeing the following output:
$ g++ --version
g++ (Debian 12.2.0-14) 12.2.0
or something similar. This is important, since we need at least version 11 to use C++23. Confirm that this has set up the alternative c++ command properly by running c++ --version and seeing the same output as above. If this is not the case, you can update this by running
$ sudo update-alternatives --set c++ /usr/bin/g++Step 2: Other Build Tools
So we have a compiler, but it is uncommon to run the compiler directly. Instead, this responsibility is usually given to a build system or build system generator like CMake. The other important tool we’ll need is Git, for acquiring libraries and other tools and our own version control. Let’s get both of these installed in much the same fashion as installing anything else by running:
$ sudo apt update && sudo apt install cmake gitIf you have a GitHub account, you’ll need to configure Git by running in your terminal:
$ git config --global user.name <your name>
$ git config --global user.email <your email>
$ git config --global credential.helper store
The last line means that after Git prompts you for your username and password the first time you push or pull a repository, those credentials will be stored.
Step 3: An Editor
We’ve got the essential compilers and build tools, but still need a program to write code with that will give us a pleasant experience. I opted to use Neovim since it’s lightweight and will run well on the ROCK board as opposed to a full-blown IDE, but more customisable than regular Vim. You could just as well use Emacs, Sublime Text, VSCode, and many others, but I will quickly explain how I got Neovim running on the ROCK board.
As a side note, you may prefer to run the board in headless mode and SSH into it from another machine. In this case, you don’t need an editor installed on the board itself.
You can install Neovim through apt with the usual sudo apt update && sudo apt install neovim. However, the latest release for Neovim available through apt (with the bookworm source added earlier) is 0.7, and to ensure any plugins we install are working as well as they can, I’d prefer to use a newer version. I chose to install Neovim 0.9 from source.
With a terminal open in an appropriate location on the filesystem (I usually make a dev folder in Documents), pull the appropriate branch from the Neovim Git repository:
$ git clone https://github.com/neovim/neovim.git -b release-0.9 --depth 1The flags at the end make sure we’re getting the latest stable 0.9 release branch, and doing a “shallow clone” of only the most recent commit instead of the entire commit history for the sake of space and time.
Once it’s cloned, you can follow the (rather simple) build instructions, including making sure you have the correct dependencies:
$ sudo apt update
$ sudo apt install ninja-build gettext cmake unzip curl
$ make CMAKE_BUILD_TYPE=RelWithDebInfo
$ sudo make install
This worked for the first time for me. After installation is done, you should be able to run nvim in your terminal and see:

I won’t go into detail on the plugins I use for UI/quality of life, but here is my init file. However, I will go through how I installed plugins for intellisense and syntax highlighting for C and C++ specifically.
After setting up vim-plug for package management, I installed the coc plugin using their installation instructions. We can then get the coc-clangd extension using their installation instructions to connect coc to the clangd language server for code completion and analysis for C and C++. The latest clangd language can be installed through apt, with:
$ sudo apt update && sudo apt install clangdThe coc GitHub page has a lot of configuration examples, the parts that I added to my `init.vim` are as follows:
" Navigation shortcuts
nmap <silent> gd <Plug>(coc-definition)
nmap <silent> gy <Plug>(coc-type-definition)
nmap <silent> gi <Plug>(coc-implementation)
nmap <silent> gr <Plug>(coc-references)
nmap <silent> gn <Plug>(coc-rename)
" Use return to accept code completion
inoremap <silent><expr> <CR> coc#pum#visible() ? coc#pum#confirm() : "\<C-g>u\<CR>\<c-r>=coc#on_enter()\<CR>"
" Use tab/shift tab to cycle through completion options
inoremap <silent><expr> <TAB> coc#pum#visible() ? coc#pum#next(1) : CheckBackspace() ? "\<Tab>" : coc#refresh()
inoremap <expr><S-TAB> coc#pum#visible() ? coc#pum#prev(1) : "\<C-h>"
" Control + space to retrigger completion
inoremap <silent><expr> <C-space> coc#refresh()
" K to show documentation for a symbol in floating window
nnoremap <silent> K :call ShowDocumentation()
function! CheckBackspace() abort
    let col = col('.') - 1
    return !col || getline('.')[col - 1] =~# '\s'
endfunction
function! ShowDocumentation()
    if CocAction('hasProvider', 'hover')
        call CocActionAsync('doHover')
    else
        call feedkeys('K', 'in')
    endif
endfunction
" Highlight all occurrences of the same symbol under the cursor
autocmd CursorHold * silent call CocActionAsync('highlight')
For syntax highlighting, I used nvim-treesitter. This is also simple to install using vim-plug, and to make it trigger when opening a file I added the following code to the end of my init.vim:
lua <<EOF
require'nvim-treesitter.configs'.setup({
    ensure_initialised = "maintained",
    sync_install = false,
    highlight = {
        enable = true,
        additional_vim_regex_highlighting = false,
    }
})
EOF
Grammars for various languages can be installed by going into command mode in Neovim by pressing : and using the TSInstall command.
:TSInstall cpp
:TSInstall c
:TSInstall cmake
:TSInstall python
:TSInstall vim
Now, we can open up a new C++ file with nvim test.cpp and see code completion, documentation, and static analysis.


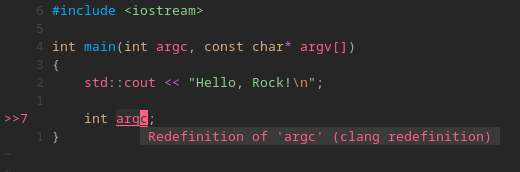
Bonus: Easily Set Up New Projects
Because I always forget how to write CMake files and .gitignore files even though I’ve done it a bajillion times, I like to have a script that can easily spit out the skeleton of a new project for me. I did this using Python, which should already be on the board but you can make sure it is installed using
$ sudo apt update && sudo apt install python3The script is available here, and contains the following code:
#!/usr/bin/python3
import argparse
import os
parser = argparse.ArgumentParser(description='Create a new C/C++ project directory')
parser.add_argument('project_name', type=str, help='The name of the new project being created')
def main():
    args = parser.parse_args()
    project_name = args.project_name
    cwd = os.getcwd()
    project_dir = os.path.join(cwd, project_name)
    if os.path.isdir(project_dir):
        raise FileExistsError(f'{project_dir} already exists!')
    # Create folder
    os.mkdir(project_dir)
    source_dir = os.path.join(project_dir, 'src')
    os.mkdir(source_dir)
    # Create main file
    main_file_text = """#include <fmt/core.h>
int main([[maybe_unused]] int argc, [[maybe_unused]] const char* argv[])
{
    fmt::print("Hello, Rock!\\n");
}
"""
    with open(os.path.join(source_dir, 'main.cpp'), 'w') as f:
        f.write(main_file_text)
    cmake_file_text = f"""cmake_minimum_required(VERSION 3.23)
project({project_name})
include(FetchContent)
set(CMAKE_EXPORT_COMPILE_COMMANDS ON)
FetchContent_Declare(fmt
    GIT_REPOSITORY https://github.com/fmtlib/fmt.git
    GIT_TAG master
)
FetchContent_MakeAvailable(fmt)
add_executable({project_name} src/main.cpp)
set_property(TARGET {project_name} PROPERTY CXX_STANDARD 23)
if (CMAKE_BUILD_TYPE MATCHES Debug)
    target_compile_definitions({project_name} PRIVATE {project_name.upper()}_DEBUG)
endif()
target_compile_options({project_name} PRIVATE -Wall -Wextra -Wpedantic -Werror)
target_link_libraries({project_name} PRIVATE fmt::fmt-header-only)
"""
    with open(os.path.join(project_dir, 'CMakeLists.txt'), 'w') as f:
        f.write(cmake_file_text)
    gitignore_text = """# Prerequisites
*.d
# Compiled Object files
*.slo
*.lo
*.o
*.obj
# Precompiled Headers
*.gch
*.pch
# Compiled Dynamic libraries
*.so
*.dylib
*.dll
# Fortran module files
*.mod
*.smod
# Compiled Static libraries
*.lai
*.la
*.a
*.lib
# Executables
*.exe
*.out
*.app
# Generated Folders
build/**/*
"""
    with open(os.path.join(project_dir, '.gitignore'), 'w') as f:
        f.write(gitignore_text)
    print(f'Successfully created {project_dir}!')
if __name__ == '__main__':
    main()
As well as making a directory for the project, it creates a main C++ file that prints "Hello, Rock!" to the screen, a .gitignore file that ignores common build output, and a CMakeLists.txt file. Since I like to use libfmt for console output and string formatting over the standard library, the CMakeLists.txt I'm generating here is set up to clone libfmt from GitHub into the build folder when you build the project and link to it there.
The CMake file also sets the C++ standard to 23 (the latest standard) and adds the -Wall -Wextra -Wpedantic -Werror compiler flags to catch more warnings and flag them as errors to avoid common bugs and inaccuracies in our code. By setting CMAKE_EXPORT_COMPILE_COMMANDS to ON, a file will be emitted in the build folder that our clangd extension in Noevim will use to give code analysis based on our compiler options. I also like to set a handy preprocessor definition for debug mode that will be the project name (in upper case) followed by _DEBUG.
You can make the Python script callable globally by running the following commands from a terminal in the same directory as the script:
$ sudo cp setup_proj.py /usr/bin/setup_proj
$ sudo chmod +x /usr/bin/setup_proj
The script uses a shebang, so after copying it to /usr/bin/ without the .py extension and making it executable with chmod we can call it anywhere. By running
$ setup_proj MyProjectwe get the following structure generated from the directory we called the script from:
├── MyProject
    ├── CMakeLists.txt
    ├── .gitignore
    └── src
        └── main.cpp
Let’s see if it works!
$ cd MyProject
$ mkdir build
$ cmake -B build -S .
$ cmake --build build
$ ./build/MyProject
Hello, Rock!
Conclusion
In this article, we’ve gone through installing the various programs necessary to start writing C and C++ code as well as some basic setup for the Neovim editor and some quality-of-life tools on the Okdo ROCK 4 C+ single board computer. I hope this was helpful for you, please leave a comment if you had any issues, and stay tuned for projects in the future!