ROCK 4 C+ | How to run Debian from a SSD disk
Follow article Dave from DesignSpark
How do you feel about this article? Help us to provide better content for you.
Dave from DesignSpark
Thank you! Your feedback has been received.
Dave from DesignSpark
There was a problem submitting your feedback, please try again later.
Dave from DesignSpark
What do you think of this article?
ROCK 4 C+ boots and run the system from a micro-SD card, which is fine because it is a simple installation of the system in a small form factor. But SD cards have also two big disadvantages: (1) they are slow, especially for writing, so if you need to store your data on the SD card and the data is big you will experience a performance degradation. And (2) SDs have a limited number of writes before they die, so if your system writes its data on the SD continuously at one point in time the SD card will fail; in my experience with a data collector system I built the SD card survived for about a year before failing irremediably, and the BIG problem was that there was no previous sign of failure before all data was lost.
To cope with these limitations the operating system takes some precautions to write as rarely as possible to the SD (one notable precaution is to write the log files into a ramdisk). But the issue remains with your data located on the SD card.
Fortunately, ROCK 4 C+ has an eMMC socket that you can use to run the system from. But eMMC boards are quite expensive even for small sizes (16GB costs around 30EUR on AliExpress, and the programming adapter will be another 4 or 5 EUR). And 16GB is still a small memory nowadays...
But what about running the system from an external USB drive? ROCK 4 C+ has two USB3.0 ports and in combination with an external SSD disk promise to deliver a very good speed, not talking that an SSD will not wear out like an SD card (well, it will wear out eventually, but the controller chip inside the disk will take care what and where to write data so the lifespan of an SSD disk is much, much longer)
Let's explore this idea further. I started with a Debian Bullseye downloaded from the official distributions: https://www.okdo.com/software-hub/. Choose the ROCK 4 Model C+ and select "Debian 11 Desktop (Linux 5.10) for ROCK 4 C+" which will download the latest image ("rock-4c-plus_debian_bullseye_kde_b55.img.xz" in my case).
Let's talk a bit about the principles of what we will do next. The ROCK 4C+ boots from the micro-SD card (accessed through mmcblk0 device) that contains two partitions, one formatted as VFAT and the second one as ext4 which is also the system, or root partition. What we want to do is to move the second partition to the SSD disk and trick somehow the booting process into loading the root partition from SSD instead of the SD card. The SD card will still have to stay in the ROCK 4 C+ as it is responsible for the initial part of the boot process, but because it will not be used to run the system it can be quite small, maybe an 8GB card or even smaller (the system uses about 4.5GB of space).
The system "knows" which partition to load as root by looking into some configuration files. One of them tells the boot process what is the identifier of the root partition (a partition can be referred to in several ways, but the most common and safe one is to use UUIDs of the partitions). Another file is used during the boot process to mount several notable partitions, and this file is simply called "fstab".
What we want to do is to take a copy of the root partition that is initially located on the micro-SD card and copy it onto the SSD disk. Then we change the UUIDs to point to the root partition on the SSD instead of the root partition on the SD card. This is the principle we will apply, but not without sweating a bit.
So let's start. Write the downloaded image to a SD card using Etcher, insert the SD in the ROCK and start the system. Login is user: "radxa" with password "radxa", so you can now update and upgrade it as usual:
sudo apt-get update
sudo apt-get upgrade
Now connect the SSD disk by using a USB to SATA adapter, preferably one that supports USB 3.0 to get the maximum speed. Plug the USB connector of the USB to SATA adapter into the lower USB 3.0 port (the blue one near the wired LAN connector) and type the command:
lsblk
This will list the block devices attached to ROCK 4 C+, something like:

My SSD disk is sda and has one partition (from a previous test I have done with this disk on another system). First, it must be wiped out by deleting all existing partitions:
sudo gdisk /dev/sda
and keep pressing d for delete while all partitions are removed. Then write the changes with "w" and that will exit gdisk. Verify that the SSD is now empty by typing again lsblk, now only the sda device should be present.
So now it's time to copy the system from the SD card onto the SSD. There are several ways to do that, including a raw copy (disk duplication), but I prefer another approach. We will use a Windows system and a backup and restore application to back up the root partition of the SD card onto a temporary location on the hard disk, and then restore it onto the SSD; this approach has several advantages such as space-saving (we will back up and restore only the root partition of the SD card), ability to roll over if something wrong happens, and also benefit of "intelligent" back up.
As for backup and restore applications on Windows there are many options, among them Aomei backupper (https://www.ubackup.com) or PARAGON Backup & Recovery Community Edition (https://www.paragon-software.com/free/br-free/).
Let's shut down the ROCK 4 C+, and take both the SD card and the SSD disk to a Windows system. Connect them both, use the backup and restore utility to back up the root partition of the SD card (the second partition) onto a temporary location on the hard disk, and then restore it onto the SSD. I prefer to back up and restore only the root partition, not the entire SD card, but you can do a duplicate of the whole SD card onto the SSD if you want.
So now we have: the micro-SD card with the running system, and an SSD with a copy of the root partition. Now it's time to connect the SSD and the SD card back to the ROCK 4 C+ and do the second part: trick the system to load the root system from the SSD instead of the SD card.
Now a quick note: insert the SD card into the ROCK without connecting the SSD disk, boot it and after it has booted now connect the SSD disk (you will see immediately why - hint: it's about UUIDs that can be doubled).
First, we will need to ensure there are no duplicate root partitions in the system:
lsblk -o NAME,SIZE,TYPE,UUID
and that may produce an output like this:
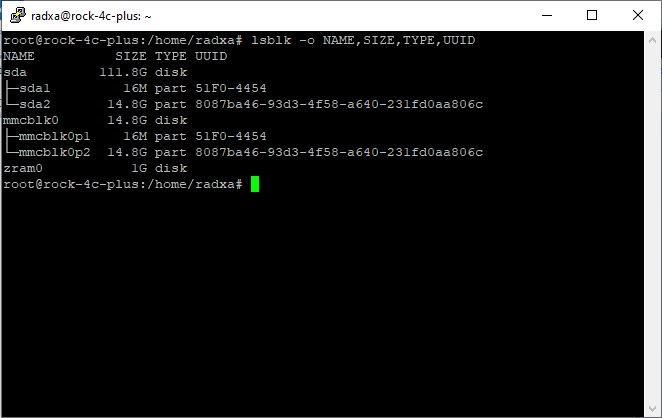
Here we can see that the root partition on the SSD disk has the same UUID as the root partition on the micro-SD card. This happens because some restore utilities blindly copy all sectors of the backup, including the one that contains the UUID (Aomei backupper does this). Other restore utilities offer an option to preserve or not the original ID (Paragon Backup & Recovery has something similar).
Anyway, we need to ensure that there are no duplicate UUIDs for the two root partitions.
But if the partition on the SSD has the same ID we must regenerate the UUID of the root partition on the SSD. The command is:
sudo tune2fs -O metadata_csum_seed -U random /dev/sda2
lsblk -o NAME,SIZE,TYPE,UUID
and write down the new UUID of the root partition, it will be needed later:

The last thing that is left to be done is to trick the system to load the root partition on the SSD instead of the root partition of the SD card. This can be accomplished by editing a boot configuration file called "extlinux.conf" and located in "/boot/extlinux". But first, we make a safety copy of it:
sudo cp /boot/extlinux/extlinux.conf /boot/extlinux/extlinux.conf.bak
Now we can edit the file:
sudo nano /boot/extlinux/extlinux.conf

Go to the line that says:
append root=UUID=8087ba46-93d3-4f58-a640-231fd0aa806c loglevel=4 console=tty0 .......
and replace the string after root=UUID with the new UUID of the root partition on SSD disk, so it will look like this:
append root=UUID=8a8aaa3f-cee2-43ae-ae74-c7d56156f3b4 loglevel=4 console=tty0 .......
Be aware that there might be multiple entries (i.e. more than one place where you need to make the change).Now just save the file (CTRL-O) and exit the editor (CTRL-X).
The second file that has to be changed is called fstab:
sudo nano /etc/fstab

Again, replace 8087ba46-93d3-4f58-a640-231fd0aa806c with the UUID of the root partition on the SSD disk 8a8aaa3f-cee2-43ae-ae74-c7d56156f3b4. Now just save the file (CTRL-O) and exit the editor (CTRL-X).
The last command updates the configuration files used by the boot loader to take into account the changes we made:
sudo u-boot-update
Now reboot the system
sudo reboot
After the system restarts (you can tell if it loads the root partition from the SSD by monitoring the activity LED on the USB to SATA adapter). Or you can use df to see the mount points, particularly for / (which is the root filesystem):

If you want to see the benefits of running from an SSD disk, you can test the performance using the following tool:
sudo curl https://raw.githubusercontent.com/TheRemote/PiBenchmarks/master/Storage.sh | sudo bash
Here is the result with the SSD disk connected to the lower USB 3.0 port:
| Category | Test | Result |
|---|---|---|
| HDParm | Disk Read | 271.78 MB/s |
| HDParm | Cached Disk Read | 222.89 MB/s |
| DD | Disk Write | 128 MB/s |
| FIO | 4k random read | 20521 IOPS (82084 KB/s) |
| FIO | 4k random write | 10893 IOPS (43574 KB/s) |
| IQZone | 4k read | 26802 KB/s |
| IQZone | 4k write | 22221 KB/s |
| IQZone | 4k random read | 16180 KB/s |
| IQZone | 4k random write | 23129 KB/s |
| Score | 6671 |
Compare these results with the same benchmark that was run before moving the root partition to SSD (i.e. running all from the micro-SD card):
| Category | Test | Result |
|---|---|---|
| HDParm | Disk Read | 58.18 MB/s |
| HDParm | Cached Disk Read | 62.77 MB/s |
| DD | Disk Write | 19.5 MB/s |
| FIO | 4k random read | 3071 IOPS (12287 KB/s) |
| FIO | 4k random write | 668 IOPS (2674 KB/s) |
| IQZone | 4k read | 8762 KB/s |
| IQZone | 4k write | 3024 KB/s |
| IQZone | 4k random read | 8198 KB/s |
| IQZone | 4k random write | 2140 KB/s |
| Score | 1049 |
Please note that the performance improvement is due to the USB 3.0 speed; if you connect the same SSD disk to a USB 2.0 port (one of the two most far from the wired LAN port) there will be not much improvement compared to the micro-SD card (though you will still benefit of the longer life of the disk). Here is a benchmark with the SSD connected to one of the USB 2.0 ports:
| Category | Test | Result |
|---|---|---|
| HDParm | Disk Read | 32.17 MB/s |
| HDParm | Cached Disk Read | 31.84 MB/s |
| DD | Disk Write | 31.3 MB/s |
| FIO | 4k random read | 4010 IOPS (16043 KB/s) |
| FIO | 4k random write | 3940 IOPS (15762 KB/s) |
| IQZone | 4k read | 7747 KB/s |
| IQZone | 4k write | 7294 KB/s |
| IQZone | 4k random read | 6506 KB/s |
| IQZone | 4k random write | 7693 KB/s |
| Score | 2054 |
And in the end, this is a picture of how the system looks like:
