MercuryRover's Journey to Redefine Custom RC Cars
Follow project Dave from DesignSpark
How do you feel about this article? Help us to provide better content for you.
Dave from DesignSpark
Thank you! Your feedback has been received.
Dave from DesignSpark
There was a problem submitting your feedback, please try again later.
Dave from DesignSpark
What do you think of this article?
 In the ever-evolving world of custom-built RC cars, innovation often sets the exceptional projects apart from the rest. MercuryRover isn't just another remote-controlled car; it's a journey of ingenuity, creativity, and forward-thinking engineering.
Parts list
| Qty | Product | Part number | |
|---|---|---|---|
| 1 | 24V, 2A DC motor | ||
| 1 | 6V DC motor | ||
| 1 | LN298N DC motor driver | ||
| 1 | IBT-2 43A DC motor driver | ||
| 1 | Raspberry Pi 4 Model B | 182-2096 | |
| 1 | PS4 controller | ||
| 1 | Raspberry Pi Zero | ||
| 1 | XL4015 Buck Converter | ||
| 1 | LTC3780 Buck Boost Converters | ||
| 3 | 21700 li-ion battery | ||
| 1 | 3s Battery Management System | ||
| 1 | 6V 330MA 2W solar cell | ||
| 1 | 18650 li-ion battery | ||
| 5 | Surface-Mount LEDs | ||
| 2 | Toggle switches | ||
| 1 | Rocker Switch | ||
| 1 | TP4056 li-ion18650 battery charger | ||
| 1 | XL6009E1 Buck Boost Converter | ||
This remarkable project is born from a humble origins of a thesis testing rig and has rapidly transformed into a symbol of cutting-edge innovation in the world of DIY robotics and sustainable technology.
A Childhood Spark: Collecting Parts and Unleashing Imagination
My journey with electronics and tinkering began at a young age when I had a habit of collecting electronic parts from broken RC toys. I've always had a knack for rescuing discarded components and turning them into something new. One of my earliest creations was a pencil fan made from a motor and blades salvaged from a broken RC helicopter—a little invention that sparked a lifelong passion for engineering and innovation. Over the years, I've been gathering components and building a treasure trove of electronics that became invaluable in the creation of MercuryRover. These components, collected since I was young, have finally found their place in this project, adding a layer of sentimental value to the innovation.
Addressing a Need for Speed: The Challenge at Hand
The genesis of MercuryRover can be traced back to a pressing problem—a challenge that demanded an innovative solution. The original testing rig, laden with all the additional hardware I needed for my project, had a significant drawback—it was painfully slow. It was a limitation that needed to be overcome, setting the stage for ingenuity to flourish.

Figure 1: Original testing rig.
Student Ingenuity: Maximizing Limited Resources
As a student with a tight budget, I had to get creative. I leveraged components collected from university projects, drew upon the knowledge I gained in my academic pursuits, and even incorporated extra parts from my brother's MSc project and components from friends. Every piece played a crucial role in turning a modest budget into a canvas for innovation.
Revolutionary Power Utilization: A Hairdryer Motor's Second Life
At the core of MercuryRover's innovation is an ingenious approach to power utilization. I decided to repurpose a recycled 24V, 2A DC motor from a discarded hairdryer as the car's propulsion motor. This move not only reduced electronic waste but also demonstrated my commitment to sustainable practices, all while delivering impressive performance.
Adaptation and Innovation: Hacking the Original Base
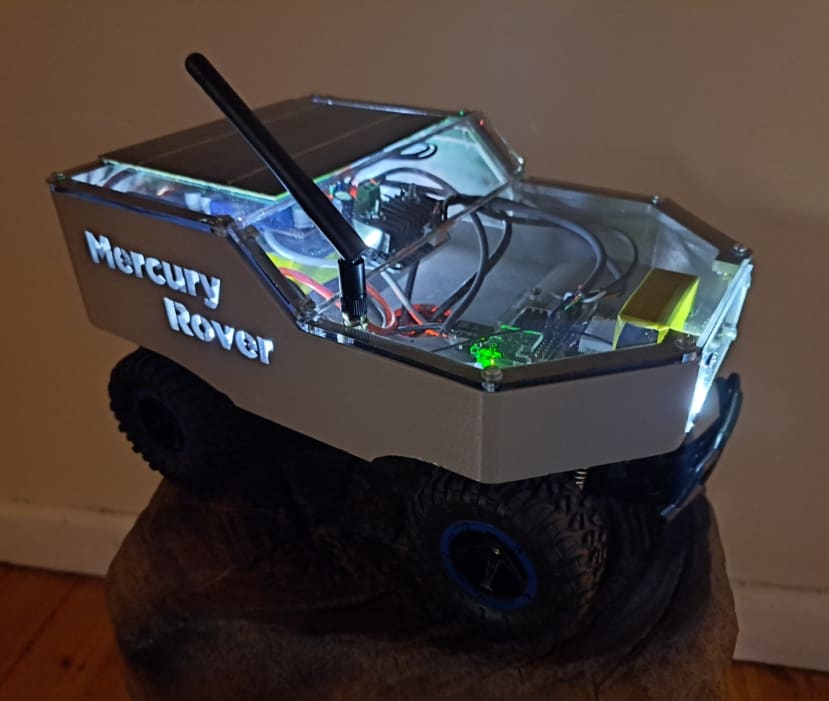
To unleash the full potential of the hairdryer motor, I knew I needed to make a daring modification. It wasn't the original steering motor that lacked speed and torque; it was the rear motor. So, I decided to hack into the original base of the testing rig. I expertly fitted the larger hairdryer motor in place of the original rear motor, turning MercuryRover into a speedy RC car. Its name, a fusion of the Roman god Mercury's swift attributes and the vehicle's agile design, emerged as a testament to its transformation. I retained the original 6V DC motor for steering to maintain precise control. This resourceful approach not only saved time and effort but also ensured a sturdy foundation for MercuryRover's enhanced performance.
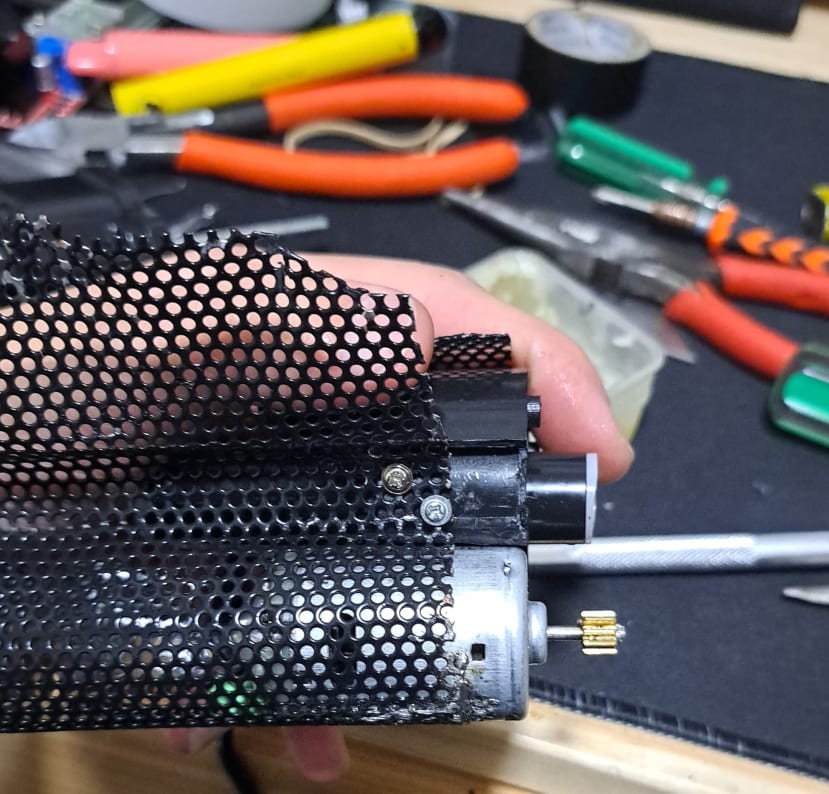

Figure 2: Hacking into the base of RC car.
Innovative Motor Control: LN298N and IBT-2 Motor Drivers
For precise motor control, MercuryRover employs two motor drivers. The steering motor is managed by an LN298N DC motor driver, providing the necessary control and drive for responsive steering. The hairdryer motor, the powerhouse of propulsion, is controlled and driven by an IBT-2 43A DC motor driver, a critical component that I acquired from a friend.
Raspberry Pi: The Brain of MercuryRover
To control the two motor drivers, I initially used a Raspberry Pi 4 Model B, which I had on hand from my thesis work. I developed a Python script in collaboration with the Evdev library to read input signals from a PS4 controller connected via Bluetooth—the remote controller for the car. Upon receiving signals from the controller's linear switches, the Python script generated the relevant PWM signals, which were then transmitted via the Raspberry Pi's GPIO pins to the motor drivers for precise speed control. This setup allowed me to command MercuryRover's movements intuitively through the PS4 controller.
A Regretful Turn of Events
It's worth noting that I encountered a significant setback in the project. In an unfortunate turn of events, I sent an excessive amount of power to the LN298N motor driver, resulting in its malfunction and an unintended high voltage surge to the Raspberry Pi 4 GPIO pins. This incident was a regrettable mishap that I still remember vividly.
Resilience and Adaptation: A New Raspberry Pi and Generosity
Despite the setback, I was unwavering in my determination to get MercuryRover back on track. I made the decision to use a Raspberry Pi Zero, which I obtained from my university's embedded course, as the new control unit. Additionally, I replaced the blown LN298N motor driver with a similar one, albeit with reduced power requirements. Fortunately, one of the lab technical officer at the university had the exact motor driver on hand, and he generously provided it to me.
Efficient Power Management: XL4015 Buck and LTC3780 Buck Boost Converters
Another fundamental aspect of MercuryRover's innovation lies in its efficient power management system. To power the entire system, I employed three 21700 Li-ion batteries in series to create a 12V, 4800mAh battery. To ensure the safe and efficient operation of the 3-cell lithium-ion battery pack, a 3s BMS (Battery Management System) is used. It oversees functions such as charging, balancing, and most importantly, protection. With the BMS in place, the battery is safeguarded against overcharging, over-discharging, and short-circuiting, enhancing the overall reliability and safety of the project.
To ensure consistent and stable power distribution, I integrated an XL4015 DC-DC Buck Converter. This component effectively dropped the 12V output of the battery to a stable 5V, 2.5A power supply, precisely tailored for the Raspberry Pi's requirements. To meet the power demands of the hairdryer motor through the IBT-2 motor driver, I implemented an LTC3780 DC-DC Buck-Boost Converter. This remarkable device stepped up the 12V input to a robust 20V, unleashing the full potential of the hairdryer motor while maintaining optimal control and performance.

Figure 3: Power distribution circuit diagram.
Sustainability Statement: Solar-Powered Progress
A defining feature of MercuryRover is its unwavering commitment to sustainability. The seamless integration of a 6V 330MA 2W solar cell into the design not only showcases a dedication to eco-friendly solutions but also symbolizes a visionary step toward greener technology. While the solar panel may not fully charge the primary 12V, 4800mAh battery, it effectively powers a separate 18650 li-ion battery, illuminating the car's LEDs with sustainable energy. An XL6009E1 buck-boost converter regulates the voltage from the 6V solar cell, ensuring a consistent 5V output. This stable 5V supply is then channeled into a TP4056 single-cell Li-ion battery charger which efficiently charges the separate 18650 battery.

Figure 4: Solar cell circuitry.
Remote Vision and Intelligent Navigation
The main purpose of the MercuryRover is to provide a moving platform to test my thesis device that requires a video feed from the car. This led to one of the most exciting features of MercuryRover which is its integration of an ESP32-CAM module, enabling real-time video feed transmission through an https webserver. This groundbreaking feature opens the door to remote control and monitoring, expanding the possibilities of the project beyond the physical confines of the car. The ESP32-CAM module is equipped with an OV2640 120° Wide Angle Lens Camera and a 2.4GHz SMA Antenna Type 1 for a wide viewing angle and a long-range video transmission. The ESP32-CAM module is powered through the Raspberry Pi Zero USB port.

Figure 5: 3D model exploded view.
Crafting the Chassis: 3D Design Mastery
The aesthetic appeal of MercuryRover isn't just a byproduct; it's an intentional part of the project. I utilized SolidWorks, a powerful 3D design software, to meticulously craft the chassis. This design process allowed me to create a chassis that not only embodies sleekness but also maximizes functionality and performance. I utilized laser-cut Perspex sheets to create a precisely fitted cover that sits atop the chassis. This custom cover not only adds a sleek and polished look to the vehicle but also serves the crucial purpose of protecting the internal electrical components.

Illuminating Excellence: The "MercuryRover" Emblem
As an extra touch of brilliance, I incorporated a distinctive element into the chassis itself. I cut and extruded the name "MercuryRover" directly into the chassis design. This illuminated emblem isn't just a cosmetic addition; it's a testament to attention to detail and a passion for perfection. The LEDs, powered by the solar panel and 18650 batteries, cast a captivating glow, making the MercuryRover truly shine.
AI Object Detection: The Future of RC Cars
The pièce de résistance of MercuryRover is its AI-based traffic light and stop sign detection system. Operating remotely, this innovative object detection technology adds an unprecedented level of intelligence to the car's capabilities. It's a visionary glimpse into the future of AI-assisted navigation and safety in the realm of RC vehicles. A full tutorial on how the AI objection detection works and how to deploy it on a new Raspberry Pi and accessed by clicking this GitHub link.
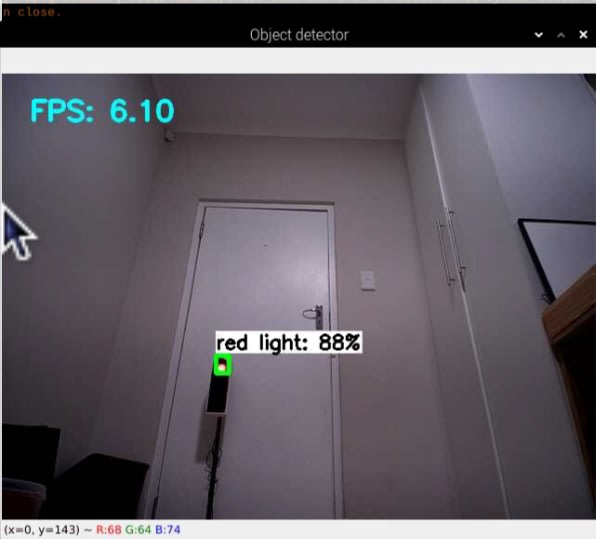


Figure 7: Traffic light and stop sign detection.
A Manifestation of Innovative Skills and Creative Vision
MercuryRover represents the epitome of my innovative skills and creative vision. It stands as a testament to boundless innovation in electronics, programming, 3D design, and sustainable engineering. This project is not just a car; it's a canvas upon which innovation and passion are painted with meticulous precision and unwavering purpose.
In a landscape filled with custom RC cars, MercuryRover is the embodiment of true innovation—a project that defies convention and sets a new benchmark for the future of DIY robotics and sustainable technology. It's not just a car; it's a visionary journey.
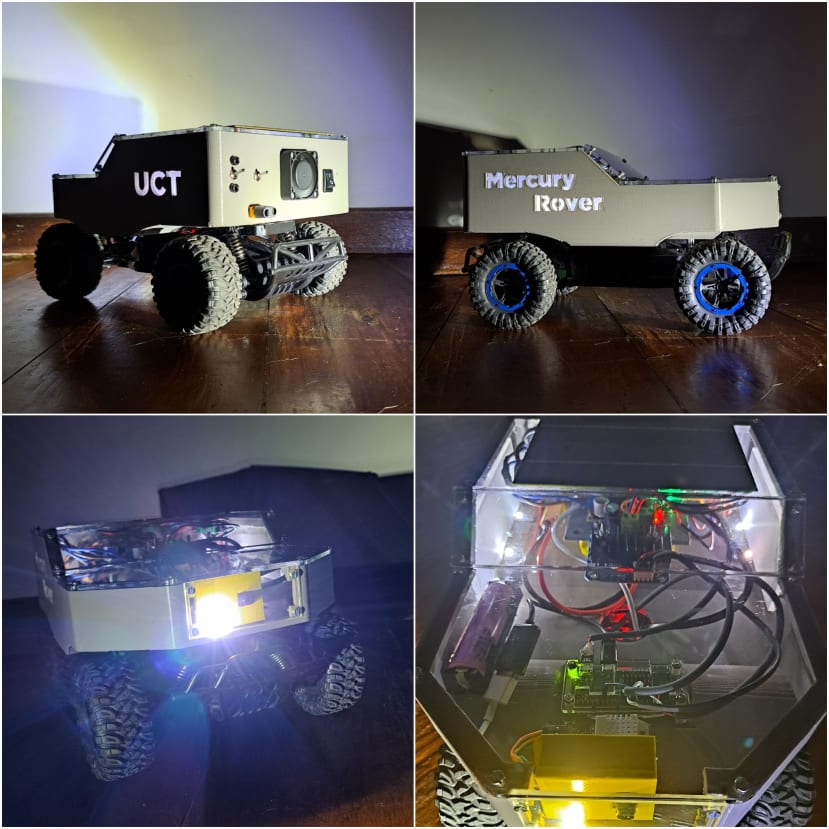
Figure 8: Collage of the MercuryRover
See the car in action: