Painting with light using Bare Conductive paint
Follow article
 Dave from DesignSpark
How do you feel about this article? Help us to provide better content for you.
Dave from DesignSpark
Thank you! Your feedback has been received.
Dave from DesignSpark
There was a problem submitting your feedback, please try again later.
Dave from DesignSpark
What do you think of this article?
I am an artist and love to experiment with new materials and technologies in my artwork. I've been playing with Bare Conductive paint for quite a while now. It's very handy for a lightweight cold solder and of course for painting circuits onto my work. I love LEDs and use them a lot and the paint gives me an easy non-bulky way to 'wire' them up in locations where real wire would look too conspicuous.
I am very interested in working with the idea of ‘line’ in my artwork, but I like the lines to be 3 dimensional - objects in their own right. I recently had the idea of making panels with wooden rods embedded into them. This way the rods would form 'lines' on the panel surface, and their shadows would draw another set of lines. Also because it was 3 dimensional, the 'drawing' would change depending on the viewing perspective. Finally, each of the rods would be tipped with a pulse of coloured light - a flashing LED.
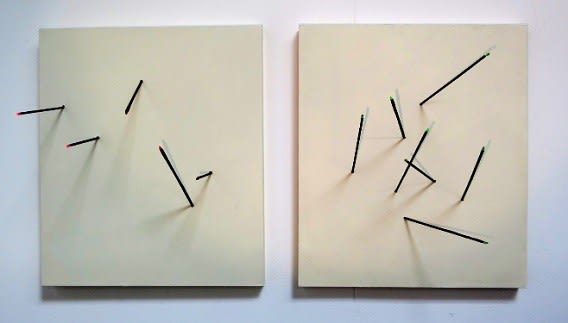
I wanted the rods to be long and thin and protrude a long way from the panel. I decided to use bamboo skewers - the kind you use in barbecues. Usefully these had a similar diameter to the LEDs. I was able to use the Bare Conductive paint as a cold solder to attach the LEDs to the tips of the rods. I painted a long strip of the paint down each side of the rod, with two narrow slivers of masking tape separating the strips so as not to create a short circuit. I then used more conductive paint to fix one of the LED legs to each strip. When the conductive paint was dry I removed the masking tape and painted the entire length of each rod with black acrylic paint. It was a fiddly process, but using the paint meant that I ended up with light tipped rods that were smooth and wire-free.

On the back of the panel I used the Bare Conductive paint again to attach wires to the end rods. I was then able to wire up the LEDs in parallel and attach them to a battery concealed within the back of the panel.
I was interested to see that the bulbs are all slightly out of phase with each other. This surprised me, although I think it actually looks better than having them all flashing simultaneously. But what I particularly liked about these panels is the two different plays of light over it: the asynchronous flashing of the LEDs, and also the lines ‘drawn’ on the panels by the shadows of the rods - which vary depending on the surrounding lighting conditions.
I called this piece Augenblick - which is German for the blink of an eye, or a moment in time. I wanted to draw attention to the constantly changing nature of the piece and ideas of perception.
There are some issues of practicality that I haven’t yet fully resolved. At the moment each panel is running off regular batteries. I didn’t want to have power cables running from each piece. But this means that I have to detach the batteries when they’re not on show in order to save power, and presents a problem if I wanted to have them on display in a gallery. Maybe I could use a phone battery which could then be periodically recharged, and I’m guessing would power a handful of LEDs for quite a long time? I should probably also add a concealed power switch. Anyone who has any thoughts do let me know.
Nye Thompson
Twitter - @nyethompson
www.nyethompson.co.uk