Texas Instruments TM4C LaunchPad – First Steps
Follow article Dave from DesignSpark
How do you feel about this article? Help us to provide better content for you.
Dave from DesignSpark
Thank you! Your feedback has been received.
Dave from DesignSpark
There was a problem submitting your feedback, please try again later.
Dave from DesignSpark
What do you think of this article?
I have a new LaunchPad, the TM4C Series Crypto Connected. It's the first time that I'm working with this controller family and with TivaWare. I've defined a learning path for @self.
Before learning to run, I'd better take the baby steps first. In the LaunchPad world, that means that you start with Project0. That first project starts with the typical blinky program. Then it teaches you how to detect button clicks and how to drive LEDs.

The Crypto Connected controllers have hardware support for encryption.
That's why I selected an encrypt/decrypt program as step 2 on the learning path.
My third exercise is to try out one of the communication blocks. I've tested how TivaWare talks i2c to the temperature sensor on a SensorHub BoosterPack.
Project0
point is to become familiar with Code Composer Studio and the build process. And it's a good test to see if you have all drivers and libraries installed correctly. Part 1 of the Project0 documentation focuses on getting the environment and hardware up and running. It's all straightforward. And as a first experience it was perfect for me. Everything just worked.

I've spent some time stepping through the code to see how things are done in TivaWare. How do you intialise the microcontroller? How do you configure the UART module? And how do you talk to the GPIO pins?
While stepping through the project in the debugger, I got a little lost however. The program stepped through the lines of code, but the LED seemed to toggle on lines of code where I didn't expect it. Turned out that the example projects for this board are configured with optimisation active.
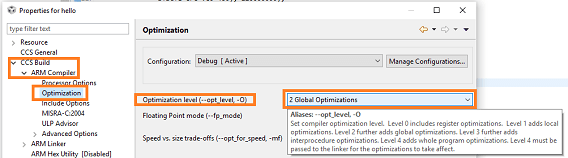
Once I turned that off for Project0 and recompiled the project, things were going as expected.
The second part of Project0 lets you make some changes to the code. You learn how to read the button state and how to drive pins high and low. The core steps of I/O learned in a few minutes.
Project0 may look like to easy for the experienced firmware authors out there. But I'm glad that I didn't skip this step. You get the look-and-feel of the controller and its libraries while cruising in your comfort zone. It prevents frustration later on.
Crypto Connected
The TM4C129 LaunchPad is branded Crypto Connected. Crypto refers to the hardware encryption accelerator and Connected stands for the integrated 10/100 Ethernet MAC+PHY. I can't show the networking part here, because my network switch is on a different floor than the lab (yes, the Cumps castle relies on WiFi). But I tried out some encryption/decryption examples. There are several sample projects available in TivaWare that show the various encryption and decription options. You can start with the simple ones and step through them in the debugger (don't forget to turn of the optimisation).
The most complete project is aes_example, an interactive program that lets you encrypt and decrypt messages using the various algorithms and key sizes. The easiest way to get it running in Code Composer Studio is by using the 4-steps wizard in TI Resource Explorer.

Search for the LaunchPad, then select the aes_example. Click on each step, and you're ready to execute the program.
Connect your favorite terminal program and you can put the encryption accelerator to the test.
I've asked the controller to encrypt the 16 hex values 00 to 0F with ecb algorithm and a key size of 128. Then I asked the engine to decrypt the scrambled value again. Here are the commands I submitted:
a: encryption
Give the data that needs to be encrypted
data hex 000102030405060708090A0B0C0D0E0F
Choose algorithm and key size. Set action to 'encrypt'.
algo ecb 128 1
Encrypt the data and display the scrambled result
process
ENCRYPTED OUTPUT
00000000 : 7a ca 0f d9 bc d6 ec 7c 9f 97 46 66 16 e6 a2 82
b: decryption
Enter the scrambled data as input for the decryption algorithm
data hex 7aca0fd9bcd6ec7c9f97466616e6a282
Choose algorithm and key size. Set action to 'decrypt'.
algo ecb 128 0
Encrypt the data and display the unscrambled result (typo in the output isn't mine – all other typos in this blog are)
process
DEECRYPTED OUTPUT
00000000 : 00 01 02 03 04 05 06 07 08 09 0a 0b 0c 0d 0e 0f
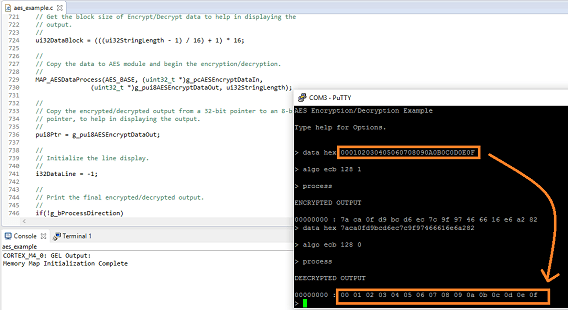
The decrypted output are our original 16 values. It works!
SensorHub BoosterPack and I2C
The SensorHub BoosterPack can be used on most LaunchPad families, but has some extras for the TM4C range. I've mounted it on my LaunchPad to test how you I2C in TivaWare. The temperature sensor on the hub is a good candidate to give it a spin.

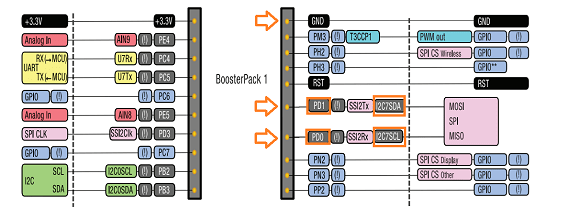
Image source: Sensor Hub BoosterPack User Manual
You'll notice that TivaWare doesn't have example projects for the EK-TM4C129EXL – SensorHub combination. But here's a trick: the examples for the ek-tm4c1294xl-boostxl-senshub work like a charm.
- Import and build the temperature_tmp006 project with the TI Resource Explorer.
- Mount the BoosterPack on slot 1 (the one on the right labeled BoosterPack1).
- Connect the LaunchPad to your computer with the Debug USB connector (the one under the BoosterPack). Connect your Terminal program once more, and execute the program.

Once you're done with admiring the output, it's time to dig into the code.
The temperature sensor is a TMP006 Infrared Thermopile Contactless Temperature Sensor. Get the documentation for that chip. It helps you to understand what's going on inside the i2c module, and what data is going back and forth.
This is also a good time to pull out your logic analyser if you happen to have one. Peek the i2c data and clock signal. They are available on PD0 and PD1 of the BoosterPack1 slot (you can see that in these two lines of code).
ROM_GPIOPinConfigure(GPIO_PD0_I2C7SCL);
ROM_GPIOPinConfigure(GPIO_PD1_I2C7SDA);
I'll show the results of that exercise in my next article.
BUY A TM4C LaunchPad (906-4224)
BUY A Sensor Hub BoosterPack (795-0722)